
There’s something magical about baking bread at home — the way your kitchen fills with that warm, comforting aroma, and the satisfaction of slicing into a loaf you made from scratch. When I decided to try making sourdough sandwich bread for the first time, I wasn’t expecting such a perfect outcome. But to my surprise, this loaf turned out incredibly soft, tender, and absolutely delicious.
I know many of you love baking for your families, whether it’s to bring everyone together around the table or to simply enjoy something homemade and nourishing. That’s why I’m excited to share this recipe with you — it’s straightforward, rewarding, and gives you a loaf that’s perfect for toast, sandwiches, or just enjoying with butter and a warm drink.

What Makes This Bread Special
Not all homemade bread turns out this soft. This sourdough loaf is different. It combines the tangy depth of flavor you get from a traditional sourdough starter with the light, fluffy texture you expect from a classic sandwich loaf. It doesn’t crumble, it slices beautifully, and it holds up well whether you’re spreading on some jam or building a hearty lunch sandwich.
What makes it even more special is that it’s naturally leavened — meaning no added commercial yeast. It rises slowly over time, which helps develop flavor and structure. The result is a soft, slightly chewy loaf with a golden crust and that wonderful homemade charm you just can’t buy at the store.
Ingredients You’ll Need
When it comes to baking, using simple ingredients with care always makes a difference. Here’s what you’ll need to make this sourdough sandwich bread:
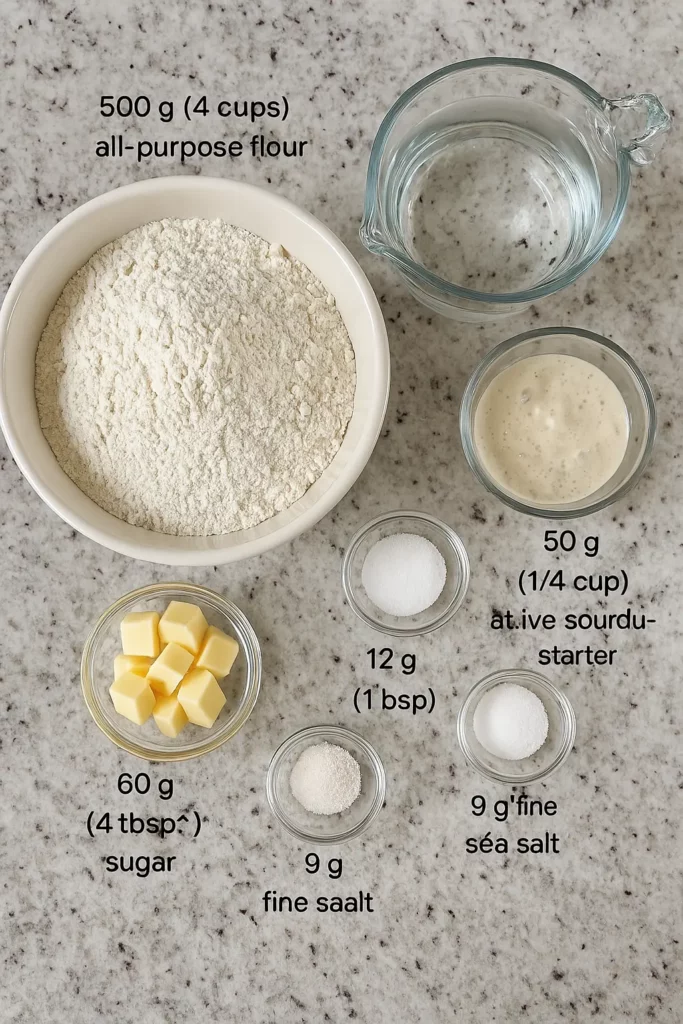
Dry Ingredients:
- 500 g (4 cups) all-purpose flour – A good quality flour makes all the difference in texture.
- 12 g (1 tbsp) sugar – Adds just a touch of sweetness to balance the tanginess of the sourdough.
- 9 g fine sea salt – Enhances flavor and strengthens the dough’s structure.
Wet Ingredients:
- 60 g (4 tbsp) unsalted butter, softened and cubed – Brings moisture, softness, and a rich taste.
- 50 g (¼ cup) active sourdough starter – Make sure it’s bubbly and recently fed for the best rise.
- 270 g (1 cup + 2 tbsp) warm water – Helps bring everything together and activates the starter.
Using a kitchen scale is recommended for best results, especially with sourdough. Volume measurements can vary, but weight ensures precision every time.
Step-by-Step Instructions
Sourdough baking may sound complex, but once you follow this process a couple of times, it becomes second nature. Let’s walk through it together.
1. Mix the Dough
In a stand mixer fitted with the paddle attachment, combine the flour, cubed butter, sugar, and salt. Mix on low speed just until the butter is broken down into small bits — it should look like coarse crumbs.
Next, add your sourdough starter and warm water. Mix until the flour is fully absorbed and no dry spots remain. If needed, finish mixing by hand. The dough should feel slightly sticky and elastic, but not overly wet. Cover the bowl with plastic wrap or a damp towel and let it rest for 30 minutes. This resting phase is called “autolyse” and helps the flour hydrate fully, improving the dough’s texture.
2. Knead the Dough
After the dough has rested, switch to the dough hook on your mixer and knead on medium-low speed for 6 to 8 minutes. If you prefer to knead by hand, transfer the dough to a lightly floured surface and knead for 8 to 10 minutes. You’ll know it’s ready when it feels smooth, elastic, and doesn’t stick to your fingers.
Kneading builds gluten, which gives the bread its structure and keeps it soft instead of crumbly.
3. Bulk Rise (Overnight Fermentation)
Place the dough back in the bowl and cover it tightly. Let it rise overnight at room temperature — ideally around 68°F. This slow fermentation is what gives sourdough its rich flavor and lovely open crumb.
By morning, the dough should be puffy and have doubled in size. If your kitchen is cooler, it may take a bit longer — up to 14 hours — so don’t rush it.
4. Shape the Dough
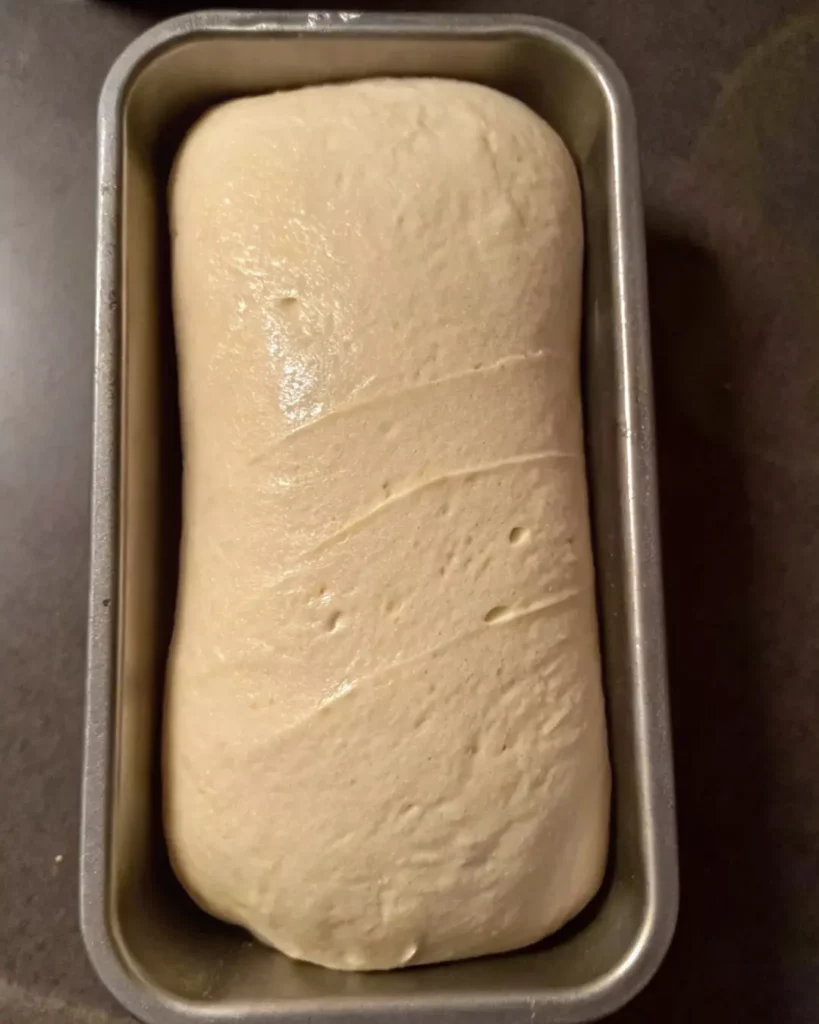
Lightly flour your countertop and gently turn the dough out. Flatten it gently with your hands to release any large air bubbles. Roll it into a log shape, tucking the sides and ends underneath to create surface tension.
Let it rest seam side down for 5 to 10 minutes. Then with floured hands, tighten the shape by gently cupping the dough and pulling it toward you on the surface. Butter an 8.5 x 4-inch loaf pan and place the dough inside, seam side down.
5. Second Rise
Cover the loaf pan with oiled plastic wrap or a clean towel. Let the dough rise again at room temperature for about 1½ to 2½ hours, or until the dough domes 1 inch above the rim of the pan. This rise may vary depending on your starter’s activity and kitchen temperature.
Toward the end of this rise, preheat your oven to 375°F. If you want an extra boost in oven spring, preheat the oven to 500°F and reduce it to 375°F as soon as the bread goes in.
6. Bake
Bake the loaf on the center rack for 45 to 50 minutes, or until the top is golden brown and the loaf sounds hollow when tapped. You can also use a thermometer — the internal temperature should be around 200°F.
Let the bread cool in the pan for 10 minutes, then carefully transfer it to a wire rack to cool completely. Cutting too early will result in a gummy interior, so patience is key.

Helpful Tips & Notes
- Weighing Ingredients: A digital scale is your best friend when baking. It ensures every batch turns out exactly right.
- Slow Rise Equals Better Flavor: Sourdough takes time, but that time works in your favor. The long fermentation improves both taste and digestibility.
- Storing Your Bread: Once fully cooled, store the loaf in a plastic bag or bread box at room temperature. It stays fresh for up to 3 days. You can also slice and freeze it for longer storage.
Why Sourdough?
Sourdough is more than just a trend — it’s a traditional baking method that’s stood the test of time. Unlike commercial yeast, sourdough starter is alive and wild. It ferments the dough naturally, giving it depth of flavor and wonderful texture.
Beyond taste, sourdough bread is easier to digest for many people. The fermentation process helps break down gluten and phytic acid, making nutrients more available. Plus, it’s more filling and tends to keep better without added preservatives.
Make-Ahead & Freezing Tips
Life can get busy, and sourdough is wonderfully flexible. If you don’t have time to bake right away, here’s how to plan ahead:
- Overnight shaping: After the bulk rise, shape the dough and place it in the loaf pan. Cover and refrigerate overnight. The next morning, let it sit at room temperature for about an hour before baking.
- Freezing baked bread: Let the loaf cool completely, then slice it and store the slices in a freezer bag. Toast directly from frozen for a quick and easy breakfast or snack.
Serving Ideas
This bread is incredibly versatile. Here are some of our favorite ways to enjoy it:
- Morning toast with butter and a drizzle of honey or jam.
- Grilled sandwiches, like classic grilled cheese or turkey with melted Swiss.
- Side for soups, especially creamy ones like tomato basil or potato leek.
- French toast: Dip slices into a cinnamon-vanilla egg mixture for a cozy weekend treat.
FAQ (Frequently Asked Questions)
Can I use whole wheat flour instead of all-purpose?
Yes, you can substitute up to 50% of the all-purpose flour with whole wheat flour. Keep in mind that whole wheat absorbs more water and can make the loaf a bit denser. You might need to slightly increase the water and extend the kneading time.
What should my sourdough starter look like?
Your starter should be bubbly, doubled in size within 4 to 6 hours after feeding, and have a pleasant, slightly tangy smell. A quick way to test it is the “float test” — drop a spoonful into water. If it floats, it’s ready to use.
What if my dough doesn’t rise overnight?
Don’t worry. Sourdough is slower than commercial yeast. If it hasn’t doubled by morning, just give it a few more hours in a warmer spot. You can also place it in a turned-off oven with the light on to help it along.
Conclusion
Making sourdough sandwich bread from scratch may seem like a big project, but once you try it, you’ll see how rewarding and peaceful the process can be. This recipe brings together everything we love about homemade baking — simplicity, tradition, and wholesome flavor.
Give it a try and enjoy the softest, most delicious loaf of bread you’ve ever made in your own kitchen. It’s a recipe worth returning to, time and time again.
Print
The Softest Sourdough Sandwich Bread You’ll Ever Bake
- Total Time: 12–16 hours (including resting and rising)
- Yield: 1 loaf (8.5 x 4 inch)
- Diet: Vegetarian
Description
There’s something magical about baking bread at home — the way your kitchen fills with that warm, comforting aroma, and the satisfaction of slicing into a loaf you made from scratch. When I decided to try making sourdough sandwich bread for the first time, I wasn’t expecting such a perfect outcome. But to my surprise, this loaf turned out incredibly soft, tender, and absolutely delicious.
I know many of you love baking for your families, whether it’s to bring everyone together around the table or to simply enjoy something homemade and nourishing. That’s why I’m excited to share this recipe with you — it’s straightforward, rewarding, and gives you a loaf that’s perfect for toast, sandwiches, or just enjoying with butter and a warm drink.
Ingredients
Dry Ingredients:
-
12 g (1 tbsp) sugar – Adds just a touch of sweetness to balance the tanginess of the sourdough.
-
9 g fine sea salt – Enhances flavor and strengthens the dough’s structure.
500 g (4 cups) all-purpose flour – A good quality flour makes all the difference in texture.
Wet Ingredients:
-
50 g (¼ cup) active sourdough starter – Make sure it’s bubbly and recently fed for the best rise.
-
270 g (1 cup + 2 tbsp) warm water – Helps bring everything together and activates the starter.
60 g (4 tbsp) unsalted butter, softened and cubed – Brings moisture, softness, and a rich taste.
Instructions
In a stand mixer fitted with the paddle attachment, combine the flour, cubed butter, sugar, and salt. Mix on low speed just until the butter is broken down into small bits — it should look like coarse crumbs.
Next, add your sourdough starter and warm water. Mix until the flour is fully absorbed and no dry spots remain. If needed, finish mixing by hand. The dough should feel slightly sticky and elastic, but not overly wet. Cover the bowl with plastic wrap or a damp towel and let it rest for 30 minutes. This resting phase is called “autolyse” and helps the flour hydrate fully, improving the dough’s texture.
After the dough has rested, switch to the dough hook on your mixer and knead on medium-low speed for 6 to 8 minutes. If you prefer to knead by hand, transfer the dough to a lightly floured surface and knead for 8 to 10 minutes. You’ll know it’s ready when it feels smooth, elastic, and doesn’t stick to your fingers.
Kneading builds gluten, which gives the bread its structure and keeps it soft instead of crumbly.
Place the dough back in the bowl and cover it tightly. Let it rise overnight at room temperature — ideally around 68°F. This slow fermentation is what gives sourdough its rich flavor and lovely open crumb.
By morning, the dough should be puffy and have doubled in size. If your kitchen is cooler, it may take a bit longer — up to 14 hours — so don’t rush it.
Lightly flour your countertop and gently turn the dough out. Flatten it gently with your hands to release any large air bubbles. Roll it into a log shape, tucking the sides and ends underneath to create surface tension.
Let it rest seam side down for 5 to 10 minutes. Then with floured hands, tighten the shape by gently cupping the dough and pulling it toward you on the surface. Butter an 8.5 x 4-inch loaf pan and place the dough inside, seam side down.
Cover the loaf pan with oiled plastic wrap or a clean towel. Let the dough rise again at room temperature for about 1½ to 2½ hours, or until the dough domes 1 inch above the rim of the pan. This rise may vary depending on your starter’s activity and kitchen temperature.
Toward the end of this rise, preheat your oven to 375°F. If you want an extra boost in oven spring, preheat the oven to 500°F and reduce it to 375°F as soon as the bread goes in.
Bake the loaf on the center rack for 45 to 50 minutes, or until the top is golden brown and the loaf sounds hollow when tapped. You can also use a thermometer — the internal temperature should be around 200°F.
Let the bread cool in the pan for 10 minutes, then carefully transfer it to a wire rack to cool completely. Cutting too early will result in a gummy interior, so patience is key.
Notes
Use a Digital Scale: For the most accurate results, especially with sourdough baking, it’s best to weigh your ingredients. Measuring by cups can vary depending on how the flour is scooped.
Flour Type: This recipe uses all-purpose flour, but you can swap up to 50% with bread flour for extra chew or with whole wheat flour for a heartier texture.
Starter Strength: Your sourdough starter should be active, bubbly, and recently fed. If it’s sluggish or hasn’t doubled in size within a few hours after feeding, give it a few more days of consistent feeding before baking.
Overnight Proofing: Letting the dough rise overnight develops more flavor and gives the bread that classic sourdough tang. If your kitchen is cold, the rise may take a bit longer — just be patient and trust the process.
Room Temperature Matters: Every kitchen is different. If your dough isn’t rising as expected, try placing it in a turned-off oven with the light on to create a warmer environment.
Slicing Tip: Let the bread cool completely before slicing. Cutting too soon can result in a gummy or dense texture, even if the bread is fully baked.
Freezing: Slice the cooled loaf and store in a freezer-safe bag. You can toast slices directly from the freezer without thawing — perfect for quick breakfasts.
- Prep Time: 20 minutes (active prep) 10–12 hours (overnight bulk fermentation) 1.5–2.5 hours (second rise)
- Cook Time: 45–50 minutes
- Category: Bread, Baking, Sourdough
- Method: Oven-baked, Naturally Leavened (No Yeast)
- Cuisine: American, Traditional
Nutrition
- Serving Size: 1 slice
- Calories: 170 kcal
- Sugar: 1 g
- Sodium: 150 mg
- Fat: 4.5 g Saturated Fat: 2.5 g Unsaturated Fat: 2 g Trans Fat: 0 g
- Carbohydrates: 28 g Fiber: 1 g Sugar: 1 g
- Protein: 4 g
- Cholesterol: 10 mg


