
Introduction
Baking sourdough bread has become more than just a kitchen hobby—it’s a calming ritual that brings joy, pride, and delicious reward. After spending over a year nurturing my starter and baking loaf after loaf, I thought I had seen it all. But recently, I discovered a small change that completely transformed my sourdough process.
I want to share with you the simple step that gave my starter the biggest rise I’ve ever seen. It doesn’t require any new tools or ingredients—just a second stir. Let me walk you through what I did, why it worked, and how you can try it in your own kitchen.
My Sourdough Routine Before This Trick
Before trying this new technique, I followed a fairly standard routine. I would feed my starter once or twice a day, combining it with flour and water, giving it a good stir, and leaving it in a warm spot to rise. On good days, it would double in size and bubble beautifully. But on colder days or when I was short on time, the rise would fall flat.
I tried adjusting water temperature, flour types, even container shapes, but nothing seemed to consistently improve the rise or texture. It was good—but not great. That’s when I came across a small tip from another baker that made me rethink everything.
The New Trick I Tried
Ingredients I Used

- 30 g active sourdough starter
- 125 g warm water
- 140 g all-purpose flour
The Method That Made the Difference
Step 1: I combined the starter, water, and flour in a clean jar and stirred it thoroughly until it formed a smooth paste with no lumps. I made sure to scrape down the sides to keep everything neat and evenly mixed.
Step 2: After letting it sit for 45 minutes, I returned and gave it a second, firm stir. This was the step I had never done before—and the one that changed everything.
Step 3: I left the jar loosely covered at room temperature overnight. Despite the cooler air in my kitchen, the starter rose significantly more than usual—at least two inches higher—and looked full of life.
The texture was beautifully aerated, the bubbles were larger, and the smell had that ideal balance of tangy and sweet. It was the most active I had ever seen my starter.
Why This Works
The second stir isn’t just about mixing—it’s about strengthening and activating the starter at a critical time. Here’s what’s happening:
Promotes Gluten Formation
Giving your starter a second stir works like a mini kneading session. It helps form stronger gluten strands, which provide structure and support for the gases produced during fermentation.
Adds Oxygen
Oxygen is fuel for the natural yeasts and bacteria in your starter. Stirring again introduces more air into the mix, encouraging faster and stronger growth.
Redistributes Microbes
Not all parts of your jar ferment at the same speed. Stirring again ensures that all areas are evenly hydrated and fed, giving the yeast and bacteria equal access to nutrients.
It’s a gentle nudge that reminds the starter to stay awake and active—even in cooler conditions.
The Visual Impact: What I Observed
I always mark the side of my starter jar with a rubber band to track the rise. Normally, I see a steady, predictable lift. But after the second stir, the rise shot up above my usual mark—so much so that I had to switch jars the next time to prevent an overflow.
The starter looked smoother, puffier, and more bubbly than ever. The texture when scooped was airy and elastic, which translated into better oven spring and a more flavorful final loaf.
How This Changed My Bread
The benefits of this method didn’t stop with the starter. When I baked my next loaf using the newly energized starter, I noticed:
- A more open crumb structure
- A taller loaf with better oven spring
- A sweeter, deeper flavor with mild tang
- A lighter texture and softer crust
If you’ve been struggling with flat or dense loaves, this simple tip might give your bread the extra boost it needs.
Making This Work in Your Kitchen
If you’re ready to try this yourself, here are some tips to help you succeed:
Tip 1: Use a Transparent Jar
It makes it easier to monitor the rise and bubbles. Plus, it’s encouraging to see the starter come to life before your eyes.
Tip 2: Time It Right
The second stir should happen around 30–45 minutes after the first mix, when the flour has begun to absorb the water and the fermentation is just starting.
Tip 3: Avoid Overfeeding
Make sure you’re not feeding your starter too frequently or too much. This method works best when you’re following a 1:1:1 or 1:2:2 feeding ratio.
Tip 4: Adjust Based on Temperature
If your kitchen is especially cold, consider using slightly warmer water or placing the jar in a proofing box, microwave (turned off), or wrapped in a towel to keep it cozy.
FAQs
Can I do this trick every day?
Yes, you can. It’s especially helpful when preparing a starter for baking. If you keep your starter in the fridge during the week, try this method after your regular feeding once it warms up.
Will stirring twice hurt my starter?
Not at all. Stirring is a gentle, non-disruptive action that encourages better fermentation. It doesn’t weaken your starter—it enhances it.
What if my starter doesn’t rise?
Make sure your starter is active, not past its peak, and hasn’t been underfed. If it’s sluggish, try refreshing it a couple of times with warm water and fresh flour before using this method.
Conclusion
The beauty of sourdough lies in its simplicity—and yet, it constantly surprises us with new lessons. Who would have thought that a second stir could make such a dramatic difference?
This small tweak breathed new life into my baking routine. It reminded me that sometimes, all it takes is one small step to transform the entire outcome. If you’re looking for more rise, better texture, and more consistent results, give this a try. You might just be amazed at what your starter can do.
Print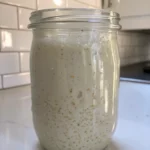
The Simple Stir That Changed My Sourdough Starter Game
- Total Time: 50 minutes (starter prep only)
- Yield: Enough starter for 1–2 loaves
- Diet: Vegetarian
Description
Baking sourdough bread has become more than just a kitchen hobby—it’s a calming ritual that brings joy, pride, and delicious reward. After spending over a year nurturing my starter and baking loaf after loaf, I thought I had seen it all. But recently, I discovered a small change that completely transformed my sourdough process.
I want to share with you the simple step that gave my starter the biggest rise I’ve ever seen. It doesn’t require any new tools or ingredients—just a second stir. Let me walk you through what I did, why it worked, and how you can try it in your own kitchen.
Ingredients
-
125 g warm water
30 g active sourdough starter
140 g all-purpose flour
Instructions
Step 1: I combined the starter, water, and flour in a clean jar and stirred it thoroughly until it formed a smooth paste with no lumps. I made sure to scrape down the sides to keep everything neat and evenly mixed.
Step 2: After letting it sit for 45 minutes, I returned and gave it a second, firm stir. This was the step I had never done before—and the one that changed everything.
Step 3: I left the jar loosely covered at room temperature overnight. Despite the cooler air in my kitchen, the starter rose significantly more than usual—at least two inches higher—and looked full of life.
The texture was beautifully aerated, the bubbles were larger, and the smell had that ideal balance of tangy and sweet. It was the most active I had ever seen my starter.
Notes
This method isn’t a full recipe but rather a preparation tip that improves sourdough starter performance. Ideal for bakers looking to boost rise, texture, and consistency in homemade sourdough bread.
- Prep Time: 5 minutes
- Second Stir Wait Time:: 45 minutes
- Cook Time: Not applicable
- Category: Baking Tips, Sourdough Starter
- Method: Fermentation (Room Temperature)
- Cuisine: American, Artisan Bread
Nutrition
- Serving Size: ~100 g (starter portion)
- Calories: 190 kcal
- Sugar: 0.2 g
- Sodium: 5 mg
- Fat: 0.5 g
- Saturated Fat: 0.1 g
- Unsaturated Fat: 0.4 g
- Trans Fat: 0 g
- Carbohydrates: 38 g
- Fiber: 1.2 g
- Protein: 5g
- Cholesterol: 0mg


