
Introduction
There’s something truly special about baking sourdough at home. The scent that fills the kitchen, the anticipation as it bakes, and the satisfaction of that first slice—it’s a feeling many of us cherish. I’ve been baking sourdough for years, and while the taste was always good, I was never quite satisfied with the oven spring. That beautiful rise and split you see on top? It took time, patience, and a bit of experimenting to get just right. Recently, I made a few changes to my routine—and everything finally came together.
Ingredients You’ll Need

To get this result, I use a straightforward dough formula. Here’s what you’ll need:
- 1000 g flour (I use a mix of 1/3 artisan and 2/3 special patent flour from King Arthur)
- 800 g water
- 150 g active sourdough starter
- 20 g kosher salt
This mix gives you a dough that’s strong, workable, and bakes up beautifully.
Step-by-Step Instructions
Mixing the Dough
I like to keep things simple. I skip the autolyse step entirely. Instead, I weigh all my dry ingredients in a bowl, then tare the scale and spray water directly into the bowl. This makes it easier to incorporate the water evenly without fuss. I mix just enough until everything comes together into a rough dough—nothing fancy at this stage.
Stretch & Folds Routine
Over the next two hours, I perform ten sets of stretch and folds, spaced out every 30 minutes. I focus extra attention on the first few sets to develop strength early on. This helps the dough build structure without being overworked.
Bulk Fermentation
Once the folding is done, I cover the bowl with a damp tea towel and let it sit on the counter for about 2.5 hours. This rest time lets the fermentation process work its magic, building flavor and gas inside the dough.
Shaping the Loaf
After bulk fermentation, I move on to shaping. I’ve learned a lot by watching how others shape their loaves, and now I’m getting a tighter, more cohesive form. Once shaped, I let the dough rest for 15 minutes, then use a stitching technique on the bottom of the loaf. This helps trap air and moisture, which supports that dramatic oven spring during baking.
Overnight Proofing
For the final proof, I place the loaves in flour-dusted tea towels inside bannetons, then cover them with plastic and pop them in the fridge overnight. I don’t use liners anymore because they always stick and drive me a bit crazy. The tea towel method works much better and leaves a nice finish on the loaf.
Baking to Perfection
The next day, I preheat my Dutch ovens to 500°F for at least 30 minutes. I sprinkle a little cornmeal on the base of the loaves, then use slings to gently transfer them into the hot pots. After scoring the tops, I mist them with water and bake as follows:
- 20 minutes at 500°F, covered
- 20 minutes at 450°F, uncovered
Once baked, I place them on a wire rack to cool completely before slicing. This step is hard to wait for—but so worth it.
What Made the Difference This Time
The biggest change that helped me achieve that perfect oven spring was a combination of a few key tweaks. First, allowing the dough a little more time on the counter before cold proofing gave it extra volume. Second, the stitching technique at shaping helped seal in air and structure. Finally, switching to a flour-dusted tea towel instead of liners made handling the dough much smoother. Together, these adjustments transformed my loaf.
Tips for Better Results at Home
If you’re just getting into sourdough, or have been baking for a while and want to refine your technique, here are a few tips:
- Use a kitchen scale for accuracy
- Let the dough rest if it feels tight during shaping
- Invest in a Dutch oven—it really helps with crust and rise
- Don’t rush the cooling process, even if the bread smells amazing
Most of all, don’t be afraid to experiment. Every kitchen and every starter is a little different. The fun is in learning what works best for you.
Common Mistakes to Avoid
Here are a few things I’ve learned the hard way:
- Skipping the stretch and folds can lead to a flat loaf
- Not letting the Dutch oven preheat long enough results in a pale crust
- Over-proofing the dough makes it collapse during baking
- Using too much flour during shaping can make the crust dry
With a bit of practice and patience, these are all easy to overcome.
Why I Love Baking Sourdough
Baking sourdough has become more than a hobby—it’s a way to connect with people. There’s something deeply rewarding about giving a homemade loaf to a friend or family member. It’s a simple gesture, but it carries warmth, care, and a bit of your time. For me, it’s also a peaceful moment in the day, a rhythm I look forward to each week.
FAQ
Can I use all-purpose flour instead of bread flour?
Yes, but the texture may be slightly softer. Bread flour has more protein, which gives better structure.
Do I need a Dutch oven?
It’s highly recommended. The enclosed steam creates that crackly crust and good rise.
How long does this bread stay fresh?
It stays fresh for up to 3 days at room temperature. For longer storage, slice and freeze it.
Can I skip the overnight proof?
You can, but the flavor and structure may not be as developed. Cold proofing gives better results.
What if I don’t have a sling to transfer the dough?
You can use parchment paper to lift and lower the dough into the pot safely.
Conclusion
Baking the perfect sourdough loaf is a journey, and every step is a chance to learn something new. Whether you’re baking for your family or just for the joy of it, this process offers so much comfort. I hope this guide helps you enjoy your time in the kitchen—and maybe even inspires you to share a loaf with someone special.
Print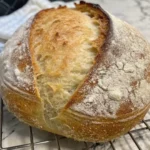
The Joy of Perfecting Oven Spring in Sourdough Baking
- Total Time: 15–19 hours (including fermentation and proofing)
- Yield: 1 large round loaf 1x
- Diet: Vegetarian
Description
There’s something truly special about baking sourdough at home. The scent that fills the kitchen, the anticipation as it bakes, and the satisfaction of that first slice—it’s a feeling many of us cherish. I’ve been baking sourdough for years, and while the taste was always good, I was never quite satisfied with the oven spring. That beautiful rise and split you see on top? It took time, patience, and a bit of experimenting to get just right. Recently, I made a few changes to my routine—and everything finally came together.
Ingredients
To get this result, I use a straightforward dough formula. Here’s what you’ll need:
-
800 g water
-
150 g active sourdough starter
-
20 g kosher salt
1000 g flour (I use a mix of 1/3 artisan and 2/3 special patent flour from King Arthur)
This mix gives you a dough that’s strong, workable, and bakes up beautifully.
Instructions
Mixing the Dough
I like to keep things simple. I skip the autolyse step entirely. Instead, I weigh all my dry ingredients in a bowl, then tare the scale and spray water directly into the bowl. This makes it easier to incorporate the water evenly without fuss. I mix just enough until everything comes together into a rough dough—nothing fancy at this stage.
Stretch & Folds Routine
Over the next two hours, I perform ten sets of stretch and folds, spaced out every 30 minutes. I focus extra attention on the first few sets to develop strength early on. This helps the dough build structure without being overworked.
Bulk Fermentation
Once the folding is done, I cover the bowl with a damp tea towel and let it sit on the counter for about 2.5 hours. This rest time lets the fermentation process work its magic, building flavor and gas inside the dough.
Shaping the Loaf
After bulk fermentation, I move on to shaping. I’ve learned a lot by watching how others shape their loaves, and now I’m getting a tighter, more cohesive form. Once shaped, I let the dough rest for 15 minutes, then use a stitching technique on the bottom of the loaf. This helps trap air and moisture, which supports that dramatic oven spring during baking.
Overnight Proofing
For the final proof, I place the loaves in flour-dusted tea towels inside bannetons, then cover them with plastic and pop them in the fridge overnight. I don’t use liners anymore because they always stick and drive me a bit crazy. The tea towel method works much better and leaves a nice finish on the loaf.
Baking to Perfection
The next day, I preheat my Dutch ovens to 500°F for at least 30 minutes. I sprinkle a little cornmeal on the base of the loaves, then use slings to gently transfer them into the hot pots. After scoring the tops, I mist them with water and bake as follows:
-
20 minutes at 500°F, covered
-
20 minutes at 450°F, uncovered
Once baked, I place them on a wire rack to cool completely before slicing. This step is hard to wait for—but so worth it.
Notes
This recipe is the result of years of testing and refining sourdough techniques to finally achieve perfect oven spring. It’s ideal for home bakers who love baking from scratch and are ready to level up their sourdough game.
- Prep Time: 20 minutes (active time)
- overnight cold proof: 12–16 hours
- Cook Time: 40 minutes
- Category: Bread
- Method: Baking
- Cuisine: Artisan / American
Nutrition
- Serving Size: 1 slice (1/10 of loaf)
- Calories: 180
- Sugar: 0.3 g
- Sodium: 390 mg
- Fat: 0.8 g
- Saturated Fat: 0.2 g
- Unsaturated Fat: 0.6 g
- Trans Fat: 0g
- Carbohydrates: 37 g
- Fiber: 1.5 g
- Protein: 5.5 g
- Cholesterol: 0mg


