
Why You’ll Love This Loaf
There’s something truly comforting about the smell of fresh bread baking in your kitchen. This sourdough sandwich bread delivers all the rustic charm of traditional sourdough but in a shape that’s perfect for everyday use. Whether you’re making morning toast, a hearty lunch sandwich, or a slice with butter for a cozy snack, this loaf has you covered.
The texture is soft and tender with just the right chew. The honey adds a subtle sweetness, while the oil gives the crumb a lovely richness. Best of all? It bakes in a loaf pan — no special baskets or complicated scoring required.
Ingredients You’ll Need

For Two Loaves
- 300 grams active sourdough starter (about 1 ¼ cups)
- 650 grams warm water (about 2 ¾ cups)
- 50 grams honey (about 2 ½ tablespoons)
- 40 grams avocado oil (about 3 tablespoons)
- 20 grams salt (about 1 tablespoon)
- 1000 grams bread flour (about 7 ½ cups)
Note: Using a kitchen scale helps with accuracy, but approximate cup measurements are included for convenience.
Step-by-Step Instructions
Mix and Rest
Start by adding your sourdough starter, water, honey, and oil to a large mixing bowl. Stir everything together until combined. Then add the salt and flour. The dough will look rough and uneven — that’s exactly what we want at this stage.
Cover with a towel or plastic wrap and let it rest for 1 hour. This rest period, also called autolyse, helps the flour hydrate and starts gluten development without any kneading.
Stretch and Fold
Over the next two hours, perform four sets of stretch and folds — one every 30 minutes. To do this, wet your hands, grab one side of the dough, gently stretch it upward, and fold it over the middle. Rotate the bowl and repeat until you’ve done all four sides.
These folds strengthen the dough and help it trap air for a better rise.
Overnight Fermentation
After the final stretch and fold, cover the bowl again and leave it on your countertop overnight, ideally for 8–10 hours. The slow fermentation gives this bread its classic sourdough tang and improves texture and digestibility.
Shaping the Loaves
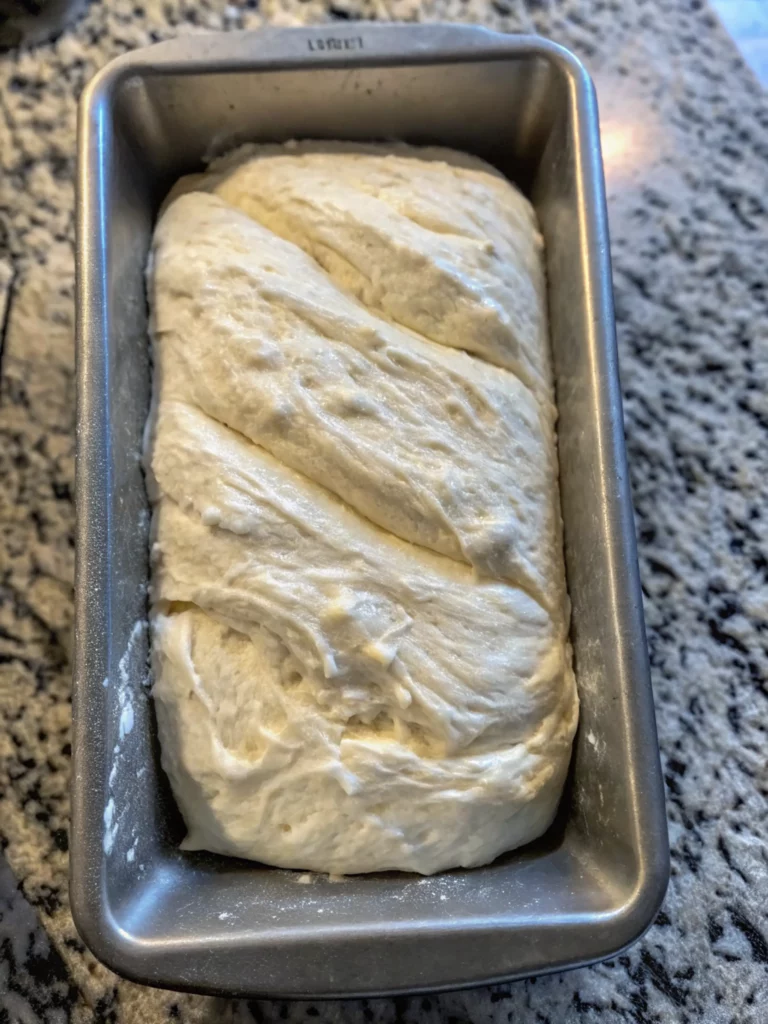
In the morning, lightly flour your counter. Gently deflate the dough and divide it into two equal portions. Flatten each into a rectangle. Fold the long edges toward the center, then roll the dough tightly into a log, like you’re making cinnamon rolls.
Place each loaf seam-side down into a lightly greased loaf pan.
Final Rise and Baking
Cover the pans with a clean towel and let them rest at room temperature for about 1 hour. During this time, preheat your oven to 400°F.
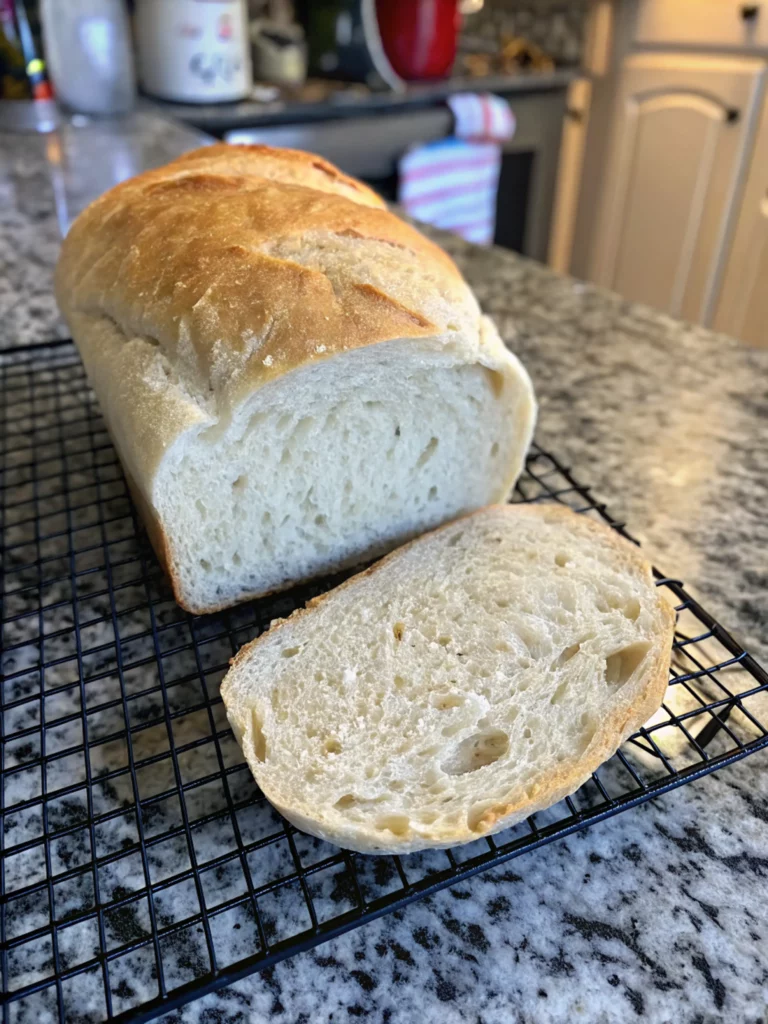
Once risen, lightly score the tops of each loaf with a sharp knife. Cover the pans loosely with foil — this allows for a good oven spring while protecting the crust.
Bake for 35 minutes with the foil on, then remove the foil and bake an additional 15 minutes until the tops are golden brown.
Transfer the loaves to a cooling rack and let them cool completely before slicing.
Tips for Success
Activate Your Starter
Make sure your sourdough starter is well-fed and bubbly before starting the recipe. A weak starter can result in dense or under-risen bread.
Don’t Skip the Rest
That first hour of resting (autolyse) is essential — it gives your dough a head start, making it easier to work with and improving the final texture.
Use Foil to Your Advantage
Covering the loaf with foil for the first part of baking allows the dough to rise fully without forming a crust too early.
Storage and Shelf Life
Once the bread has cooled completely, you can store it in a bread box, a paper bag inside a plastic bag, or a large airtight container.
At room temperature, the loaf stays fresh for about 3–4 days. For longer storage, slice it and freeze in a zip-top bag. You can toast slices directly from the freezer.
If freezing the whole loaf, wrap it tightly in plastic wrap and place in a freezer-safe bag. Thaw at room temperature before slicing.
How to Reheat or Refresh the Loaf
If your bread starts to go a little dry, here are a few ways to refresh it:
For Slices
Place a slice in the toaster or warm it gently in a skillet with a bit of butter.
For the Whole Loaf
Wrap it in foil and warm it in a 325°F oven for about 10–12 minutes. This brings back some of that fresh-baked aroma and soft texture.
Use in Recipes
Stale slices make excellent croutons, breadcrumbs, or even savory bread puddings.
Flavor Variations to Try
Once you’ve mastered this base recipe, feel free to get creative:
- Add a handful of chopped fresh herbs like rosemary or thyme for a fragrant loaf.
- Mix in grated cheese for a rich, savory version.
- Swirl in cinnamon and raisins for a breakfast-ready option.
- Substitute part of the water with milk for an even softer texture.
Serving Ideas
This loaf works beautifully for many meals throughout the day. Here are a few favorites:
- Breakfast: Toasted with butter, jam, or a fried egg.
- Lunch: Use it for tuna salad, BLTs, or grilled cheese sandwiches.
- Dinner: Serve alongside soups, stews, or chili.
- Snack: Toast with peanut butter and banana or just a sprinkle of cinnamon sugar.
Equipment Needed
- Large mixing bowl
- Loaf pans (8.5 x 4.5 inches recommended)
- Silicone spatula or dough scraper
- Clean kitchen towel or plastic wrap
- Kitchen scale (for best results)
- Sharp knife or bread lame
- Wire cooling rack
Frequently Asked Questions (FAQ)
Can I use all-purpose flour instead of bread flour?
Yes, you can, but the texture will be slightly softer. Bread flour gives the loaf a bit more strength and chew.
How do I know my dough is done proofing?
Gently press the dough with your finger — if it slowly springs back and leaves a slight dent, it’s ready to bake.
Can I halve the recipe?
Absolutely. Just divide all the ingredients by two to make a single loaf.
What if I don’t have avocado oil?
Any neutral oil like canola, vegetable, or light olive oil will work well.
Can I skip the overnight rise?
If you’re short on time, you can use a warm spot in your kitchen to speed things up. However, the flavor and texture are best with the overnight rest.
Conclusion
This sourdough sandwich bread is everything a good loaf should be: soft, slightly chewy, full of flavor, and incredibly versatile. Whether you’re new to sourdough or a seasoned baker looking for a more practical everyday loaf, this recipe is a must-try. With just a little time and love, you’ll have two golden loaves ready to nourish your home — and maybe even win over a few neighbors, too.
Give it a go, and don’t forget to enjoy every bite — fresh, toasted, or however you love your bread.
Print
The Best Sourdough Sandwich Bread (Loaf Pan Version)
- Total Time: 11–13 hours (including rest and baking time)
- Yield: 2 standard sandwich loaves 1x
- Diet: Vegetarian
Description
There’s something truly comforting about the smell of fresh bread baking in your kitchen. This sourdough sandwich bread delivers all the rustic charm of traditional sourdough but in a shape that’s perfect for everyday use. Whether you’re making morning toast, a hearty lunch sandwich, or a slice with butter for a cozy snack, this loaf has you covered.
The texture is soft and tender with just the right chew. The honey adds a subtle sweetness, while the oil gives the crumb a lovely richness. Best of all? It bakes in a loaf pan — no special baskets or complicated scoring required.
Ingredients
-
650 grams warm water (about 2 ¾ cups)
-
50 grams honey (about 2 ½ tablespoons)
-
40 grams avocado oil (about 3 tablespoons)
-
20 grams salt (about 1 tablespoon)
300 grams active sourdough starter (about 1 ¼ cups)
1000 grams bread flour (about 7 ½ cups)
Instructions
Start by adding your sourdough starter, water, honey, and oil to a large mixing bowl. Stir everything together until combined. Then add the salt and flour. The dough will look rough and uneven — that’s exactly what we want at this stage.
Cover with a towel or plastic wrap and let it rest for 1 hour. This rest period, also called autolyse, helps the flour hydrate and starts gluten development without any kneading.
Over the next two hours, perform four sets of stretch and folds — one every 30 minutes. To do this, wet your hands, grab one side of the dough, gently stretch it upward, and fold it over the middle. Rotate the bowl and repeat until you’ve done all four sides.
These folds strengthen the dough and help it trap air for a better rise.
After the final stretch and fold, cover the bowl again and leave it on your countertop overnight, ideally for 8–10 hours. The slow fermentation gives this bread its classic sourdough tang and improves texture and digestibility.
In the morning, lightly flour your counter. Gently deflate the dough and divide it into two equal portions. Flatten each into a rectangle. Fold the long edges toward the center, then roll the dough tightly into a log, like you’re making cinnamon rolls.
Place each loaf seam-side down into a lightly greased loaf pan.
Cover the pans with a clean towel and let them rest at room temperature for about 1 hour. During this time, preheat your oven to 400°F.
Once risen, lightly score the tops of each loaf with a sharp knife. Cover the pans loosely with foil — this allows for a good oven spring while protecting the crust.
Bake for 35 minutes with the foil on, then remove the foil and bake an additional 15 minutes until the tops are golden brown.
Transfer the loaves to a cooling rack and let them cool completely before slicing.
Notes
This sourdough sandwich bread is soft, slightly tangy, and ideal for daily use. It’s a practical twist on rustic sourdough that bakes beautifully in loaf pans and makes excellent toast, sandwiches, or French toast. The overnight rise deepens the flavor and improves texture, and it freezes well for long-term storage.
- Prep Time: 25 minutes
- Rest + Fermentation Time:: 10–12 hours (overnight rise + proofing)
- Cook Time: 50 minutes
- Category: Bread, Sourdough, Baking
- Method: Stretch and Fold, Oven-Baked, Overnight Fermentation
- Cuisine: American, Homestyle
Nutrition
- Serving Size: 1 slice
- Calories: 160 kcal
- Sugar: 1.5 g
- Sodium: 180 mg
- Fat: 2.5 g
- Saturated Fat: 0.4 g
- Unsaturated Fat: 2.1 g
- Trans Fat: 0g
- Carbohydrates: 30 g
- Fiber: 1g
- Protein: 4g
- Cholesterol: 0mg


Your bread is amazing, I used a second loaf pan on top instead of tin foil. And baked uncovered for about 20-25 minutes as my loafs weren’t golden at the 15min point. Best sourdough loaf results I have had so far. On the first try!