
Introduction
There’s something deeply satisfying about turning kitchen scraps into something extraordinary—and that’s exactly what this brownie recipe does. If you bake with sourdough, you likely have discard sitting in your fridge, waiting to be used or tossed. Don’t throw it out just yet! These sourdough discard brownies are proof that even leftovers can become something magical. Rich, decadent, and wonderfully fudgy, they have that perfect crackly top with a chewy center. When I made them, I knew immediately they were a keeper—and now I’m sharing them with you.
Whether you’re an experienced baker or just starting your sourdough journey, this recipe will quickly earn a place in your favorites.
Ingredients

These simple ingredients come together to create a batch of deeply chocolatey brownies with just a hint of tang from the discard.
- 8 tablespoons (113 g) unsalted butter – for richness and structure
- 12 oz. (340 g) semi-sweet chocolate chips – melted into the batter for deep chocolate flavor
- 1/4 cup (40 g) Dutch-processed or regular cocoa powder – adds depth
- 2 teaspoons (10 g) vanilla extract – enhances the flavor
- 2 large eggs + 1 egg yolk – for that perfect fudgy texture
- 1 cup (200 g) granulated sugar – for sweetness and structure
- 1/2 cup (110 g) dark brown sugar – adds moisture and a slight molasses flavor
- 1/2 cup (125 g) sourdough starter discard – gives a subtle tang and soft texture
- 1 cup (120 g) all-purpose flour – to hold it all together
- 1 teaspoon (5 g) salt – enhances and balances the sweetness
Step-by-Step Instructions
Step 1: Preheat and Prep
Start by preheating your oven to 350°F (176°C). Line a 9″ x 9″ baking dish with parchment paper, allowing the edges to overhang. This makes it easy to lift out the brownies once cooled.
Step 2: Melt and Mix Chocolate
In a small saucepan over low heat, melt the butter. Once fully melted, stir in the cocoa powder, vanilla, and chocolate chips. Stir gently until everything is smooth. Set aside to cool slightly—this helps avoid cooking the eggs when mixed later.
Step 3: Beat Eggs and Sugars
In a large bowl, use an electric mixer to beat together the eggs, yolk, granulated sugar, and brown sugar for 7 to 10 minutes. This creates air and gives you those classic brownie crackly tops. Don’t skip or rush this step—it makes all the difference.
Step 4: Combine Wet Ingredients
Slowly pour in the melted chocolate mixture into the whipped eggs and sugar. Add in the sourdough discard. Beat gently on low until just combined. The mixture should be thick and glossy.
Step 5: Fold in Dry Ingredients
Add the flour and salt. Use a spatula to fold the mixture until just incorporated—do not overmix. Overmixing can lead to tough brownies.
Step 6: Bake
Pour the batter into your prepared dish, smoothing out the top with a spatula. Bake for 35 to 40 minutes, until a toothpick inserted in the center comes out with moist crumbs (not wet batter). Don’t overbake or they’ll dry out.
Step 7: Cool and Slice
Let the brownies cool completely in the pan—this is key for clean slices. Once cooled, lift them out using the parchment and cut into 16 squares.
Why Use Sourdough Discard?
If you’re new to sourdough baking, you might be wondering what “discard” even is. It’s the portion of the sourdough starter you remove during feeding, and while many people throw it out, it’s actually a versatile ingredient.
In this brownie recipe, discard adds:
- A slight tang that enhances the chocolate flavor
- Extra moisture for a tender texture
- Structure and body, especially helpful in egg-based recipes
It’s also a sustainable way to reduce food waste while enjoying something delicious.
Tips for Perfect Brownies
- Whip the eggs and sugar thoroughly – this helps the brownies rise and gives that shiny top.
- Use parchment paper – it makes cleanup easier and lifting the brownies out a breeze.
- Let the chocolate cool – adding it too hot can scramble your eggs.
- Don’t overbake – the center should look set but slightly underdone. Brownies continue cooking as they cool.
How to Store and Freeze
Fresh brownies will keep at room temperature in an airtight container for up to 3 days. If you want to make a batch ahead of time or freeze leftovers:
- To refrigerate: Wrap them tightly in foil or plastic wrap. They stay good for up to 1 week.
- To freeze: Wrap individual pieces and store them in a freezer-safe bag for up to 2 months. Thaw at room temperature or warm slightly in the microwave.
Variations You Can Try
Want to make them your own? Here are some fun twists:
- Add chopped walnuts or pecans for crunch
- Swirl in peanut butter or Nutella before baking
- Sprinkle sea salt on top after baking for a gourmet finish
- Use espresso powder (1 tsp) in the batter to deepen the chocolate flavor
Making it a Family Activity
These brownies are easy and fun to make with family. Kids can help with:
- Measuring the dry ingredients
- Stirring the chocolate (once it’s slightly cooled)
- Lining the pan or placing chocolate chips on top
Not only do you end up with a tasty treat, but it’s a great way to spend quality time in the kitchen.
Can I Make This Gluten-Free?
Yes! Substitute the all-purpose flour with a gluten-free baking blend that includes xanthan gum. Just make sure it’s a 1:1 replacement. The texture may be slightly different, but still chewy and rich.
FAQ
Can I use active starter instead of discard?
Yes, but discard is usually preferred for baked goods like brownies since it has a more neutral flavor and lower activity.
Do I have to use Dutch-processed cocoa?
No. Regular cocoa powder works well too—it may just produce a slightly lighter flavor.
Can I use a different chocolate?
You can swap semi-sweet chips for dark chocolate or even a mix of milk and dark. Just keep the weight the same.
Why did my brownies turn out cakey?
This often happens when the batter is overmixed or if they’re baked too long. Stick to the recommended baking time and gently fold in the flour.
Conclusion
These sourdough discard brownies are more than just a clever way to reduce waste—they’re a rich, indulgent treat that’s hard to beat. Whether you’re baking for your family, friends, or just for yourself, this recipe is a must-try. It’s simple, satisfying, and a wonderful way to give your discard new life. Once you make them, you’ll see exactly why they’re the best brownies I’ve ever had—and maybe you’ll say the same.
Print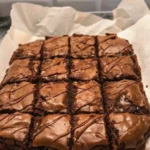
The Best Sourdough Discard Brownies You’ll Ever Make
- Total Time: 1 hour 55 minutes
- Yield: 16 brownies (9″ x 9″ pan)
- Diet: Vegetarian
Description
There’s something deeply satisfying about turning kitchen scraps into something extraordinary—and that’s exactly what this brownie recipe does. If you bake with sourdough, you likely have discard sitting in your fridge, waiting to be used or tossed. Don’t throw it out just yet! These sourdough discard brownies are proof that even leftovers can become something magical. Rich, decadent, and wonderfully fudgy, they have that perfect crackly top with a chewy center. When I made them, I knew immediately they were a keeper—and now I’m sharing them with you.
Whether you’re an experienced baker or just starting your sourdough journey, this recipe will quickly earn a place in your favorites.
Ingredients
These simple ingredients come together to create a batch of deeply chocolatey brownies with just a hint of tang from the discard.
-
12 oz. (340 g) semi-sweet chocolate chips – melted into the batter for deep chocolate flavor
-
1/4 cup (40 g) Dutch-processed or regular cocoa powder – adds depth
-
2 teaspoons (10 g) vanilla extract – enhances the flavor
-
2 large eggs + 1 egg yolk – for that perfect fudgy texture
-
1 cup (200 g) granulated sugar – for sweetness and structure
-
1/2 cup (110 g) dark brown sugar – adds moisture and a slight molasses flavor
-
1/2 cup (125 g) sourdough starter discard – gives a subtle tang and soft texture
-
1 cup (120 g) all-purpose flour – to hold it all together
-
1 teaspoon (5 g) salt – enhances and balances the sweetness
8 tablespoons (113 g) unsalted butter – for richness and structure
Instructions
Start by preheating your oven to 350°F (176°C). Line a 9″ x 9″ baking dish with parchment paper, allowing the edges to overhang. This makes it easy to lift out the brownies once cooled.
In a small saucepan over low heat, melt the butter. Once fully melted, stir in the cocoa powder, vanilla, and chocolate chips. Stir gently until everything is smooth. Set aside to cool slightly—this helps avoid cooking the eggs when mixed later.
In a large bowl, use an electric mixer to beat together the eggs, yolk, granulated sugar, and brown sugar for 7 to 10 minutes. This creates air and gives you those classic brownie crackly tops. Don’t skip or rush this step—it makes all the difference.
Slowly pour in the melted chocolate mixture into the whipped eggs and sugar. Add in the sourdough discard. Beat gently on low until just combined. The mixture should be thick and glossy.
Add the flour and salt. Use a spatula to fold the mixture until just incorporated—do not overmix. Overmixing can lead to tough brownies.
Pour the batter into your prepared dish, smoothing out the top with a spatula. Bake for 35 to 40 minutes, until a toothpick inserted in the center comes out with moist crumbs (not wet batter). Don’t overbake or they’ll dry out.
Let the brownies cool completely in the pan—this is key for clean slices. Once cooled, lift them out using the parchment and cut into 16 squares.
Notes
These brownies are rich, fudgy, and have a subtle tang thanks to the sourdough discard. They’re a smart, delicious way to use discard instead of tossing it. Great for family treats or small gatherings.
- Prep Time: 20 minutes
- + Time (Cooling): 1 hour (for best slicing and texture)
- Cook Time: 35–40 minutes
- Category: Dessert
- Method: Baking
- Cuisine: American.
Nutrition
- Serving Size: 1 brownie
- Calories: 290
- Sugar: 25g
- Sodium: 120mg
- Fat: 15g
- Saturated Fat: 9g
- Unsaturated Fat: 5g
- Trans Fat: 0g
- Carbohydrates: 36g
- Fiber: 2g
- Protein: 3g
- Cholesterol: 50mg


