
A tender, golden loaf perfect for toast, grilled cheese, and everything in between.
Introduction
There’s a special kind of joy that comes from baking bread at home. The warmth of the oven, the smell that fills the kitchen, and the first slice—still slightly warm—slathered with butter. If you’ve ever wanted a reliable, soft, and delicious sandwich loaf that fits into your sourdough routine, this one’s a true keeper.
Recently, I’ve been working on ways to use up sourdough discard while still getting that fluffy texture we all love in store-bought bread. This recipe checks all the boxes: soft, slightly chewy, beautifully golden, and so versatile. It’s ideal for toast in the morning, sandwiches at lunch, or even a midnight snack. And the best part? It’s beginner-friendly and doesn’t require any fancy tools.

Why You’ll Love This Recipe
This isn’t just any sourdough bread—it’s the kind you’ll come back to week after week. Here’s why:
- Perfect for everyday use: Whether it’s toast, grilled cheese, or a turkey sandwich, this loaf handles it all.
- Flexible with your schedule: You can use discard or active starter. And the optional yeast speeds things up when needed.
- Kid-approved: Its soft texture and mild flavor make it a hit with little ones too.
- Freezer-friendly: Make one now and save slices for later—great for meal prepping.
- Familiar yet homemade: You get that store-bought softness, but with the goodness and satisfaction of homemade sourdough.
Ingredients (With Helpful Notes)
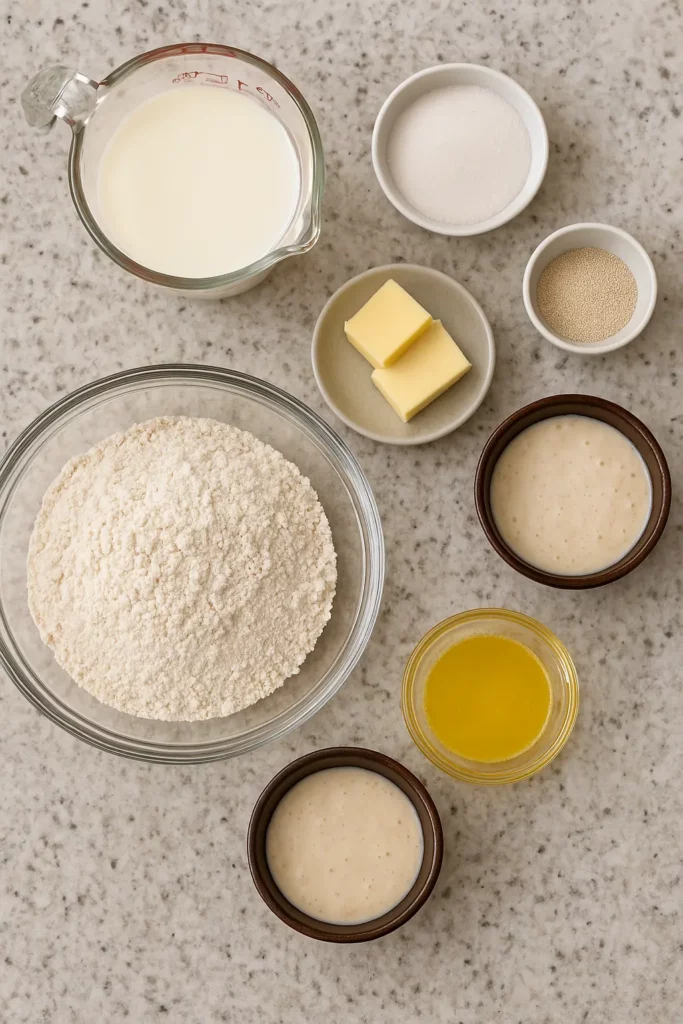
Gather your ingredients before you start, and you’ll have a smooth baking experience.
- 1 scant cup (225g) warm milk: Whole milk works best here, giving the loaf richness and moisture. Warming the milk helps activate the yeast and improve rise.
- 3 tablespoons (36g) granulated sugar: Adds subtle sweetness and feeds the yeast if using.
- 1 teaspoon instant yeast (optional): This gives the dough a little extra boost, especially helpful in cooler kitchens or when you’re short on time.
- 1/2 cup (150g) sourdough starter: Ripe or discard both work! Discard adds a mild tang, while active starter gives a stronger rise.
- 3 cups + 2 tablespoons (400g) bread flour: Bread flour gives the loaf structure, making it soft yet strong enough to slice.
- 1 teaspoon sea salt: Balances the flavor and helps control yeast activity.
- 2 tablespoons (28g) softened butter: Adds softness, flavor, and that bakery-style texture we all love.
- 1 tablespoon melted butter (for brushing): Creates a shiny golden crust and a rich, buttery finish.
Step-by-Step Instructions
1. Mix the Dough
In the bowl of a stand mixer fitted with the dough hook, add the warm milk, sugar, and yeast (if using). Stir gently to help the sugar dissolve and activate the yeast.
Add your sourdough starter and stir again to combine everything.
Next, add the bread flour and sea salt. Mix on medium-low speed until a shaggy dough forms. The mixture should start coming together into a ball.
2. Knead and Rest
With the mixer still on low, gradually add the softened butter. Let the dough knead for about 5 minutes, until it becomes smooth and elastic.
Once done, cover the bowl with a damp towel or plastic wrap and let it rest for 30 minutes. This resting time allows the flour to fully hydrate and the dough to relax.
3. First Rise
After resting, give the dough one quick knead (just a minute). Then cover the bowl again and let the dough rise at room temperature until it’s doubled in size. This usually takes 2–3 hours if you’re using yeast—or longer if you’re only using sourdough starter.
Look for a puffy, airy texture—it’s ready when a finger poke leaves a dent that slowly springs back.
4. Shape the Loaf
Lightly flour your countertop, then gently deflate the dough and shape it into a rectangle. Roll it up tightly into a log, starting from one short side. This helps create surface tension for a tall, even loaf.
Pinch the seam to seal, and tuck in the ends if needed. Place the log seam-side down in a greased 9×5-inch loaf pan.
5. Second Rise
Cover the loaf pan with a towel and let the dough rise again until it crowns about 1 inch over the edge of the pan. This can take 1 to 2 hours depending on room temperature and whether or not you used yeast.
Be patient here—a full second rise helps the loaf bake tall and fluffy.
6. Bake
Preheat your oven to 350°F (177°C). Place the loaf pan on the center rack and bake for 35 to 40 minutes.
The top should be golden and sound hollow when tapped. To be sure, you can insert a thermometer into the center of the loaf—it should read between 190–200°F.
7. Finishing Touch
As soon as the bread comes out of the oven, brush the top with melted butter. This gives it that gorgeous sheen and adds flavor.
Let the loaf rest in the pan for 5 minutes, then transfer it to a wire rack to cool completely before slicing. Don’t rush this step—cutting too early can make the loaf gummy.
Tips for Success
- Use warm milk, not hot: Too much heat can kill the yeast and starter. Aim for about 100°F.
- Don’t over-knead: Once your dough is smooth and elastic, you can stop the mixer.
- Watch your room temp: If your kitchen is chilly, place the dough near a sunny window or inside a turned-off oven with the light on.
- Let it cool completely: It might be hard to wait, but slicing warm bread will squish the crumb and make it sticky.
How to Serve It

This bread is incredibly versatile. Try these simple ways to enjoy it:
- Classic toast: Slice thick, toast golden, and slather with butter, jam, or cream cheese.
- Grilled cheese: Its soft crumb and rich flavor make it the perfect base for a gooey grilled sandwich.
- Breakfast sandwiches: Add eggs, cheese, and bacon or sausage between slices.
- French toast: The dense yet soft texture makes amazing French toast—especially with maple syrup and a sprinkle of cinnamon.
- Bread pudding: Use older slices to make a comforting dessert with custard and raisins.
Storage & Freezing
- Room temperature: Keep in a bread bag or airtight container for up to 4 days.
- Freezing: Slice the loaf and place parchment paper between slices. Store in a freezer-safe bag for up to 1 month.
- Reheating: Toast frozen slices directly—no need to thaw.
FAQs
Can I use all-purpose flour instead of bread flour?
You can, but the texture will be slightly less chewy. Bread flour is preferred for structure and softness.
Can I double the recipe?
Yes! You can make two loaves at once. Just be sure your mixer is big enough, or knead by hand in batches.
Can I use plant-based milk and butter?
Absolutely. Almond milk or oat milk works well, and vegan butter substitutes can be used without issue.
Why is my loaf dense?
A dense loaf can happen if the dough was under-kneaded, didn’t rise fully, or if the flour measurement was off. Try spooning and leveling flour instead of scooping straight from the bag.
Conclusion
There’s something timeless and comforting about a loaf of homemade bread, and this soft sourdough sandwich loaf brings that feeling to life. Whether you’re an experienced sourdough baker or just starting to explore, this recipe is a gentle, rewarding introduction. With simple steps, everyday ingredients, and unbeatable flavor, you’ll find yourself making this loaf again and again.
Give it a try—and don’t be surprised if your family asks for it every week.
Print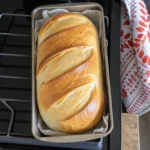
Soft & Fluffy Sourdough Sandwich Bread
- Total Time: 5–7 hours
- Yield: 1 standard loaf (about 12–14 slices)
- Diet: Vegetarian
Description
There’s a special kind of joy that comes from baking bread at home. The warmth of the oven, the smell that fills the kitchen, and the first slice—still slightly warm—slathered with butter. If you’ve ever wanted a reliable, soft, and delicious sandwich loaf that fits into your sourdough routine, this one’s a true keeper.
Recently, I’ve been working on ways to use up sourdough discard while still getting that fluffy texture we all love in store-bought bread. This recipe checks all the boxes: soft, slightly chewy, beautifully golden, and so versatile. It’s ideal for toast in the morning, sandwiches at lunch, or even a midnight snack. And the best part? It’s beginner-friendly and doesn’t require any fancy tools.
Ingredients
-
3 tablespoons (36g) granulated sugar: Adds subtle sweetness and feeds the yeast if using.
-
1 teaspoon instant yeast (optional): This gives the dough a little extra boost, especially helpful in cooler kitchens or when you’re short on time.
-
1/2 cup (150g) sourdough starter: Ripe or discard both work! Discard adds a mild tang, while active starter gives a stronger rise.
-
3 cups + 2 tablespoons (400g) bread flour: Bread flour gives the loaf structure, making it soft yet strong enough to slice.
-
1 teaspoon sea salt: Balances the flavor and helps control yeast activity.
-
2 tablespoons (28g) softened butter: Adds softness, flavor, and that bakery-style texture we all love.
1 scant cup (225g) warm milk: Whole milk works best here, giving the loaf richness and moisture. Warming the milk helps activate the yeast and improve rise.
1 tablespoon melted butter (for brushing): Creates a shiny golden crust and a rich, buttery finish.
Instructions
In the bowl of a stand mixer fitted with the dough hook, add the warm milk, sugar, and yeast (if using). Stir gently to help the sugar dissolve and activate the yeast.
Add your sourdough starter and stir again to combine everything.
Next, add the bread flour and sea salt. Mix on medium-low speed until a shaggy dough forms. The mixture should start coming together into a ball.
With the mixer still on low, gradually add the softened butter. Let the dough knead for about 5 minutes, until it becomes smooth and elastic.
Once done, cover the bowl with a damp towel or plastic wrap and let it rest for 30 minutes. This resting time allows the flour to fully hydrate and the dough to relax.
After resting, give the dough one quick knead (just a minute). Then cover the bowl again and let the dough rise at room temperature until it’s doubled in size. This usually takes 2–3 hours if you’re using yeast—or longer if you’re only using sourdough starter.
Look for a puffy, airy texture—it’s ready when a finger poke leaves a dent that slowly springs back.
Lightly flour your countertop, then gently deflate the dough and shape it into a rectangle. Roll it up tightly into a log, starting from one short side. This helps create surface tension for a tall, even loaf.
Pinch the seam to seal, and tuck in the ends if needed. Place the log seam-side down in a greased 9×5-inch loaf pan.
Cover the loaf pan with a towel and let the dough rise again until it crowns about 1 inch over the edge of the pan. This can take 1 to 2 hours depending on room temperature and whether or not you used yeast.
Be patient here—a full second rise helps the loaf bake tall and fluffy.
Preheat your oven to 350°F (177°C). Place the loaf pan on the center rack and bake for 35 to 40 minutes.
The top should be golden and sound hollow when tapped. To be sure, you can insert a thermometer into the center of the loaf—it should read between 190–200°F.
As soon as the bread comes out of the oven, brush the top with melted butter. This gives it that gorgeous sheen and adds flavor.
Let the loaf rest in the pan for 5 minutes, then transfer it to a wire rack to cool completely before slicing. Don’t rush this step—cutting too early can make the loaf gummy.
Notes
This recipe is perfect for using up sourdough discard or baking with an active starter. The optional addition of instant yeast helps speed up the rise without affecting the soft, fluffy texture. It’s ideal for toast, sandwiches, and freezing for later use.
- Prep Time: 20 minutes
- Rest Time (Autolyse + Rises):: 4–6 hours (depending on whether yeast is used)
- Cook Time: 40 minutes
- Category: Bread
- Method: Baking
- Cuisine: American.
Nutrition
- Serving Size: 1 slice
- Calories: 170 kcal
- Sugar: 3g
- Sodium: 220 mg
- Fat: 4.5 g
- Saturated Fat: 2.5 g
- Unsaturated Fat: 1.8 g
- Trans Fat: 0g
- Carbohydrates: 27 g
- Fiber: 1g
- Protein: 4 g
- Cholesterol: 10mg


