
A Homemade Loaf That Fits Into Your Day
There’s something deeply satisfying about pulling a warm, crusty loaf of bread from your own oven. For years, I thought baking sourdough at home required endless hours, precise timing, and complicated steps. I told myself it wasn’t for me—too much work, too much waiting. But after just one try with this method, I became what I now proudly call an “UNLOAF girl.”
This is a recipe that doesn’t demand your full day. It works with you, not against you. Whether you’re running errands, having coffee, or just catching up on things around the house, this bread will quietly rise, rest, and bake while you live your day.
Why You’ll Love This Recipe
This sourdough loaf is a perfect balance of simplicity and flexibility. You don’t need to wake up at dawn or babysit your dough for hours on end. The steps are easy to follow, and you can space them out around the natural flow of your day.
Unlike traditional sourdough methods that call for overnight bulk fermentation or feeding schedules, this recipe uses an active but unfed starter and gets you results by dinnertime. It’s approachable even for beginners—and satisfying for experienced bakers who want great results with less fuss.
If you’re someone who loves homemade, wholesome food but doesn’t want to spend all day in the kitchen, this recipe is for you. It’s cozy, rewarding, and absolutely delicious.

Ingredients
To make this beautifully golden sourdough loaf, you’ll need just a few basic ingredients:
- 125g active sourdough starter (unfed, but bubbly and alive)
- 500g bread flour (provides structure and chew)
- 300g water (lukewarm is best)
- 10g salt (enhances flavor)
That’s it—no commercial yeast, no additives, and no stress. Just good ingredients, good timing, and your hands.
Step-by-Step Instructions
Step 1: Mix the Dough
Begin your day around 8:00 AM by mixing the dough. In a large mixing bowl, combine the starter, bread flour, water, and salt. Use your hands to mix it together—it doesn’t need to be smooth, just enough to form a sticky ball.
Once it’s mixed, cover the bowl with a towel or plastic wrap and let it rest for 30 minutes. This resting time (called “autolyse”) helps the flour fully absorb the water and makes the dough easier to work with later.
I used this window to make and enjoy a peaceful cup of coffee.
Step 2: First Stretch and Fold
After 30 minutes, perform a set of stretch and folds. To do this, grab one side of the dough, stretch it up, and fold it over the center. Rotate the bowl and repeat three more times, once on each side. This builds gluten strength without kneading.
Cover the dough again and let it rest for a few hours at room temperature.
This was the perfect time for me to head out for some fresh air and play two sets of tennis, followed by a quick Target run.
Step 3: Second Stretch and Fold
Once the dough has rested and you notice it’s beginning to rise slightly, do a second round of stretch and folds. The dough will feel smoother and more elastic now.
Let it rest again for 30 minutes.
I used this moment to hop in the shower and freshen up before continuing.
Step 4: Shape and Final Rise
After the final rest, gently shape the dough into a round or oval loaf. Avoid deflating it too much—be gentle and keep as much air in the dough as possible. Place it into a proofing basket or a bowl lined with a floured kitchen towel.
Let it rest for another hour at room temperature, covered.
This was the perfect opportunity to prepare and enjoy a relaxed lunch.
Step 5: Cold Fermentation
Once your dough has risen again, cover it and place it in the refrigerator. It can stay there for a few hours—or even longer if needed. This step helps develop flavor and makes scoring easier.
I popped mine into the fridge and headed out for a doctor’s appointment. No rush, no stress.
Step 6: Baking Time
When ready to bake, remove the dough from the fridge. Place it in a cold Dutch oven, score the top with a sharp knife or blade, and place it into a cold oven.
Set the oven to 450°F and bake for 50 minutes with the lid on. Then remove the lid and bake for an additional 10 minutes on the rack or baking sheet to get that perfect golden crust.
Baking Tips
- Cold Start Works Wonders: Starting with a cold Dutch oven and cold oven helps create steam, resulting in a better crust. No need to preheat.
- Check Your Starter: Your starter should be bubbly and active, even if it hasn’t been fed that morning. It doesn’t need to be at peak rise.
- Don’t Overthink Timing: This recipe is forgiving. If you need more time between steps, the dough can handle short delays.
Serving and Storage Suggestions
Let the bread cool completely before slicing—it continues cooking inside after it comes out of the oven. Slicing too early can cause it to be gummy inside.
Serve it with soft butter, honey, or alongside your favorite soup or stew. It’s also great for sandwiches or toasted with avocado in the morning.
For storage, wrap it in a clean kitchen towel or store it in a paper bag to keep the crust crisp. You can freeze slices individually and toast them straight from the freezer when needed.
Behind the Scenes
This recipe didn’t interrupt my day—it blended right into it. I enjoyed my morning coffee, squeezed in a tennis match, ran to the store, showered, had lunch, went to the doctor, and still managed to bake a beautiful loaf by dinner.
That’s the beauty of this bread. It’s not just about ingredients and timing—it’s about making something special while still living your life. There’s room for joy, movement, and flexibility.
Time Breakdown Summary
Here’s a simple breakdown of how this bread fits into a real day:
- 8:00 AM: Mix dough
- 8:30 AM: First stretch and fold
- 9:00 AM to 12:00 PM: Let dough bulk (go out, relax)
- 12:00 PM: Second stretch and fold
- 12:30 PM: Shape dough
- 1:30 PM: Cold proof in fridge
- Evening (anytime): Bake for 50 + 10 minutes
No timers every hour. No strict timelines. Just rhythm and flow.
Frequently Asked Questions (FAQ)
Can I use all-purpose flour instead of bread flour?
Yes, you can. Bread flour gives you a slightly chewier texture and better structure, but all-purpose flour works well for a softer loaf.
What if I don’t have a Dutch oven?
You can bake the loaf on a sheet pan or baking stone, but you’ll want to add steam. Place a tray of water at the bottom of your oven to create humidity, which helps with crust development.
Can I freeze this bread?
Absolutely. Once cooled, slice the bread and freeze the slices in a sealed freezer bag. They can be toasted directly from frozen—perfect for busy mornings.
How can I tell when my bread is fully baked?
The crust should be deep golden brown, and the loaf should sound hollow when tapped on the bottom. If you want to be exact, the internal temperature should be around 200–210°F.
Conclusion
This one-day sourdough bread recipe is proof that homemade doesn’t have to mean hard. It’s possible to fit baking into a full, active life—and enjoy the rewards at your dinner table the same day.
If you’ve ever felt intimidated by the idea of sourdough, let this be the recipe that invites you in. It’s not about perfection. It’s about process, presence, and the little joy of slicing into something you made from scratch.
Print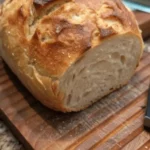
One-Day Sourdough Bread: Fresh, Homemade, and Ready by Dinner
- Total Time: Approx. 7–9 hours
- Yield: 1 medium loaf (about 8 slices)
- Diet: Vegetarian
Description
There’s something deeply satisfying about pulling a warm, crusty loaf of bread from your own oven. For years, I thought baking sourdough at home required endless hours, precise timing, and complicated steps. I told myself it wasn’t for me—too much work, too much waiting. But after just one try with this method, I became what I now proudly call an “UNLOAF girl.”
Ingredients
To make this beautifully golden sourdough loaf, you’ll need just a few basic ingredients:
-
500g bread flour (provides structure and chew)
-
300g water (lukewarm is best)
-
10g salt (enhances flavor)
125g active sourdough starter (unfed, but bubbly and alive)
Instructions
Begin your day around 8:00 AM by mixing the dough. In a large mixing bowl, combine the starter, bread flour, water, and salt. Use your hands to mix it together—it doesn’t need to be smooth, just enough to form a sticky ball.
Once it’s mixed, cover the bowl with a towel or plastic wrap and let it rest for 30 minutes. This resting time (called “autolyse”) helps the flour fully absorb the water and makes the dough easier to work with later.
I used this window to make and enjoy a peaceful cup of coffee.
After 30 minutes, perform a set of stretch and folds. To do this, grab one side of the dough, stretch it up, and fold it over the center. Rotate the bowl and repeat three more times, once on each side. This builds gluten strength without kneading.
Cover the dough again and let it rest for a few hours at room temperature.
This was the perfect time for me to head out for some fresh air and play two sets of tennis, followed by a quick Target run.
Once the dough has rested and you notice it’s beginning to rise slightly, do a second round of stretch and folds. The dough will feel smoother and more elastic now.
Let it rest again for 30 minutes.
I used this moment to hop in the shower and freshen up before continuing.
After the final rest, gently shape the dough into a round or oval loaf. Avoid deflating it too much—be gentle and keep as much air in the dough as possible. Place it into a proofing basket or a bowl lined with a floured kitchen towel.
Let it rest for another hour at room temperature, covered.
This was the perfect opportunity to prepare and enjoy a relaxed lunch.
Once your dough has risen again, cover it and place it in the refrigerator. It can stay there for a few hours—or even longer if needed. This step helps develop flavor and makes scoring easier.
I popped mine into the fridge and headed out for a doctor’s appointment. No rush, no stress.
When ready to bake, remove the dough from the fridge. Place it in a cold Dutch oven, score the top with a sharp knife or blade, and place it into a cold oven.
Set the oven to 450°F and bake for 50 minutes with the lid on. Then remove the lid and bake for an additional 10 minutes on the rack or baking sheet to get that perfect golden crust.
Notes
This recipe is ideal for anyone with a busy day who still wants to enjoy homemade sourdough. It uses an unfed but active starter, no commercial yeast, and a cold-start baking method—perfect for flexibility and convenience.
- Prep Time: 20 minutes (active)
- Cook Time: 1 hour
- Category: Bread
- Method: Baking
- Cuisine: American / Artisan
Nutrition
- Serving Size: 1 slice (based on 8 slices)
- Calories: 170 kcal
- Sugar: 0.2 g
- Sodium: 290 mg
- Fat: 0.5 g
- Saturated Fat: 0.1 g
- Unsaturated Fat: 0.4 g
- Trans Fat: 0 g
- Carbohydrates: 35 g
- Fiber: 1.5 g
- Protein: 5 g
- Cholesterol: 0 mg


