

Three years ago, I decided to dive into the world of sourdough baking, starting with something many people consider the most challenging: croissants. At the beginning, it felt overwhelming. My croissants came out dense, butter would leak everywhere, and sometimes they barely rose. But with every bake, I learned something new — about the dough, about temperature, about patience. Today, I’m proud to say that my croissants are finally showing consistent, beautiful results.
This journey taught me that sourdough is not about perfection. It’s about persistence, learning to trust the process, and finding joy even in the mistakes. If you’re starting out, remember: every imperfect bake is a step forward.
Why You Shouldn’t Give Up
It’s tempting to feel discouraged after a few failed batches. Maybe your butter melts out. Maybe the layers disappear. Maybe the croissants don’t puff up like you hoped. But none of that means you’re failing.
Sourdough, especially laminated dough like croissants, demands patience. It’s a skill that develops over time — not in one recipe, not even in one month. You build instincts: how the dough should feel, when to stop rolling, when to chill. Every bake sharpens your understanding. If you embrace the long process instead of rushing to the final result, you will find yourself not only improving your croissants, but also falling in love with the art of slow baking.
Ingredients
Levain (Starter Build)
- 35g sourdough starter
- 70g all-purpose flour
- 70g water
This levain will be the heart of your dough, providing flavor, rise, and strength.
Dough
- 450g all-purpose flour
- 1 teaspoon salt
- 40g sugar
- 230ml water
- 150g active sourdough starter (from the levain)
- 50g unsalted butter, at room temperature
The dough must be soft but structured, able to hold layers of butter without tearing.
Butter Packet
- 250g unsalted butter, at room temperature
- 1½ tablespoons all-purpose flour
Adding a small amount of flour to the butter stabilizes it, helping it laminate smoothly without breaking.
Egg Wash
- 1 egg
- 1 tablespoon water
An essential step for that shiny, golden-brown finish.
Step-by-Step Instructions
Day 1: Preparing the Dough
Start your morning by feeding your starter. Use a 1:2:2 ratio — one part starter, two parts flour, two parts water — and leave it in a warm spot until bubbly and active. This ensures your levain is strong enough to lift the dough.
When the levain is ready, mix the flour, salt, sugar, water, active starter, and soft butter in a large bowl. It will seem sticky at first, but don’t add more flour. Knead for about 5–8 minutes until smooth but still slightly tacky to the touch. This elasticity is key for successful laminations.
Place the dough into a greased bowl. Cover and ferment at room temperature for about 3 hours, until slightly puffed.
After bulk fermentation, gently deflate the dough, cover it tightly, and refrigerate overnight. This overnight rest will allow the dough to relax and build flavor.
Day 2: Lamination and Folding
Begin by making your butter packet. Mix butter and flour, then roll between two sheets of parchment paper into a 15×20 cm rectangle. Chill it until firm but pliable — about 20 minutes.
Take the cold dough from the fridge and roll it out into a 20×40 cm rectangle. Place the chilled butter packet in the center and fold the dough over it like a letter, fully enclosing the butter.
Turn the dough 90 degrees and roll it out again into a 20×40 cm rectangle. Perform your first “single fold” by folding the dough into thirds, like folding a letter.
Wrap the dough tightly and refrigerate for 30 minutes to relax the gluten.
Repeat the rolling and folding process two more times, each time allowing the dough to rest in the fridge for 30 minutes between folds.
After the third and final fold, wrap the dough well and refrigerate for at least 2 hours, preferably overnight. This resting time is crucial to achieving light, flaky layers.
Day 3: Shaping and Baking
Remove the rested dough from the fridge. Lightly flour your surface and roll the dough out into a large rectangle about 5mm thick. Be gentle and avoid pressing too hard to preserve the layers.
Using a sharp knife or pizza cutter, cut the dough into long triangles. Starting at the base, gently stretch each triangle a little, then roll it up tightly toward the tip to form a croissant shape.
Place the croissants on a parchment-lined tray. Cover them loosely with plastic wrap or a damp cloth, and allow them to proof at room temperature until they are very puffy and have doubled in size. This can take anywhere from 3 to 5 hours depending on your room temperature.
Preheat your oven to 200°C (392°F). Prepare the egg wash by whisking together the egg and water.
Gently brush the tops of the proofed croissants with egg wash, being careful not to deflate them.
Bake for 20–25 minutes until deeply golden and crisp. Rotate the tray halfway through baking for even color. Cool on a wire rack before serving.
Understanding Sourdough in Laminated Doughs
Sourdough laminated dough behaves differently from yeast-based ones. The fermentation is slower, but the payoff is richer flavor, complex aroma, and a beautiful tender crumb.
It’s important to manage fermentation carefully. Overproofing can cause butter to leak, while underproofing results in heavy, doughy croissants. Temperature control at every stage is the secret weapon: cool dough, pliable but cold butter, and patient proofing.
How to Troubleshoot Common Problems
If your croissants are dense, it may be due to underproofing or not enough folds.
If the butter leaks during baking, it’s often a sign the dough or butter became too warm during lamination.
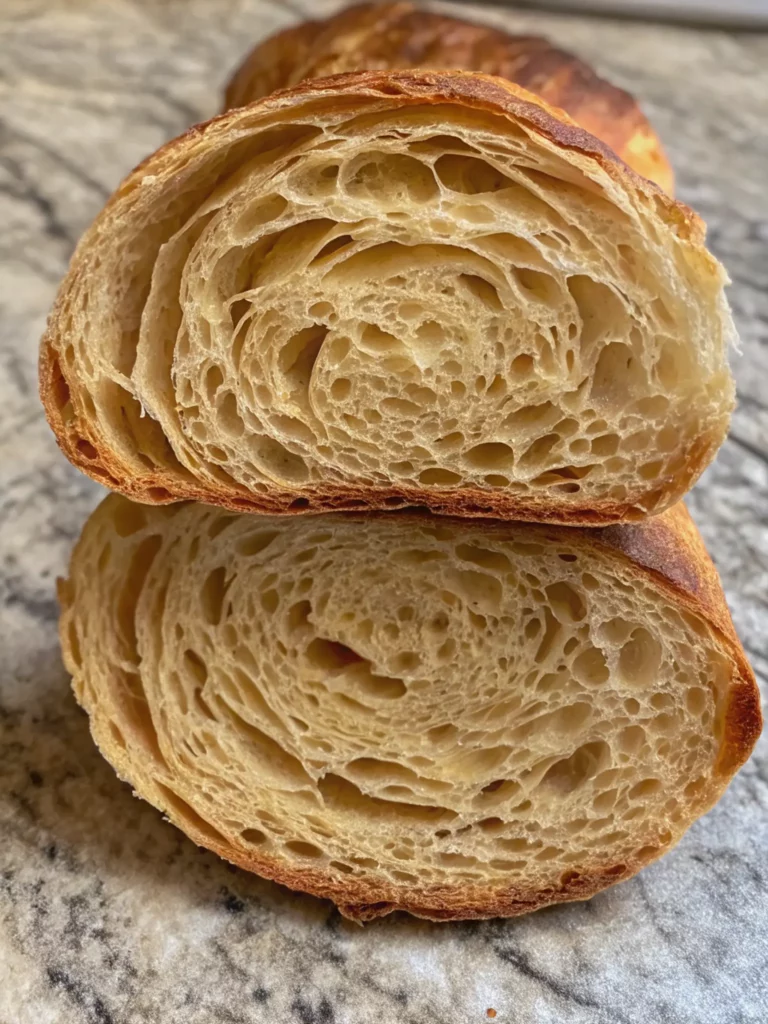
If you see big holes in the structure but they are uneven, it could be a rolling issue where butter melted into the dough unevenly.
Keeping everything cool, working quickly but gently, and building strength into the dough will help solve most of these issues.
Tips for Best Results
- Use European-style butter if possible. It has a higher fat content, which makes the butter layers thinner and more flexible.
- Chill as needed. If at any point the dough feels soft or the butter feels melty, stop and chill everything for 20–30 minutes.
- Don’t rush proofing. Give the croissants enough time to rise fully. Look for jiggly, puffy croissants before baking.
- Work cleanly. Dust off excess flour between folds to avoid drying out the dough layers.
FAQs
Can I use regular yeast instead of sourdough starter?
No, this recipe is designed for the slow, flavor-rich fermentation that only sourdough provides. If you want to use yeast, you’d need a different dough recipe with adjusted proofing times.
Why is my butter leaking during baking?
Leaking butter usually means your dough got too warm during lamination or proofing. Always keep dough and butter cold. Chill between folds and be gentle when rolling.
Can I freeze the croissants before baking?
Absolutely. After shaping, place croissants on a tray and freeze until solid. Store in a ziplock bag. When ready, thaw overnight in the fridge, then proof at room temperature until doubled in size before baking.
How can I tell if my croissants are proofed enough?
Gently jiggle the tray. If the croissants wobble slightly and feel airy and puffy to the touch, they are ready to bake.
Conclusion
Learning to bake sourdough croissants is truly a rewarding journey. It takes patience, practice, and a little bit of bravery to face those imperfect early bakes. But every fold, every chill, every bake brings you closer to mastering the art of flaky, buttery perfection.
If you’re just starting out, remember — it’s okay to struggle. It’s okay to have imperfect results. What matters is that you keep going. Embrace the beauty of the process, enjoy the lessons along the way, and soon you’ll find yourself pulling trays of golden, airy croissants from your own oven — and there is no better reward than that.

My 3-Year Sourdough Croissant Journey
- Total Time: About 2½ days from start to finish
- Yield: 12 croissants 1x
- Diet: Vegetarian
Description
Three years ago, I decided to dive into the world of sourdough baking, starting with something many people consider the most challenging: croissants. At the beginning, it felt overwhelming. My croissants came out dense, butter would leak everywhere, and sometimes they barely rose. But with every bake, I learned something new — about the dough, about temperature, about patience. Today, I’m proud to say that my croissants are finally showing consistent, beautiful results.
This journey taught me that sourdough is not about perfection. It’s about persistence, learning to trust the process, and finding joy even in the mistakes. If you’re starting out, remember: every imperfect bake is a step forward.
Ingredients
Levain (Starter Build)
-
70g all-purpose flour
-
70g water
35g sourdough starter
This levain will be the heart of your dough, providing flavor, rise, and strength.
Dough
-
1 teaspoon salt
-
40g sugar
-
230ml water
-
150g active sourdough starter (from the levain)
-
50g unsalted butter, at room temperature
450g all-purpose flour
The dough must be soft but structured, able to hold layers of butter without tearing.
Butter Packet
-
1½ tablespoons all-purpose flour
250g unsalted butter, at room temperature
Adding a small amount of flour to the butter stabilizes it, helping it laminate smoothly without breaking.
Egg Wash
-
1 tablespoon water
1 egg
An essential step for that shiny, golden-brown finish.
Instructions
Start your morning by feeding your starter. Use a 1:2:2 ratio — one part starter, two parts flour, two parts water — and leave it in a warm spot until bubbly and active. This ensures your levain is strong enough to lift the dough.
When the levain is ready, mix the flour, salt, sugar, water, active starter, and soft butter in a large bowl. It will seem sticky at first, but don’t add more flour. Knead for about 5–8 minutes until smooth but still slightly tacky to the touch. This elasticity is key for successful laminations.
Place the dough into a greased bowl. Cover and ferment at room temperature for about 3 hours, until slightly puffed.
After bulk fermentation, gently deflate the dough, cover it tightly, and refrigerate overnight. This overnight rest will allow the dough to relax and build flavor.
Begin by making your butter packet. Mix butter and flour, then roll between two sheets of parchment paper into a 15×20 cm rectangle. Chill it until firm but pliable — about 20 minutes.
Take the cold dough from the fridge and roll it out into a 20×40 cm rectangle. Place the chilled butter packet in the center and fold the dough over it like a letter, fully enclosing the butter.
Turn the dough 90 degrees and roll it out again into a 20×40 cm rectangle. Perform your first “single fold” by folding the dough into thirds, like folding a letter.
Wrap the dough tightly and refrigerate for 30 minutes to relax the gluten.
Repeat the rolling and folding process two more times, each time allowing the dough to rest in the fridge for 30 minutes between folds.
After the third and final fold, wrap the dough well and refrigerate for at least 2 hours, preferably overnight. This resting time is crucial to achieving light, flaky layers.
Remove the rested dough from the fridge. Lightly flour your surface and roll the dough out into a large rectangle about 5mm thick. Be gentle and avoid pressing too hard to preserve the layers.
Using a sharp knife or pizza cutter, cut the dough into long triangles. Starting at the base, gently stretch each triangle a little, then roll it up tightly toward the tip to form a croissant shape.
Place the croissants on a parchment-lined tray. Cover them loosely with plastic wrap or a damp cloth, and allow them to proof at room temperature until they are very puffy and have doubled in size. This can take anywhere from 3 to 5 hours depending on your room temperature.
Preheat your oven to 200°C (392°F). Prepare the egg wash by whisking together the egg and water.
Gently brush the tops of the proofed croissants with egg wash, being careful not to deflate them.
Bake for 20–25 minutes until deeply golden and crisp. Rotate the tray halfway through baking for even color. Cool on a wire rack before serving.
Notes
This sourdough croissant recipe requires patience, precision, and time. The final result is flaky, buttery, and deeply flavorful, thanks to the slow natural fermentation. It’s ideal for bakers ready to embrace the beauty of the process.
- Prep Time: 3 hours (active prep across 3 days)
- Resting and Proofing Time: Approximately 36 hours total (including overnight chills and final proof)
- Cook Time: 20–25 minutes
- Category: Baking
- Method: Lamination, Natural Fermentation
- Cuisine: French-inspired
Nutrition
- Serving Size: 1 croissant
- Calories: 320 kcal
- Sugar: 4g
- Sodium: 210mg
- Fat: 19g
- Saturated Fat: 12g
- Unsaturated Fat: 6g
- Trans Fat: 0g
- Carbohydrates: 32g
- Fiber: 1g
- Protein: 6g
- Cholesterol: 70mg


