
Introduction
Bringing a sourdough starter back to life after months of rest can feel like reviving an old friendship. That’s what happened to me recently. My refrigerator starter had been asleep for over six months. Life had simply gotten in the way — work, family, and everything in between. But when I finally took it out, fed it, and saw those first signs of life — the bubbles, the rise — I felt inspired again.
However, I also knew I needed a method that would work around my busy schedule. That’s when I came across Conley Kipp’s approach on TikTok. She experimented with skipping the traditional bulk fermentation step. Instead, she did a few stretch and folds, placed her dough straight into the fridge, and let time do the magic.
I decided to give it a try. Four loaves later, I can confidently say this has become my favorite sourdough method. Not only does it simplify the process, but it also creates bread that looks beautiful and tastes even better. Whether you’re an experienced baker or someone new to sourdough, this method might just change the way you bake.

Ingredients
For one loaf:
- 500g King Arthur Bread Flour
- 100g active sourdough starter (fed and bubbly)
- 350g water, room temperature
- 15g salt
Why these ingredients?
King Arthur Bread Flour offers higher protein content, which strengthens the dough and creates that perfect chewy crumb.
Active sourdough starter is the heart of the loaf. It provides natural yeast and lactic acid bacteria, which contribute to the flavor and rise.
Water hydrates the flour and helps develop gluten. Room temperature water works best for an even mix.
Salt does more than add flavor — it also regulates yeast activity and strengthens the dough’s structure.
Instructions
Step 1: Mixing the Dough
Place the flour, water, and sourdough starter in a large mixing bowl. Stir until no dry flour remains. Don’t worry if the dough looks rough at this stage. Cover the bowl with a damp towel or plastic wrap and let it rest for one hour. This resting period, called the autolyse, allows the flour to fully absorb the water and begin developing gluten naturally.
Step 2: Adding Salt and Stretch & Folds
After the hour rest, sprinkle the salt evenly over the dough’s surface. Perform your first round of stretch and folds. To do this, gently pull up one edge of the dough and fold it over the center. Rotate the bowl and repeat on all four sides.
Over the next two hours, perform three more rounds of stretch and folds, spacing them about 30 minutes apart. This technique strengthens the dough without needing to knead it aggressively, preserving the air pockets that create a beautiful crumb.
Step 3: Cold Fermentation
Once you’ve completed the stretch and folds, transfer the dough to a lightly oiled container. Cover it well and place it in the refrigerator. Let it ferment cold for 36 to 48 hours.
Why such a long time? This slow, cold fermentation allows the natural yeast and bacteria to develop incredible flavor and structure. Even without bulk fermentation at room temperature, the dough will mature wonderfully.
Step 4: Shaping
Remove the dough from the fridge. You’ll notice it has expanded and become airy. Gently turn it out onto a lightly floured surface. Shape it into a round or oval loaf by folding the edges into the center and turning it over, seam-side down. Let the dough rest for 30 minutes to relax the gluten.
Step 5: Final Shaping and Proofing
Reshape the dough to tighten its surface tension, then place it seam-side up into a well-floured banneton or bread basket. At this point, you can either let it rest in the fridge again for another 10 to 24 hours or bake it immediately after a short rest. The extra fridge time will deepen the flavor even further.
Step 6: Preheating the Oven
Place a Dutch oven in your oven and preheat to 450°F (232°C). Allow at least 45 minutes for the Dutch oven to heat fully. A properly preheated Dutch oven ensures the dough will spring beautifully in the oven.
Step 7: Baking
Gently transfer the dough onto parchment paper or directly into the Dutch oven. Cover and bake for 25 minutes. This traps steam inside, allowing the loaf to rise fully before the crust sets.
After 25 minutes, remove the lid, spritz the loaf lightly with water to encourage a glossy crust, and continue baking for another 35 minutes. Reduce the oven temperature to 400°F (204°C) for the second stage of baking. Rotate the loaf halfway through to ensure even browning.
Why This Method Works
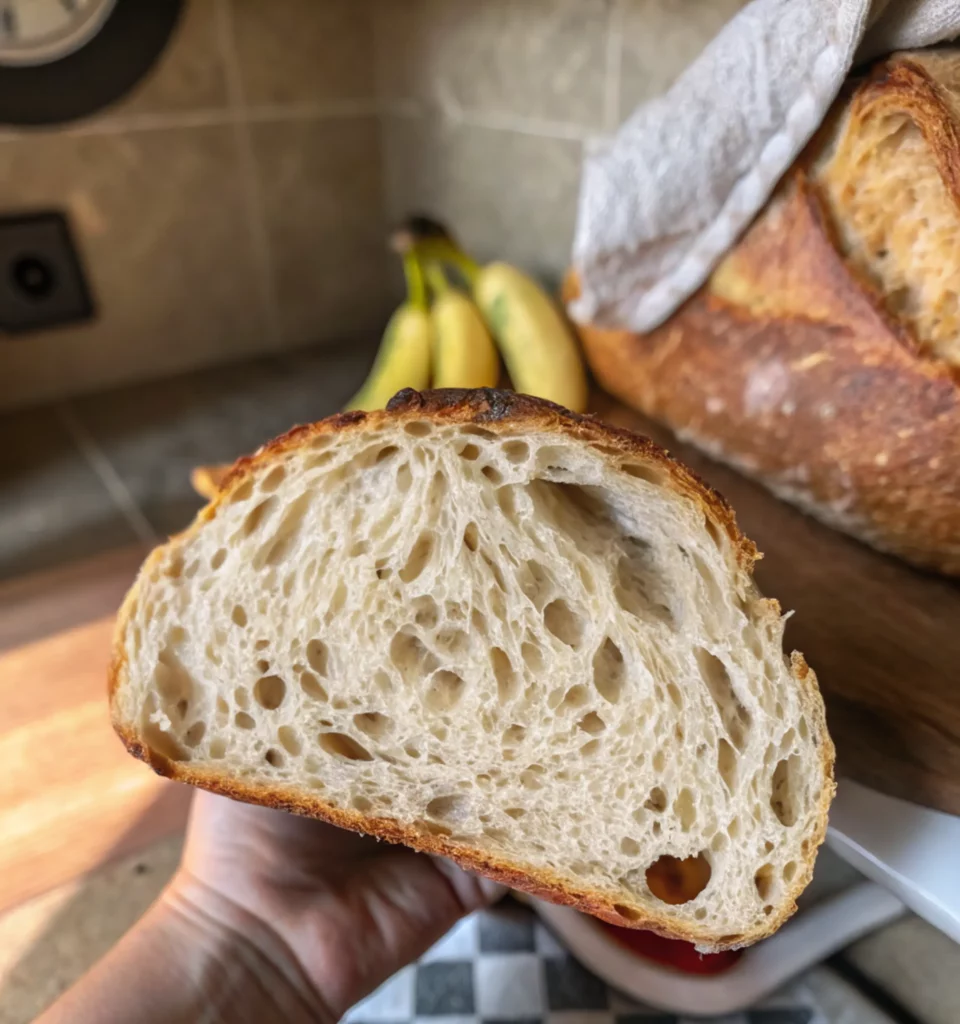
Skipping the bulk fermentation might seem unconventional. However, the long cold fermentation compensates beautifully. During this extended chill, the dough slowly ferments, developing complex flavors and the kind of open crumb that sourdough lovers dream of.
The stretch and folds provide just enough structure, and the flexible timing allows busy bakers to fit breadmaking into their schedule without sacrificing quality. This approach makes sourdough more accessible and less intimidating — especially for those new to the craft.
Tips for Best Results
- Flour Matters: Use high-quality bread flour for the best gluten development.
- Mind Your Starter: Make sure your starter is active and bubbly. Feed it regularly before baking days.
- Be Gentle: When shaping, avoid pressing out the gas bubbles. They contribute to the open crumb.
- Temperature Control: Cold fermentation is flexible. If your fridge is very cold, you can extend the fermentation slightly. If it’s warmer, reduce the time.
- Steam is Key: If you don’t have a Dutch oven, bake with a tray of water in the oven to create steam. This helps develop a crisp, blistered crust.
Equipment You’ll Need
- Large mixing bowl
- Kitchen scale (for accuracy)
- Dough scraper (optional but helpful)
- Banneton or bread basket
- Dutch oven (or pizza stone with a steam tray)
- Lame or sharp knife for scoring
- Parchment paper (optional, for easy transfer)
Storage Suggestions
Allow the bread to cool completely before slicing. Store at room temperature in a paper bag or wrapped in a clean kitchen towel for up to two days. For longer storage, slice the loaf and freeze individual slices in an airtight container or freezer bag. Reheat slices in a toaster or warm oven for a fresh-baked feel.
Notes
- You can replace up to 20% of the flour with whole wheat or rye flour for a nuttier flavor.
- If the dough feels too wet during shaping, flour your hands and the surface lightly. Avoid adding too much extra flour, as it can toughen the bread.
- This method is perfect for busy schedules. If you need to delay baking, the dough can rest in the fridge a little longer without harm.
Nutrition (per slice estimate)
- Serving Size: 1 slice (1/12 of the loaf)
- Calories: 150
- Carbohydrates: 28g
- Protein: 5g
- Fat: 1g
- Fiber: 1g
- Sugar: 0g
- Sodium: 300mg
FAQ
Can I use all-purpose flour instead of bread flour?
Yes, but the dough may feel softer and slightly stickier. All-purpose flour has lower protein content, so the crumb might be a bit more tender rather than chewy.
What if I don’t have a Dutch oven?
No problem. You can bake the loaf on a pizza stone or a heavy baking sheet. Place a metal tray filled with hot water on the bottom rack to create steam. This helps the bread rise properly and develop a crispy crust.
My dough feels too sticky. What should I do?
Sticky dough is normal for high-hydration sourdough. Lightly flour your hands and the work surface. Avoid adding too much flour to the dough itself — that can lead to a dense, heavy loaf.
Conclusion
Sourdough baking doesn’t have to be complicated or time-consuming. This no-bulk-fermentation method offers flexibility, simplicity, and consistently beautiful results. Whether you’re reviving an old starter or starting your sourdough journey from scratch, this recipe empowers you to create delicious homemade bread without the stress. Happy baking!
Print
Lazy Baker’s No-Bulk-Fermentation Sourdough Bread
- Total Time: 2 hours active + up to 72 hours passive
- Yield: 1 loaf (about 12 slices) 1x
- Diet: Vegetarian
Description
Bringing a sourdough starter back to life after months of rest can feel like reviving an old friendship. That’s what happened to me recently. My refrigerator starter had been asleep for over six months. Life had simply gotten in the way — work, family, and everything in between. But when I finally took it out, fed it, and saw those first signs of life — the bubbles, the rise — I felt inspired again.
However, I also knew I needed a method that would work around my busy schedule. That’s when I came across Conley Kipp’s approach on TikTok. She experimented with skipping the traditional bulk fermentation step. Instead, she did a few stretch and folds, placed her dough straight into the fridge, and let time do the magic.
I decided to give it a try. Four loaves later, I can confidently say this has become my favorite sourdough method. Not only does it simplify the process, but it also creates bread that looks beautiful and tastes even better. Whether you’re an experienced baker or someone new to sourdough, this method might just change the way you bake.
Ingredients
For one loaf:
-
100g active sourdough starter (fed and bubbly)
-
350g water, room temperature
-
15g salt
500g King Arthur Bread Flour
Why these ingredients?
King Arthur Bread Flour offers higher protein content, which strengthens the dough and creates that perfect chewy crumb.
Active sourdough starter is the heart of the loaf. It provides natural yeast and lactic acid bacteria, which contribute to the flavor and rise.
Water hydrates the flour and helps develop gluten. Room temperature water works best for an even mix.
Salt does more than add flavor — it also regulates yeast activity and strengthens the dough’s structure.
Instructions
Place the flour, water, and sourdough starter in a large mixing bowl. Stir until no dry flour remains. Don’t worry if the dough looks rough at this stage. Cover the bowl with a damp towel or plastic wrap and let it rest for one hour. This resting period, called the autolyse, allows the flour to fully absorb the water and begin developing gluten naturally.
After the hour rest, sprinkle the salt evenly over the dough’s surface. Perform your first round of stretch and folds. To do this, gently pull up one edge of the dough and fold it over the center. Rotate the bowl and repeat on all four sides.
Over the next two hours, perform three more rounds of stretch and folds, spacing them about 30 minutes apart. This technique strengthens the dough without needing to knead it aggressively, preserving the air pockets that create a beautiful crumb.
Once you’ve completed the stretch and folds, transfer the dough to a lightly oiled container. Cover it well and place it in the refrigerator. Let it ferment cold for 36 to 48 hours.
Why such a long time? This slow, cold fermentation allows the natural yeast and bacteria to develop incredible flavor and structure. Even without bulk fermentation at room temperature, the dough will mature wonderfully.
Remove the dough from the fridge. You’ll notice it has expanded and become airy. Gently turn it out onto a lightly floured surface. Shape it into a round or oval loaf by folding the edges into the center and turning it over, seam-side down. Let the dough rest for 30 minutes to relax the gluten.
Reshape the dough to tighten its surface tension, then place it seam-side up into a well-floured banneton or bread basket. At this point, you can either let it rest in the fridge again for another 10 to 24 hours or bake it immediately after a short rest. The extra fridge time will deepen the flavor even further.
Place a Dutch oven in your oven and preheat to 450°F (232°C). Allow at least 45 minutes for the Dutch oven to heat fully. A properly preheated Dutch oven ensures the dough will spring beautifully in the oven.
Gently transfer the dough onto parchment paper or directly into the Dutch oven. Cover and bake for 25 minutes. This traps steam inside, allowing the loaf to rise fully before the crust sets.
After 25 minutes, remove the lid, spritz the loaf lightly with water to encourage a glossy crust, and continue baking for another 35 minutes. Reduce the oven temperature to 400°F (204°C) for the second stage of baking. Rotate the loaf halfway through to ensure even browning.
Notes
This recipe skips the traditional bulk fermentation step, making it ideal for busy bakers. The extended cold fermentation develops deep flavor and a beautiful open crumb. The method is flexible — timing can be adjusted to suit your schedule without compromising the results.
- Prep Time: 2 hours (including mixing, stretch and folds, and shaping)
- Cold Fermentation Time:: 36 to 48 hours
- Cook Time: 60 minutes
- Category: Bread
- Method: Sourdough, No-Bulk-Fermentation, Long Ferment
- Cuisine: American, Artisan
Nutrition
- Serving Size: 1 slice (1/12 of the loaf)
- Calories: 150
- Sugar: 0g
- Sodium: 300mg
- Fat: 1g
- Saturated Fat: 0g
- Unsaturated Fat: 1g
- Trans Fat: 0g
- Carbohydrates: 28g
- Fiber: 1g
- Protein: 5g
- Cholesterol: 0mg


