
Introduction
There’s nothing quite like the comfort of homemade bread. The aroma that fills your kitchen, the golden crust that crackles as you slice into it, and the soft, hearty interior all create a sense of warmth and satisfaction. This honey oatmeal sourdough sandwich bread brings together the best of both worlds: the rich, tangy depth of sourdough and the sweet, nutty goodness of oats and honey. It’s a loaf that’s as nourishing as it is delicious, perfect for everyday meals, lazy weekend brunches, or sharing with family and friends. Whether you’re new to baking or have been making bread for years, this simple recipe fits easily into your routine and delivers consistently satisfying results.
Ingredients

Let’s take a look at what you’ll need for this recipe. Each ingredient plays an important role, and while the list is short, the flavors are big.
- 1 1/2 cups hot water – Used to soften the oats and melt the butter. Hot but not boiling is ideal.
- 1/4 cup honey – Adds a touch of natural sweetness and helps create a lovely brown crust.
- 1/4 cup butter – Adds richness and softness to the crumb. You can use salted or unsalted.
- 1 cup active sourdough starter – This gives your loaf its rise and that classic sourdough flavor. Make sure it’s bubbly and recently fed.
- 1 cup oats (steel-cut) – Adds texture and fiber. Rolled oats can be used as an alternative for a softer loaf.
- 3 1/2 cups bread flour – Provides structure and strength for a tall, well-shaped loaf.
- 1 1/2 teaspoons salt – Balances the flavor and strengthens the dough during the fermentation process.
Tip: You can substitute all-purpose flour if needed, but bread flour tends to give better height and texture.
Step-by-Step Instructions
Step 1: Soften the Oats
In a large bowl, combine the hot water, honey, butter, and steel-cut oats. Stir gently until the butter is melted and the mixture is well combined. This step is important because it allows the oats to begin softening, which helps them blend smoothly into the dough without remaining hard or chewy. Let the mixture sit and cool for about 15–20 minutes before adding the starter. Adding the starter too soon can damage the wild yeast due to the heat.
Step 2: Mix and Rest the Dough
Once the mixture is cool to the touch, stir in the active sourdough starter, flour, and salt. The dough will be very sticky — that’s completely normal. There’s no need to knead it vigorously. Simply mix until all the ingredients are well incorporated, then cover the bowl with a clean towel or plastic wrap. Let the dough rest for several hours at room temperature (4–6 hours works well) or overnight in a cooler spot. This slow fermentation develops deep flavor and helps the dough become easier to handle.
Step 3: Shape and Let It Rise
After the resting period, dust your hands lightly with flour and give the dough a gentle knead right in the bowl. Just enough to bring it together into a cohesive ball. Shape it into a log that fits your loaf pan, then transfer it into a lightly greased or parchment-lined pan. Cover again and let it rise for 1–2 hours. The dough should rise noticeably and puff up close to the rim of the pan. If your kitchen is cool, it might take a bit longer — be patient and let the dough rise fully for the best result.
Step 4: Score and Bake
Once the dough has risen, use a sharp knife or bread lame to make a shallow slash along the top. This helps control how the bread expands in the oven, preventing unwanted cracks. Preheat your oven to 375°F (190°C). Bake the bread for 40 to 45 minutes until the crust is golden brown and the loaf sounds hollow when tapped. If the top browns too quickly, you can tent it loosely with foil halfway through baking.
Tips for Success
- Soften the oats thoroughly for a smoother dough and more even texture.
- Avoid adding more flour, even if the dough feels sticky. Let time do the work — it becomes easier to handle after resting.
- Score confidently just before baking. This not only makes the loaf look beautiful but also helps with oven spring.
- Let the bread cool fully before slicing to prevent a gummy interior. The steam inside needs time to settle.
These small adjustments can make a big difference in the final texture and taste of your bread.
Bread Machine Version
If you’re short on time or just prefer hands-off baking, this recipe adapts well to a bread machine. Add the ingredients in the following order: hot water (cooled), honey, butter, sourdough starter, oats, flour, and salt. Select the basic or white bread cycle with a delayed start of about 6 hours. The result will be a soft, well-risen loaf with the same honey-oat flavor — no extra effort needed.
Note: Not all bread machines handle sticky doughs equally well, so check during the first few minutes and scrape down the sides if necessary.
Serving Suggestions
This bread is incredibly versatile. Here are a few favorite ways to enjoy it:
- Grilled Cheese Sandwiches: The chewy texture and hint of sweetness pair beautifully with melty cheddar.
- Morning Toast: Spread with butter and jam or peanut butter for a wholesome breakfast.
- Soup Sidekick: Serve it warm with a bowl of soup or stew for a satisfying lunch or dinner.
- French Toast: Slice it thick and use it for a rich, custardy French toast on the weekend.
The mild sweetness from the honey and the depth from the sourdough make this loaf work equally well in sweet or savory dishes.
Storage and Freezing
Once fully cooled, the loaf can be stored in a bread box or sealed bag at room temperature for up to three days. For longer storage, slice the bread and place the slices in a freezer-safe bag or container. When you’re ready to enjoy it, simply toast the slices straight from the freezer — no need to thaw. This makes it easy to enjoy homemade bread every day without waste.
Why We Love This Bread
There’s something deeply comforting about a loaf that’s both nourishing and easy to make. This bread strikes the perfect balance between flavor, texture, and simplicity. The oats bring heartiness, the honey adds a touch of sweetness, and the sourdough offers depth and complexity. It’s a recipe you can rely on — whether for a casual weekday meal or a special treat shared with loved ones.
For many, this recipe has become a weekend staple. It feels homemade in the truest sense, filled with care, and always satisfying.
Common Mistakes to Avoid
Even simple recipes have their pitfalls. Here are a few things to watch out for:
- Skipping the oat soak: This leads to hard bits of oats that affect texture.
- Adding too much flour: The dough should be sticky at first. Over-flouring makes the loaf dense.
- Rushing the final rise: Give the dough time to rise fully — this impacts both texture and flavor.
- Underbaking: Always check for a hollow sound when tapping the bottom of the loaf, or use a thermometer (it should read 200–205°F inside).
Nutrition Highlights
This bread combines the benefits of whole grains and natural fermentation.
- Oats provide fiber, protein, and complex carbohydrates for sustained energy.
- Honey is a natural sweetener and adds moisture.
- Sourdough fermentation supports easier digestion for many and contributes beneficial bacteria.
- Butter and flour offer richness and structure, making it a balanced choice when enjoyed in moderation.
It’s a wholesome loaf you can feel good about enjoying and sharing with others.
FAQ
Can I use rolled oats or quick oats instead of steel-cut?
Yes, rolled oats work well and create a slightly softer texture. Avoid quick oats as they can break down too much during baking.
What if my dough is too sticky to handle?
That’s completely normal. Wet your hands slightly or use a spatula when shaping. Avoid adding more flour unless absolutely necessary.
Can I use a different sweetener?
Maple syrup or brown sugar can be used in place of honey, though the flavor will be slightly different.
Can I skip the overnight rest?
Yes, you can let the dough rise during the day for about 4–6 hours. However, an overnight rest develops a deeper flavor and better texture.
Do I need to preheat my oven?
Yes, always preheat to ensure the loaf bakes evenly and rises properly from the start.
Conclusion
Homemade bread has a way of bringing comfort to the everyday. This honey oatmeal sourdough loaf is more than just a recipe — it’s an invitation to slow down, enjoy the process, and share something made with love. Whether you’re baking for yourself or for your family, this bread delivers warmth, nourishment, and that wonderful feeling of slicing into something you made with your own hands.
Once you try it, it just might become a favorite in your kitchen too.
Print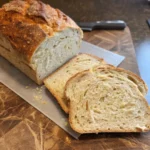
Honey Oatmeal Sourdough Sandwich Bread
- Total Time: 9 to 13 hours
- Yield: 1 loaf (12–14 slices)
- Diet: Vegetarian
Description
There’s nothing quite like the comfort of homemade bread. The aroma that fills your kitchen, the golden crust that crackles as you slice into it, and the soft, hearty interior all create a sense of warmth and satisfaction. This honey oatmeal sourdough sandwich bread brings together the best of both worlds: the rich, tangy depth of sourdough and the sweet, nutty goodness of oats and honey. It’s a loaf that’s as nourishing as it is delicious, perfect for everyday meals, lazy weekend brunches, or sharing with family and friends. Whether you’re new to baking or have been making bread for years, this simple recipe fits easily into your routine and delivers consistently satisfying results.
Ingredients
Let’s take a look at what you’ll need for this recipe. Each ingredient plays an important role, and while the list is short, the flavors are big.
-
1/4 cup honey – Adds a touch of natural sweetness and helps create a lovely brown crust.
-
1/4 cup butter – Adds richness and softness to the crumb. You can use salted or unsalted.
-
1 cup active sourdough starter – This gives your loaf its rise and that classic sourdough flavor. Make sure it’s bubbly and recently fed.
-
1 cup oats (steel-cut) – Adds texture and fiber. Rolled oats can be used as an alternative for a softer loaf.
-
3 1/2 cups bread flour – Provides structure and strength for a tall, well-shaped loaf.
-
1 1/2 teaspoons salt – Balances the flavor and strengthens the dough during the fermentation process.
1 1/2 cups hot water – Used to soften the oats and melt the butter. Hot but not boiling is ideal.
Tip: You can substitute all-purpose flour if needed, but bread flour tends to give better height and texture.
Instructions
In a large bowl, combine the hot water, honey, butter, and steel-cut oats. Stir gently until the butter is melted and the mixture is well combined. This step is important because it allows the oats to begin softening, which helps them blend smoothly into the dough without remaining hard or chewy. Let the mixture sit and cool for about 15–20 minutes before adding the starter. Adding the starter too soon can damage the wild yeast due to the heat.
Once the mixture is cool to the touch, stir in the active sourdough starter, flour, and salt. The dough will be very sticky — that’s completely normal. There’s no need to knead it vigorously. Simply mix until all the ingredients are well incorporated, then cover the bowl with a clean towel or plastic wrap. Let the dough rest for several hours at room temperature (4–6 hours works well) or overnight in a cooler spot. This slow fermentation develops deep flavor and helps the dough become easier to handle.
After the resting period, dust your hands lightly with flour and give the dough a gentle knead right in the bowl. Just enough to bring it together into a cohesive ball. Shape it into a log that fits your loaf pan, then transfer it into a lightly greased or parchment-lined pan. Cover again and let it rise for 1–2 hours. The dough should rise noticeably and puff up close to the rim of the pan. If your kitchen is cool, it might take a bit longer — be patient and let the dough rise fully for the best result.
Once the dough has risen, use a sharp knife or bread lame to make a shallow slash along the top. This helps control how the bread expands in the oven, preventing unwanted cracks. Preheat your oven to 375°F (190°C). Bake the bread for 40 to 45 minutes until the crust is golden brown and the loaf sounds hollow when tapped. If the top browns too quickly, you can tent it loosely with foil halfway through baking.
Notes
This bread is a blend of hearty oats, natural honey, and tangy sourdough. It’s perfect for sandwiches, toast, or snacking. Best made with a rested and bubbly starter. Dough will be sticky but manageable with time.
- Prep Time: 20 minutes
- Rest + Rise Time:: 8 to 12 hours (includes initial rest and final proofing)
- Cook Time: 40–45 minutes
- Category: Bread
- Method: Baking (with optional bread machine)
Nutrition
- Serving Size: 1 slice (based on 14 slices)
- Calories: 165
- Sugar: 3g
- Sodium: 190mg
- Fat: 4.5g
- Saturated Fat: 2.5g
- Unsaturated Fat: 2g
- Trans Fat: 0g
- Carbohydrates: 27g
- Fiber: 2g
- Protein: 4g
- Cholesterol: 10mg


