
Introduction to Easter No-Bake Mini Cheesecakes
As the vibrant colors of spring bloom around us, I can’t help but feel a wave of excitement for Easter. This year, I’m thrilled to share my recipe for Easter No-Bake Mini Cheesecakes. These delightful treats are not only creamy and delicious but also a quick solution for busy moms like us. With minimal effort, you can whip up a dessert that will impress your loved ones. Imagine their smiles as they savor these little bites of joy, topped with festive decorations. Let’s dive into this easy and fun recipe that’s perfect for celebrating the holiday!
Why You’ll Love This Easter No-Bake Mini Cheesecakes
These Easter No-Bake Mini Cheesecakes are a dream come true for anyone short on time. They come together in just 20 minutes, leaving you with more time to enjoy the holiday festivities. The creamy texture and rich flavor will have your family asking for seconds. Plus, they’re customizable! You can easily switch up the toppings to suit everyone’s taste. What’s not to love about a dessert that’s both simple and scrumptious?
Ingredients for Easter No-Bake Mini Cheesecakes
Gathering the right ingredients is the first step to creating these delightful Easter No-Bake Mini Cheesecakes. Here’s what you’ll need:
- Graham cracker crumbs: These form the buttery crust. You can crush whole graham crackers or buy pre-made crumbs for convenience.
- Unsalted butter: Melted butter binds the crust together, adding richness. If you prefer, you can use coconut oil for a dairy-free option.
- Sugar: A touch of sugar sweetens the crust. You can substitute with brown sugar for a deeper flavor.
- Cream cheese: The star of the filling! Make sure it’s softened for easy mixing. Neufchâtel cheese is a lighter alternative.
- Powdered sugar: This sweetens the cheesecake filling and gives it a smooth texture. Granulated sugar can work in a pinch, but it may not dissolve as well.
- Vanilla extract: A splash of vanilla enhances the flavor. For a twist, try almond extract instead.
- Heavy whipping cream: Cold cream is essential for achieving those fluffy, stiff peaks. If you’re looking for a lighter option, use whipped coconut cream.
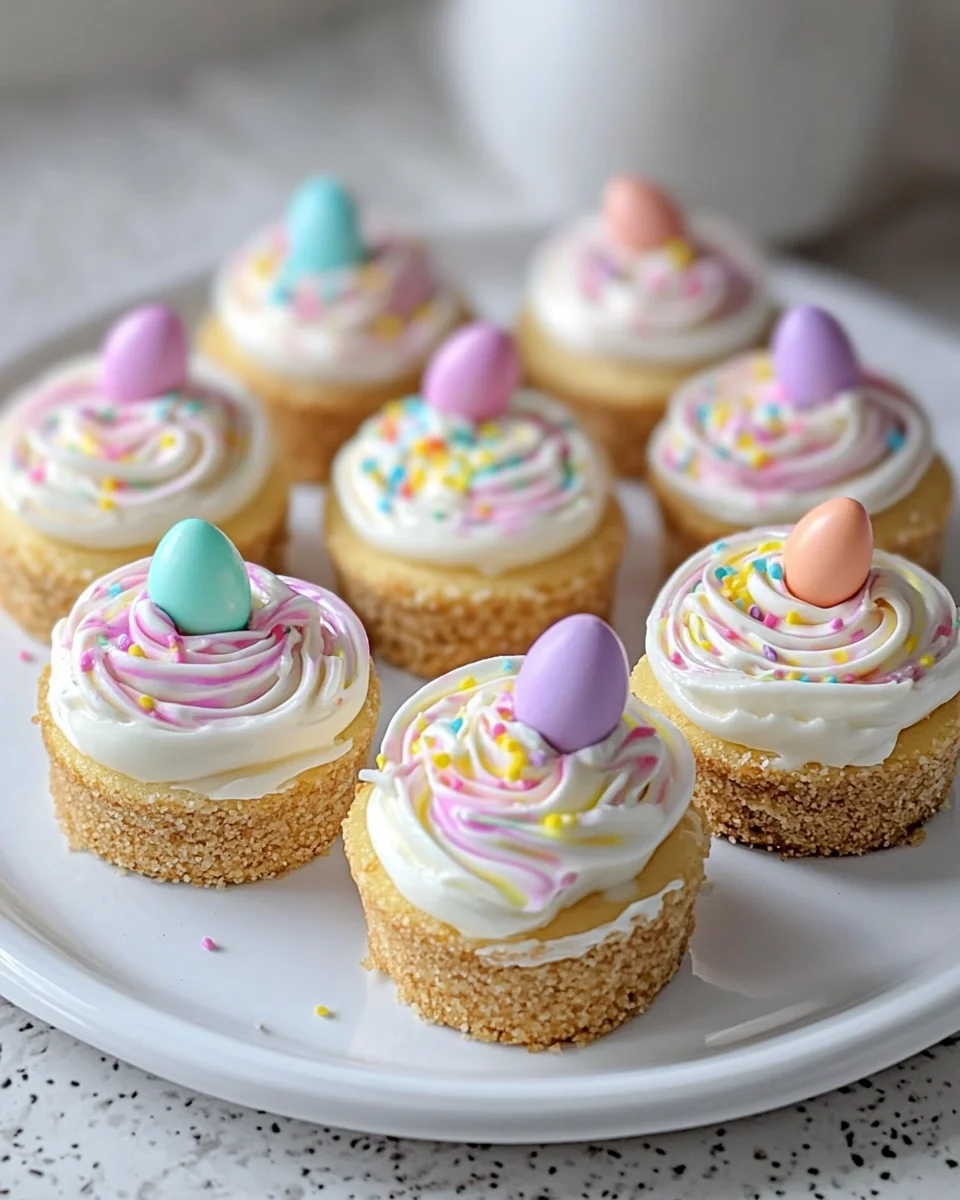
- Mini chocolate eggs: These are perfect for decoration and add a festive touch. Feel free to use M&M’s or jelly beans for a colorful pop.
- Whipped cream: A dollop on top adds a creamy finish. You can use store-bought or make your own.
- Shredded coconut: Optional, but it creates a lovely “nest” effect for your mini cheesecakes.
- Sprinkles: These add a fun, festive flair. Choose pastel colors to match the Easter theme.
For exact measurements, check the bottom of the article where you can find everything listed for easy printing. Now that we have our ingredients ready, let’s move on to the fun part—making these delicious mini cheesecakes!

How to Make Easter No-Bake Mini Cheesecakes
Prepare the Crust
Let’s start with the crust, which is the foundation of our Easter No-Bake Mini Cheesecakes. In a mixing bowl, combine the graham cracker crumbs, melted butter, and sugar. Stir until everything is well mixed and resembles wet sand. Now, take your cupcake liners and divide the mixture evenly among them. Press down firmly with your fingers or the back of a spoon to create a solid base. This step is crucial for a sturdy crust! Once you’ve pressed the mixture into the liners, pop them in the fridge to chill for about 10 minutes. This will help the crust set nicely while we prepare the filling.
Make the Cheesecake Filling
Now, let’s whip up that creamy cheesecake filling! In a large bowl, beat the softened cream cheese until it’s smooth and fluffy. Add in the powdered sugar and vanilla extract, mixing until everything is well combined. The mixture should be creamy and free of lumps. This is where the magic happens! The rich flavor of the cream cheese paired with the sweetness of the sugar creates a delightful filling that will have everyone coming back for more.
Whip the Cream
Next, it’s time to add some lightness to our filling. In a separate bowl, pour in the cold heavy whipping cream. Using an electric mixer, beat the cream until stiff peaks form, which usually takes about 3 to 4 minutes. Be careful not to over-whip, or you’ll end up with butter! Once you have those beautiful peaks, gently fold the whipped cream into the cream cheese mixture. This step is key to achieving that airy texture we all love in cheesecakes.
Assemble
Now comes the fun part—assembling our mini cheesecakes! Take your chilled crusts out of the fridge and grab your cheesecake filling. You can either spoon the filling directly onto the crusts or use a piping bag for a more polished look. Smooth the tops with a spatula or the back of a spoon. Make sure each mini cheesecake is filled to the top, creating a lovely dome shape. This is where you can let your creativity shine!
Chill
After assembling, it’s crucial to chill the cheesecakes again. Place them in the refrigerator for at least 3 hours, or even better, overnight. This allows the flavors to meld and the filling to firm up, making them easier to serve.
Decorate & Serve
Finally, it’s time to bring these Easter No-Bake Mini Cheesecakes to life! Before serving, top each cheesecake with mini chocolate eggs, a dollop of whipped cream, and a sprinkle of colorful sprinkles. If you’re feeling extra festive, add some shredded coconut to create a cute “nest” effect. These little touches not only enhance the flavor but also make for a beautiful presentation that will wow your guests!
Tips for Success
- Always use cold heavy whipping cream for the best whipped texture.
- Chill the crust for at least 10 minutes to ensure it holds its shape.
- Don’t over-whip the cream; stop when stiff peaks form.
- Feel free to customize toppings based on your family’s favorites.
- Make these mini cheesecakes a day ahead for even better flavor!
Equipment Needed
- Mixing bowls: Any size will do, but a large bowl is best for the filling.
- Electric mixer: A hand mixer works great, but a stand mixer can save time.
- Cupcake liners: Use paper or silicone liners for easy removal.
- Muffin tin: Essential for shaping your mini cheesecakes.
- Spatula: A rubber spatula is perfect for folding and smoothing.
Variations
- Fruit Toppings: Swap out the chocolate eggs for fresh berries like strawberries, blueberries, or raspberries for a refreshing twist.
- Chocolate Cheesecake: Add melted chocolate to the cream cheese mixture for a rich chocolate flavor. Use dark or white chocolate based on your preference.
- Nutty Crust: Replace graham cracker crumbs with crushed nuts or a combination of nuts and cookies for a gluten-free option.
- Flavor Infusions: Experiment with different extracts like lemon, orange, or coconut to give your cheesecakes a unique flavor profile.
- Vegan Version: Use vegan cream cheese and coconut cream in place of heavy whipping cream for a dairy-free delight.
Serving Suggestions
- Pair these mini cheesecakes with a light fruit salad for a refreshing contrast.
- Serve alongside a chilled glass of lemonade or iced tea to balance the sweetness.
- For a festive touch, arrange them on a colorful platter with spring flowers.
- Consider adding a scoop of vanilla ice cream for an extra indulgent treat.

FAQs about Easter No-Bake Mini Cheesecakes
Can I make these Easter No-Bake Mini Cheesecakes in advance?
Absolutely! In fact, making them a day ahead enhances the flavors. Just store them in the refrigerator until you’re ready to serve.
What can I use instead of cream cheese?
If you’re looking for a lighter option, try using Neufchâtel cheese. For a dairy-free version, vegan cream cheese works wonderfully!
How long do these mini cheesecakes last in the fridge?
These delightful treats can last up to 5 days in the refrigerator. Just make sure they’re covered to keep them fresh.
Can I freeze Easter No-Bake Mini Cheesecakes?
Yes, you can freeze them! Just wrap each cheesecake tightly in plastic wrap and store them in an airtight container. They’ll keep for about a month.
What toppings can I use for these mini cheesecakes?
The sky’s the limit! You can use mini chocolate eggs, fresh fruit, whipped cream, or even a drizzle of chocolate sauce. Get creative!
Final Thoughts
Creating these Easter No-Bake Mini Cheesecakes is more than just making a dessert; it’s about bringing joy to your family and friends. The smiles on their faces as they take that first bite are priceless. With each creamy, delightful mini cheesecake, you’re not just serving a treat; you’re sharing a moment of happiness. Plus, the ease of preparation means you can spend more time enjoying the holiday festivities. So, roll up your sleeves, gather your loved ones, and let’s make some sweet memories together this Easter!
Print
Easter No-Bake Mini Cheesecakes
- Total Time: 3 hours 20 minutes
- Yield: 12 mini cheesecakes 1x
- Diet: Vegetarian
Description
As the vibrant colors of spring bloom around us, I can’t help but feel a wave of excitement for Easter. This year, I’m thrilled to share my recipe for Easter No-Bake Mini Cheesecakes. These delightful treats are not only creamy and delicious but also a quick solution for busy moms like us. With minimal effort, you can whip up a dessert that will impress your loved ones.
Ingredients
- 1 cup graham cracker crumbs (about 8 crackers)
- 3 tablespoons unsalted butter, melted
- 1 tablespoon sugar
- 8 oz cream cheese, softened
- 1/2 cup powdered sugar
- 1 teaspoon vanilla extract
- 1 cup heavy whipping cream, cold
- Mini chocolate eggs (Cadbury Mini Eggs, M&M’s, or jelly beans)
- Whipped cream
- Shredded coconut (optional, for a “nest” effect)
- Sprinkles
Instructions
- Prepare the Crust: In a bowl, mix graham cracker crumbs, melted butter, and sugar until combined. Divide the mixture evenly into 12 cupcake liners in a muffin tin, pressing down firmly. Chill in the fridge while making the filling.
- Make the Cheesecake Filling: In a large bowl, beat cream cheese, powdered sugar, and vanilla until smooth.
- Whip the Cream: In a separate bowl, beat cold heavy whipping cream until stiff peaks form (about 3–4 minutes). Gently fold the whipped cream into the cream cheese mixture.
- Assemble: Spoon or pipe the cheesecake filling onto the prepared crusts. Smooth the tops.
- Chill: Refrigerate for at least 3 hours (or overnight) until firm.
- Decorate & Serve: Top with mini chocolate eggs, whipped cream, sprinkles, or coconut before serving.
Notes
- For best results, use cold heavy whipping cream to achieve stiff peaks.
- These mini cheesecakes can be made a day in advance and stored in the refrigerator.
- Feel free to customize toppings based on your preference.
- Prep Time: 20 minutes
- Cook Time: 0 minutes
- Category: Dessert
- Method: No-Bake
- Cuisine: American
Nutrition
- Serving Size: 1 mini cheesecake
- Calories: 250
- Sugar: 15g
- Sodium: 150mg
- Fat: 18g
- Saturated Fat: 10g
- Unsaturated Fat: 5g
- Trans Fat: 0g
- Carbohydrates: 20g
- Fiber: 1g
- Protein: 3g
- Cholesterol: 50mg


