
Introduction to Easter Egg Cheesecake Jars
Spring is in the air, and with it comes the joy of Easter celebrations! If you’re like me, you love to whip up something special for your family and friends. That’s where these delightful Easter Egg Cheesecake Jars come in. They’re not just a treat for the taste buds; they’re a feast for the eyes too! Perfect for busy moms and professionals, this no-bake dessert is quick to prepare and sure to impress. Imagine the smiles on your loved ones’ faces as they dig into these colorful, creamy jars filled with deliciousness!
Why You’ll Love This Easter Egg Cheesecake Jars
These Easter Egg Cheesecake Jars are a game-changer for any busy kitchen! They come together in just 30 minutes, making them a breeze to whip up. The creamy cheesecake filling paired with a crunchy crust is a match made in dessert heaven. Plus, they’re customizable and visually stunning, ensuring your guests will be wowed. With no baking required, you can focus on what truly matters—enjoying the holiday with your loved ones!
Ingredients for Easter Egg Cheesecake Jars
Gathering the right ingredients is the first step to creating these delightful Easter Egg Cheesecake Jars. Here’s what you’ll need:
- Graham cracker crumbs: These form the base of your cheesecake jars, providing a sweet and crunchy texture.
- Granulated sugar: A touch of sweetness to enhance the crust and filling.
- Unsalted butter: This helps bind the crust together, adding richness to the flavor.
- Cream cheese: The star of the show! It gives the cheesecake its creamy, luscious texture.
- Powdered sugar: This adds sweetness and helps achieve a smooth filling.
- Vanilla extract: A splash of vanilla elevates the flavor, making it even more delightful.
- Heavy cream: Whipped to stiff peaks, it lightens the cheesecake filling and adds a cloud-like texture.
- Pink gel food coloring or freeze-dried strawberry powder (optional): For a pop of color and a fruity twist, these are fun additions!
- Whipped cream: A fluffy topping that adds a touch of elegance and extra creaminess.
- Pastel candy eggs: These are the finishing touch, creating a festive look and a sweet surprise.
- Rainbow or pastel sprinkles: They add a cheerful crunch and make your jars visually appealing.
For exact measurements, check the bottom of the article where you can find everything listed for easy printing. Happy cooking!

How to Make Easter Egg Cheesecake Jars
Now that you have all your ingredients ready, let’s dive into the fun part—making these Easter Egg Cheesecake Jars! Follow these simple steps, and you’ll have a delightful dessert that’s sure to impress.
Prepare the Crust
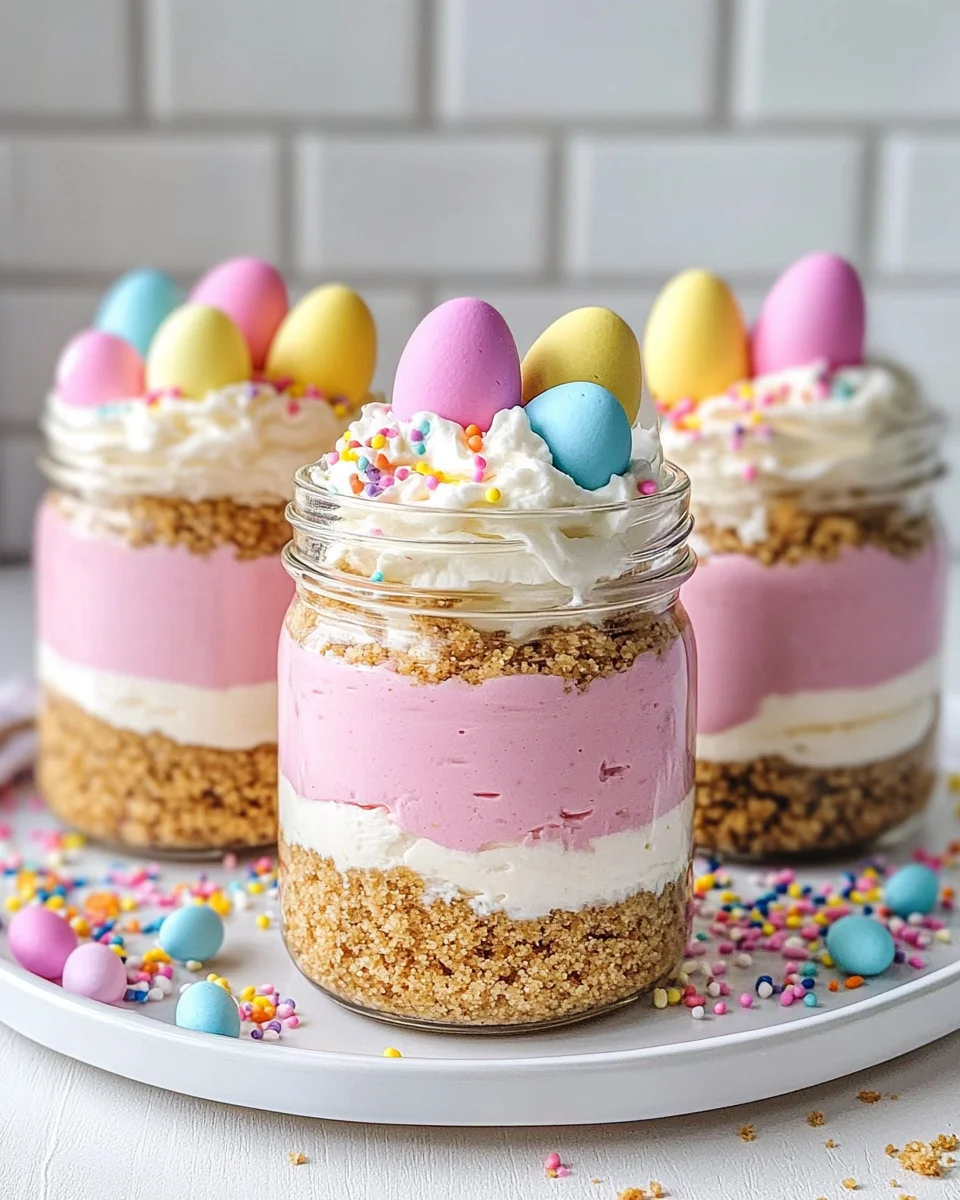
Start by mixing the graham cracker crumbs, granulated sugar, and melted butter in a bowl. Stir until the mixture resembles wet sand. This is the foundation of your jars, so make sure it’s well combined.
Next, spoon the crust mixture into the bottom of each mini jar. Use the back of a spoon to press it down gently. You want a firm base that holds up the creamy filling. Trust me, this crunchy layer is what makes each bite so satisfying!
Make the Cheesecake Filling
In a large mixing bowl, beat the softened cream cheese until it’s smooth and creamy. This is where the magic begins! Add the powdered sugar and vanilla extract, then beat again until everything is fluffy and well combined.
Now, it’s time to fold in the whipped cream. Do this in two batches for the best results. Gently fold until the mixture is fully blended. This step is crucial for achieving that light, airy texture that makes cheesecake so irresistible.
Layer the Cheesecake
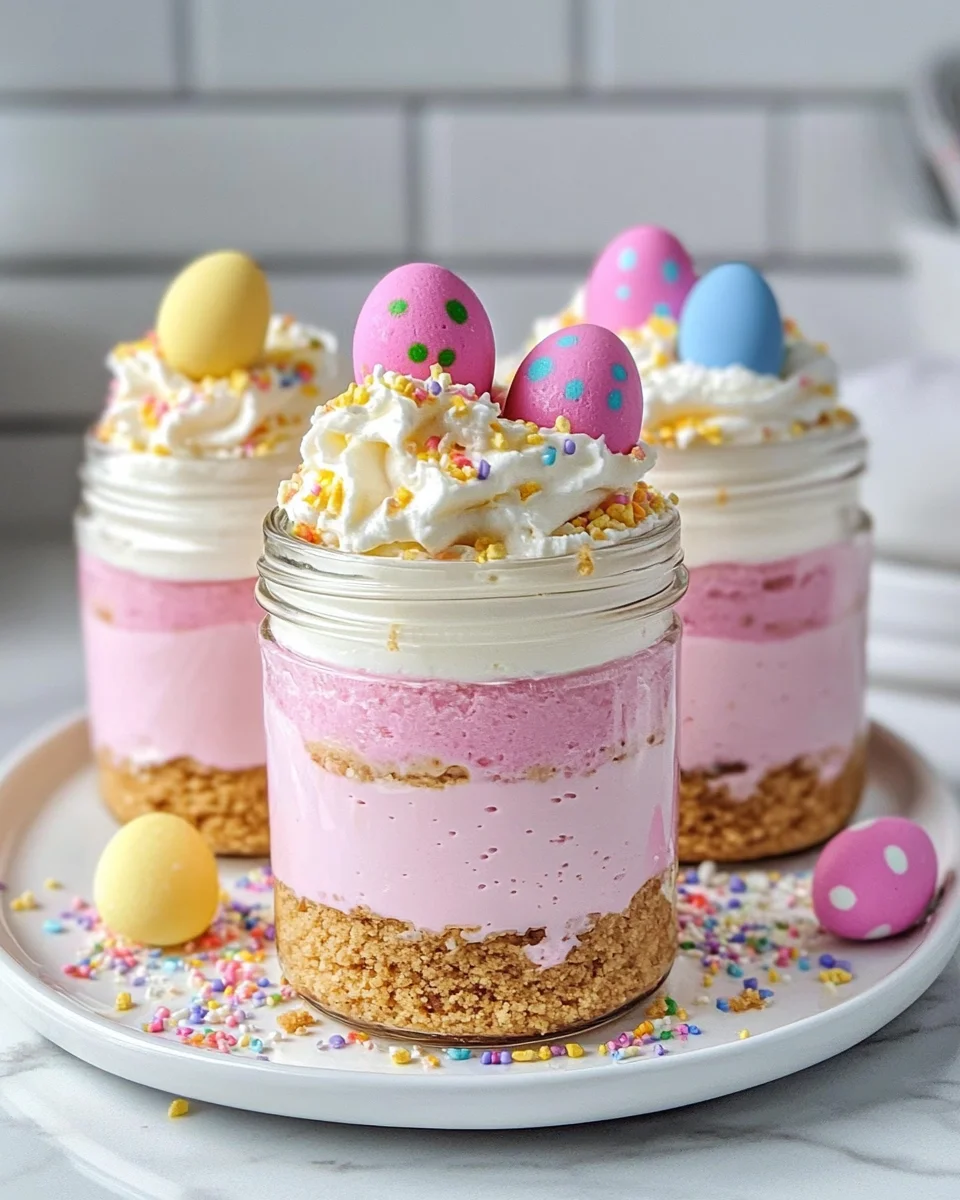
Divide the cheesecake filling into two bowls. If you’re feeling adventurous, tint one bowl with pink gel food coloring or mix in some freeze-dried strawberry powder for a fruity twist. It’s a fun way to add color and flavor!
Now, it’s time to layer! Spoon or pipe the pink cheesecake layer over the crust in each jar. Then, gently spoon or pipe the white cheesecake layer on top. Take your time with this step; a little care goes a long way in making your jars look beautiful.
Add the Toppings
Once your layers are set, it’s time to get creative with the toppings! Start by adding a swirl of whipped cream on top of each jar. This adds a lovely touch of elegance.
Next, place 2–3 pastel candy eggs on each swirl of whipped cream. This creates a mini nest-like effect that’s perfect for Easter. Don’t forget to sprinkle some rainbow or pastel sprinkles on top for that extra pop of color!
Chill and Serve
If you’re preparing these jars ahead of time, store them in the refrigerator uncovered until they’re set. Just remember to add the whipped cream and decorations right before serving. This keeps everything fresh and beautiful!
When you’re ready to serve, display the jars on a white or pastel tray. Scatter some extra candy eggs around the base for a festive touch. Your guests will be delighted by this charming dessert!
Tips for Success
- Use room temperature cream cheese for a smoother filling.
- Whip the cream to stiff peaks for the best texture.
- For cleaner layers, use a piping bag to add the cheesecake filling.
- Chill the jars for at least 2 hours to let the flavors meld.
- Feel free to mix and match toppings for a personalized touch!
Equipment Needed
- Mini jars or dessert cups: Use any small glass or plastic containers you have on hand.
- Mixing bowls: A couple of medium-sized bowls will do the trick.
- Electric mixer: A hand mixer works great, but a whisk can be used if you’re feeling strong!
- Spoon or piping bag: For layering the cheesecake filling with precision.
Variations
- Chocolate Lovers: Swap out some of the cream cheese for chocolate cream cheese for a rich, chocolatey twist.
- Fruit-Infused: Add fresh fruit puree, like raspberry or blueberry, to the cheesecake filling for a fruity flavor.
- Gluten-Free: Use gluten-free graham crackers or crushed nuts for the crust to make it suitable for gluten-sensitive guests.
- Vegan Option: Substitute cream cheese with vegan cream cheese and use coconut whipped cream for a dairy-free version.
- Nutty Crunch: Incorporate crushed nuts, like almonds or pecans, into the crust for added texture and flavor.
Serving Suggestions
- Pair these jars with a light fruit salad for a refreshing contrast.
- Serve alongside a chilled glass of sparkling lemonade or iced tea for a festive touch.
- For presentation, arrange the jars on a colorful platter with fresh flowers.
- Consider adding a small card with the recipe for guests to take home!
FAQs about Easter Egg Cheesecake Jars
Can I make Easter Egg Cheesecake Jars ahead of time?
Absolutely! These jars can be made a day in advance. Just store them in the refrigerator uncovered until they set. Add the whipped cream and decorations right before serving for the best presentation.
What can I use instead of graham cracker crumbs?
If you don’t have graham crackers, you can use crushed cookies like Oreos or vanilla wafers. For a gluten-free option, try crushed gluten-free cookies or nuts!
How long do these jars last in the fridge?
These Easter Egg Cheesecake Jars can last up to 3 days in the fridge. Just make sure they’re covered to keep them fresh!
Can I use low-fat cream cheese?
Yes, you can use low-fat cream cheese if you prefer a lighter version. Just keep in mind that the texture may be slightly different, but they’ll still be delicious!
What’s the best way to serve these jars?
For a beautiful presentation, arrange the jars on a colorful platter. Scatter some extra pastel candy eggs around for a festive touch. Your guests will love the charming display!
Final Thoughts
Creating these Easter Egg Cheesecake Jars is more than just making a dessert; it’s about bringing joy to your table and smiles to your loved ones. The vibrant colors and delightful flavors capture the essence of spring and the spirit of celebration. Each jar is a little work of art, perfect for sharing during family gatherings or festive brunches. Plus, the no-bake aspect means you can spend less time in the kitchen and more time enjoying the company of those you cherish. So, roll up your sleeves and let the fun begin—your Easter celebration awaits!
Print
Easter Egg Cheesecake Jars
- Total Time: 30 minutes plus chilling time
- Yield: 4-6 jars 1x
- Diet: Vegetarian
Description
Spring is in the air, and with it comes the joy of Easter celebrations! If you’re like me, you love to whip up something special for your family and friends. That’s where these delightful Easter Egg Cheesecake Jars come in.
Ingredients
- 1 cup graham cracker crumbs
- 2 tbsp granulated sugar
- 4 tbsp unsalted butter, melted
- 8 oz cream cheese, softened
- ½ cup powdered sugar
- 1 tsp vanilla extract
- 1 cup heavy cream, whipped to stiff peaks
- Pink gel food coloring or freeze-dried strawberry powder (optional)
- Whipped cream (for topping)
- Pastel candy eggs (chocolate-coated or speckled)
- Rainbow or pastel sprinkles
Instructions
- In a bowl, combine graham cracker crumbs, sugar, and melted butter. Stir until the texture resembles wet sand.
- Spoon the crust mixture into the bottom of each mini jar and press it down gently with the back of a spoon to form a base.
- In a large mixing bowl, beat the softened cream cheese until smooth. Add powdered sugar and vanilla extract and beat again until fully combined and fluffy.
- Gently fold the whipped cream into the cream cheese mixture in two batches until fully blended.
- Divide the cheesecake filling into two bowls. Tint one bowl with pink food coloring or mix in freeze-dried strawberry powder for a fruity twist.
- Spoon or pipe the pink layer over the crust, then gently spoon or pipe the white cheesecake layer over the pink layer in each jar.
- Top each jar with a swirl of whipped cream.
- Place 2–3 candy eggs on each swirl of whipped cream to create a mini nest-like effect. Use pastel speckled chocolate eggs for a festive Easter look.
- Sprinkle the tops with rainbow or pastel sprinkles for added texture and cheerful color.
- If preparing ahead of time, store jars in the refrigerator uncovered until set, then add whipped cream and decorations just before serving.
- Display the jars on a white or pastel tray and scatter extra candy eggs around the base for an elegant party-ready dessert board.
Notes
- For a cleaner layered look, use a piping bag or spoon carefully around the edges when adding each layer.
- Make sure to whip the cream to stiff peaks for the best texture.
- These jars can be made a day in advance for convenience.
- Prep Time: 30 minutes
- Cook Time: 0 minutes
- Category: Dessert
- Method: No-bake
- Cuisine: American
Nutrition
- Serving Size: 1 jar
- Calories: 350
- Sugar: 25g
- Sodium: 150mg
- Fat: 25g
- Saturated Fat: 15g
- Unsaturated Fat: 5g
- Trans Fat: 0g
- Carbohydrates: 30g
- Fiber: 1g
- Protein: 4g
- Cholesterol: 80mg


