Introduction to Copycat Subway Italian Herb & Cheese Bread
Hey there, fellow home cooks! If you’re anything like me, you know how hectic life can get. Between juggling work, family, and a million other things, finding time to whip up something delicious can feel impossible. That’s why I’m excited to share this easy recipe for Copycat Subway Italian Herb & Cheese Bread. It’s the perfect solution for a busy day or a dish to impress your loved ones. Soft, cheesy, and bursting with flavor, this homemade version brings the taste of your favorite sandwich shop straight to your kitchen!
Why You’ll Love This Copycat Subway Italian Herb & Cheese Bread
This Copycat Subway Italian Herb & Cheese Bread is not just another recipe; it’s your new favorite companion in the kitchen! It’s fast and easy to make, perfect for those busy weeknights when you’re short on time. The aroma of freshly baked bread filling your home is pure bliss. Plus, the gooey cheese and fragrant herbs elevate any meal. It’s simple, satisfying, and sure to please even the pickiest eaters!
Ingredients for Copycat Subway Italian Herb & Cheese Bread
Gathering the right ingredients is the first step to making this mouthwatering Copycat Subway Italian Herb & Cheese Bread. Here’s what you’ll need:
- All-purpose flour: This is your base. It gives the bread that delightful chewy texture.
- Sugar: Just a touch to help the yeast work its magic and give a slight sweetness.
- Salt: Essential for flavor. It balances the sweetness and enhances the bread’s overall taste.
- Italian seasoning: A medley of herbs that brings the Italian flair to your bread. You can use dried or fresh, but dried works perfectly here.
- Active dry yeast: This little powerhouse makes your bread rise. Make sure it’s fresh for best results!
- Warm water: Not too hot, not too cold—this helps activate the yeast. Aim for about 110°F (45°C) for optimal results.
- Olive oil: Adds moisture and richness. You could substitute it with melted butter if you’re in the mood for a different flavor.
- Shredded mozzarella cheese: It melts beautifully, adding that gooey, cheesy goodness that you’ll love.
- Grated Parmesan cheese: A sprinkle adds a delightful nutty flavor. It’s like a little surprise in every bite!
- Olive oil (for brushing): This gives the crust a beautiful, golden finish while enhancing the flavor.
Feel free to customize your toppings or experiment with different cheeses to suit your family’s taste. For exact measurements of each ingredient, scroll down to the bottom of the article where you’ll find printable instructions. Happy baking!

How to Make Copycat Subway Italian Herb & Cheese Bread
Prepare the Yeast Mixture
Let’s get things bubbling! Start by combining one cup of warm water with a tablespoon of sugar in a small bowl. The warm water should be about 110°F—think cozy bath temperature, not hot! Add in the active dry yeast and give it a gentle stir. Let this sit for about five minutes. You’ll know it’s ready when the mixture turns frothy and slightly puffy, looking like a happy yeast cloud. This frothiness signals that your yeast is alive and eager to help your dough rise. Trust me; this step is crucial for that delightful bread texture we all love!
Mix the Dry Ingredients
Now, grab a large bowl and whisk together 3 ½ cups of all-purpose flour, two teaspoons of salt, and one tablespoon of Italian seasoning. This mix is the foundation of your bread, bringing together flavor and structure. Be sure to break up any lumps in the flour as you whisk, allowing every gorgeous grain to be evenly seasoned. Create a little well in the center of the flour mixture. You’ll soon be adding the wet ingredients there, so think of it as a cozy home for your yeast mixture!
Combine Wet and Dry Ingredients
It’s time to unite the bubbly yeast mixture with the dry ingredients! Pour your frothy yeast mix and two tablespoons of olive oil into that well you created. Use a wooden spoon or spatula to stir until it’s roughly combined. Don’t worry about perfection just yet! Once the dough starts coming together, it’s time to get your hands in there. Knead the dough for about 8 to 10 minutes on a lightly floured surface. Think of it as a mini workout! You want it to become smooth and elastic, like a friendly dough ball that bounces back when you poke it. If it feels too sticky, don’t hesitate to add a little extra flour, just a tablespoon at a time!
Let the Dough Rise
After all that kneading, it’s time to let the dough relax and rise. Form it into a ball and place it in a greased bowl, turning it once to coat it in oil. Cover it with a damp cloth or plastic wrap. Now, let it sit in a warm, draft-free spot for about an hour or until it has doubled in size. This step is what gives your bread that glorious fluffiness. While you wait, the aroma filling your kitchen will make you feel like a true artisan baker!
Shape the Dough
Once your dough has risen, it’s time for the fun part! Punch it down gently to release any trapped air, and turn it out onto a floured surface. Roll it out into a rectangular shape, approximately 12 inches long and 6 inches wide. This rectangle will become your bread canvas! As you roll, make sure to keep it even and not too thick. You’re laying the groundwork for all that cheesy goodness to come.
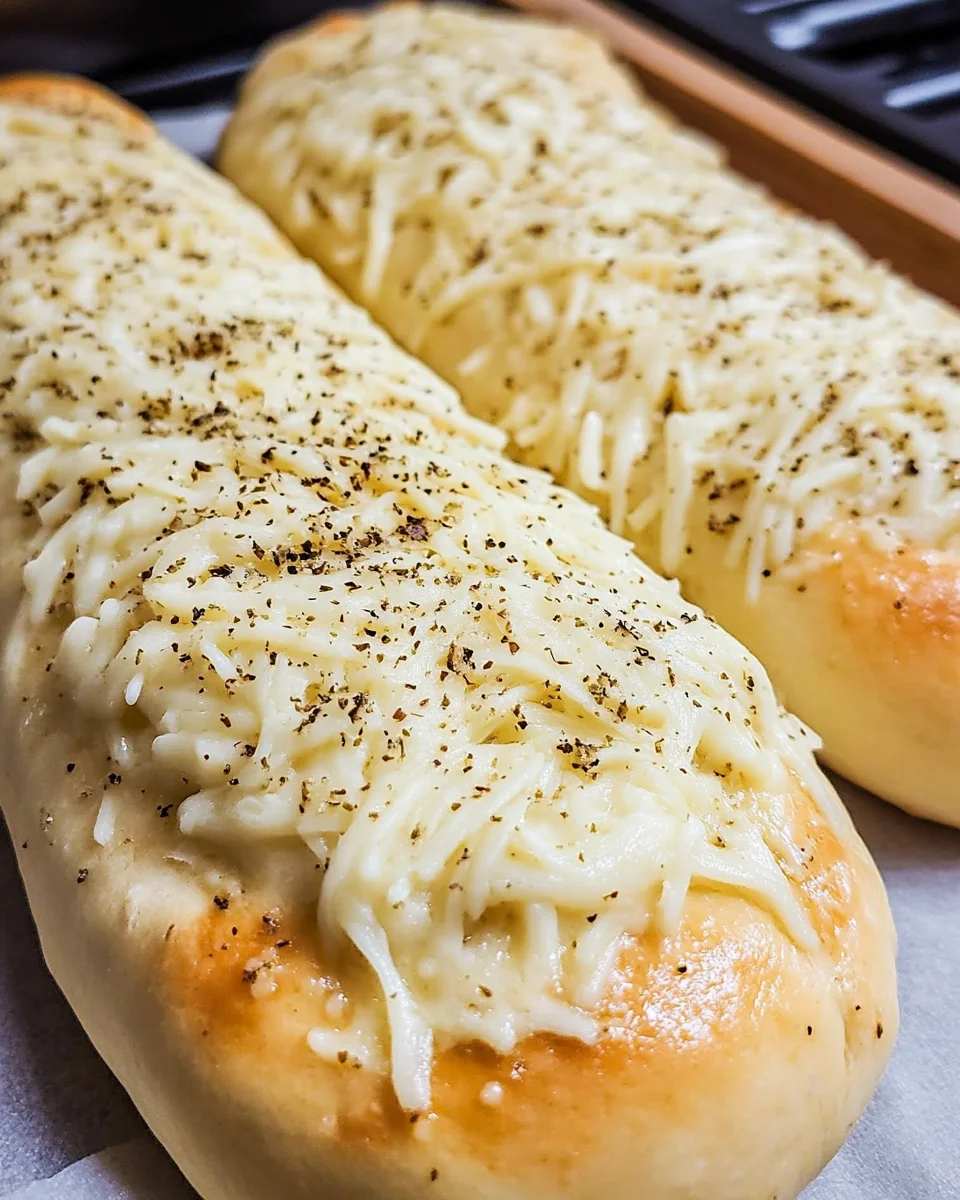
Add the Cheese and Herbs
Now, brush the surface of your rolled-out dough with a bit of olive oil. Sprinkle a generous amount of shredded mozzarella cheese and grated Parmesan evenly over the dough. Then add another sprinkle of Italian seasoning for that extra kick. Lightly press the cheese and herbs into the dough, almost like giving it a warm hug! This will help them stick and create a deliciously cheesy exterior once baked. You’ll want to keep the cheese pieces in check; nobody wants an explosion of cheese goo!
Let the Dough Rise Again
Cover the dough once more and let it rise for another 30 minutes. This second rise is essential—it helps the dough gain even more volume and ultimately leads to a softer bread. During this time, you can preheat your oven to 375°F (190°C) so it’s perfectly hot and waiting for your masterpiece. Don’t skip this step; it’s what makes your bread extra fluffy and inviting!
Bake the Bread
Now the moment of truth has arrived! Slide the risen dough into your preheated oven and bake it for about 25 to 30 minutes. Keep an eye on it! The bread is done when it’s golden brown on top and sounds hollow when you tap it on the bottom. This is the sound of success, my friends—a true baker’s bliss!
Cool and Serve
Once out of the oven, let your delicious creation cool on a wire rack for at least 15 minutes. Trust me; slicing it too soon will lead to a squished, doughy mess! After it has cooled, you can slice into beautiful thick pieces. The melted cheese will still be warm and oozy, and the taste? Oh, it’s that Copycat Subway Italian Herb & Cheese Bread you’ve been dreaming of. Enjoy every bite!
Tips for Success
- Always check your yeast expiration date; fresh yeast is key for rising.
- Use a kitchen thermometer to ensure your water is at the right temperature (110°F).
- When kneading, don’t rush! Enjoy the process to develop the dough’s elasticity.
- Experiment with herbs and cheeses for exciting flavor twists.
- For a crispier crust, place a pan of water in the oven while baking.

Equipment Needed
- Large mixing bowl: Any deep bowl will do; I often use my trusty glass mixing bowls.
- Wooden spoon or spatula: Great for mixing; a sturdy silicone spatula works too!
- Rolling pin: Useful for shaping the dough, but a wine bottle can work in a pinch.
- Oven: Essential for baking, of course! Your regular kitchen oven is perfect.
- Wire rack: Helps with cooling; if you don’t have one, a plate will suffice.
Variations
- Cheesy Garlic Bread: Add minced garlic to the dough for a delightful garlic flavor, and double the mozzarella for extra cheesiness.
- Herb Infusion: Replace the Italian seasoning with fresh herbs like basil, oregano, or rosemary for a garden-fresh taste.
- Gluten-Free Option: Use a gluten-free all-purpose flour blend to make this bread suitable for those with gluten sensitivities.
- Spicy Kick: Incorporate some crushed red pepper flakes or jalapeños into the cheese topping for those who like a little heat.
- Whole Wheat Variation: Substitute half of the all-purpose flour with whole wheat flour for a nuttier flavor and added health benefits.
Serving Suggestions
- Pair with a fresh garden salad drizzled with balsamic vinaigrette for a light meal.
- Serve alongside a hearty bowl of tomato soup for the ultimate comfort food combo.
- Enjoy it with a glass of crisp white wine for a delightful evening treat.
- Slice the bread into smaller pieces for a lovely appetizer spread at gatherings!
FAQs about Copycat Subway Italian Herb & Cheese Bread
Can I use different cheeses for this Copycat Subway Italian Herb & Cheese Bread?
Absolutely! Feel free to mix and match cheeses according to your taste. Cheddar, provolone, or even pepper jack can add a fun twist. Just keep in mind that different cheeses may alter the flavor and texture.
How can I store the leftovers?
To keep your bread fresh, wrap it tightly in plastic wrap or aluminum foil. You can also store it in an airtight container. It’ll stay good for about 3 days at room temperature or up to a week in the fridge!
Can I freeze the Copycat Subway Italian Herb & Cheese Bread?
Yes, you can! Once fully cooled, slice the bread and store it in a freezer-safe bag. It can last up to three months in the freezer. Just thaw it at room temperature or pop it in the microwave for a few seconds to enjoy it warm!
What makes this homemade bread different from the Subway version?
This Copycat Subway Italian Herb & Cheese Bread is made with love and fresh ingredients, giving it a personal touch that store-bought bread can’t match. You can adjust the flavors to fit your preferences, making it uniquely yours!
How can I enhance the flavor of the bread even more?
Try adding a sprinkle of garlic powder or onion powder to the dough for extra depth. You can also brush the top with herbed olive oil before baking. These small adjustments will truly elevate your bread-making experience!
Final Thoughts
Making this Copycat Subway Italian Herb & Cheese Bread brings me such joy, and I hope it does the same for you! There’s something magical about pulling a fresh loaf from the oven. The comfort of that soft, cheesy bread fills your home with warmth and happiness. It’s not just about eating; it’s about sharing and creating memories with family and friends. Whether it’s a busy weeknight dinner or a special occasion, this bread elevates any meal. Get ready to transform your kitchen into a beloved gathering spot with delightful aromas and satisfying flavors. Happy baking!
Print
Copycat Subway Italian Herb & Cheese Bread
- Total Time: 1 hour 50 minutes
- Yield: 1 loaf 1x
- Diet: Vegetarian
Description
Hey there, fellow home cooks! If you’re anything like me, you know how hectic life can get. Between juggling work, family, and a million other things, finding time to whip up something delicious can feel impossible. That’s why I’m excited to share this easy recipe for Copycat Subway Italian Herb & Cheese Bread. It’s the perfect solution for a busy day or a dish to impress your loved ones. Soft, cheesy, and bursting with flavor, this homemade version brings the taste of your favorite sandwich shop straight to your kitchen!
Ingredients
- 3 1/2 cups all-purpose flour
- 1 tablespoon sugar
- 2 teaspoons salt
- 1 tablespoon Italian seasoning
- 2 1/4 teaspoons active dry yeast (1 packet)
- 1 cup warm water (about 110°F/45°C)
- 2 tablespoons olive oil
- 1 cup shredded mozzarella cheese
- 1 tablespoon grated Parmesan cheese
- 1 teaspoon Italian seasoning
- 1 tablespoon olive oil (for brushing)
Instructions
- Prepare the Yeast Mixture: Combine warm water, sugar, and active dry yeast in a small bowl. Stir gently and let sit for about 5 minutes until frothy.
- Mix the Dry Ingredients: In a large bowl, whisk together the flour, salt, and Italian seasoning. Make a well in the center.
- Combine Wet and Dry Ingredients: Add the yeast mixture and olive oil to the well in the dry ingredients. Stir to combine, then knead for 8-10 minutes until smooth and elastic.
- Let the Dough Rise: Place dough in an oiled bowl, cover with a damp cloth or plastic wrap, and let rise for about 1 hour, or until doubled in size.
- Shape the Dough: Punch down the dough and turn it out onto a floured surface. Roll it into a rectangle, 12 inches long and 6 inches wide.
- Add the Cheese and Herbs: Brush the dough with olive oil. Sprinkle mozzarella, Parmesan, and Italian seasoning over the dough. Press lightly to help the cheese stick.
- Let the Dough Rise Again: Cover the dough and let rise for another 30 minutes.
- Bake the Bread: Preheat the oven to 375°F (190°C). Bake for 25-30 minutes, until golden brown on top and hollow when tapped.
- Cool and Serve: Let the bread cool for at least 15 minutes on a wire rack before slicing.
Notes
- Ensure the water temperature is around 110°F for optimal yeast activation.
- Feel free to adjust the toppings according to your preference.
- Prep Time: 20 minutes
- Cook Time: 30 minutes
- Category: Bread
- Method: Baking
- Cuisine: Italian
Nutrition
- Serving Size: 1 slice
- Calories: 150
- Sugar: 1g
- Sodium: 250mg
- Fat: 5g
- Saturated Fat: 2g
- Unsaturated Fat: 2g
- Trans Fat: 0g
- Carbohydrates: 22g
- Fiber: 1g
- Protein: 6g
- Cholesterol: 5mg