
Introduction
There’s something deeply satisfying about baking your own bread from scratch. The smell that fills the kitchen, the golden crust fresh out of the oven, and that first warm slice with a little butter — it’s more than just food. It’s a moment. This sourdough recipe is one of those special ones that you’ll want to make again and again. What makes it stand out is the gentle sweetness from honey and the soft texture from olive oil, creating a loaf that’s hearty yet delicate, rustic yet refined. It’s ideal for women who enjoy baking with purpose — whether that’s to nourish loved ones, experiment in the kitchen, or simply enjoy a peaceful morning with a homemade slice of bread.

Ingredients
This dough comes together with just a few everyday ingredients, but each one plays an important role:
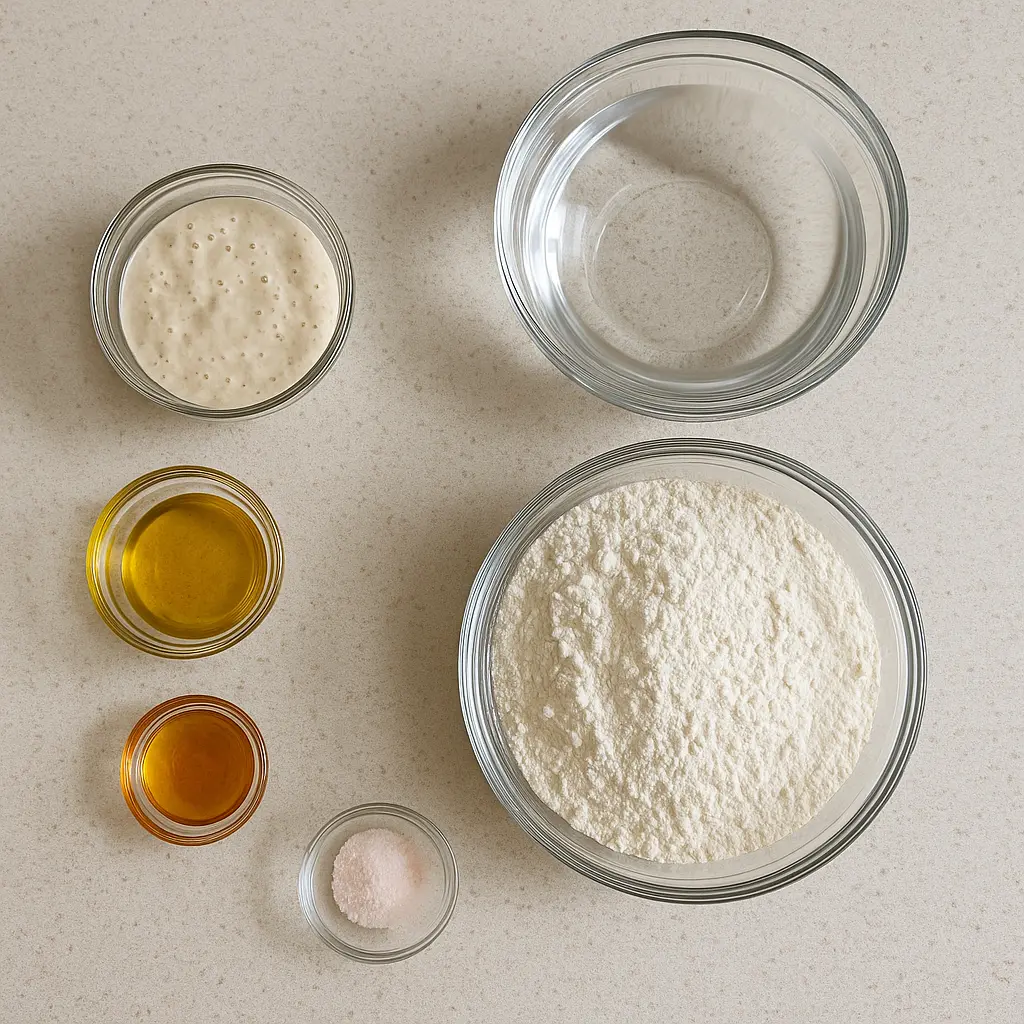
- 150g active sourdough starter – Make sure it’s bubbly and recently fed (within 4–6 hours) to give your bread a good rise and that signature tang.
- 345g water – Room temperature works best; filtered water is even better if your tap water is heavily chlorinated.
- 15g olive oil – Adds tenderness to the crumb and a subtle richness that elevates the flavor.
- 15g honey – Brings a touch of sweetness that balances the sourdough’s natural tang and helps deepen the crust’s color during baking.
- 600g bread flour – High-protein flour like King Arthur Bread Flour gives the dough strength and structure.
- 15g Himalayan pink sea salt – Adds flavor and helps regulate the fermentation process.
Note: If you don’t have a kitchen scale, this is a great moment to invest in one — it makes a world of difference in sourdough baking.
Step-by-Step Instructions
1. Mix the Dough
In a large mixing bowl, whisk together the sourdough starter, water, olive oil, and honey until well blended. Slowly add in the bread flour and salt. Use your hands or a sturdy spoon to mix until all flour is incorporated. The dough will be sticky and shaggy, but that’s expected.
2. Rest (Autolyse)
Cover the bowl with a damp towel or plastic wrap and let it sit for 30 minutes. This resting period, known as autolyse, allows the flour to fully absorb the water, which makes kneading easier and improves the dough’s elasticity.
3. Stretch and Folds
Over the next two hours, complete four sets of stretch and folds. Every 30 minutes, gently stretch one side of the dough upward and fold it over to the opposite side. Turn the bowl and repeat this process on all four sides. You’ll notice the dough becoming smoother and stronger with each round.
4. Bulk Fermentation
Let the dough ferment at room temperature until it rises by about 75%. This may take 4 to 6 hours, depending on how warm your kitchen is. The dough should look puffed and feel airy when you press a finger into it.
5. Shape and Cold Proof
Once fermentation is complete, gently turn the dough onto a lightly floured surface. Shape it into a tight round loaf using gentle movements to preserve air bubbles. Place it into a floured banneton or a bowl lined with a well-floured towel. Cover and refrigerate for 10–12 hours — this long, cold proof helps develop flavor and gives the dough structure.
6. Cold Bake
Preheat nothing — this recipe uses a cold start. Place the cold dough directly into a cold Dutch oven, score the top with a sharp blade or bread lame, then cover with the lid and place in the cold oven. Set the oven to 450°F and bake for 60 minutes. This slow, even rise creates an incredibly airy and beautifully blistered crust.
7. Check Doneness
Remove the Dutch oven and let the bread cool on a wire rack. The internal temperature should be 205°F to 210°F for a fully baked loaf. Resist the temptation to slice right away — resting helps the crumb set properly.
Tips & Tricks
- Use a scale – It’s the secret to consistent sourdough.
- Cold bake technique – Starting in a cold oven with a cold Dutch oven might sound strange, but it works wonders. It helps prevent over-proofing and gives you that perfect oven spring.
- Olive oil and honey – This duo not only adds flavor but also makes the crumb softer and more moist.
- Flour your surface and hands – The dough is sticky. Light flouring will help with shaping.
- Practice patience – Sourdough is a slow art, but the reward is worth every step.
Why You’ll Love This Bread
This isn’t just a loaf—it’s a labor of love. The crust comes out golden and slightly crackly. The crumb is open and chewy with just enough softness to feel luxurious. It has a balanced, mild tang with a gentle sweetness that doesn’t overpower. It’s versatile enough for sweet or savory pairings and makes your home feel like a bakery. Most importantly, it brings a sense of calm and accomplishment, especially for women who enjoy slowing down and creating something from scratch.
Storage Suggestions
Once completely cooled, store the loaf in a cotton bread bag or wrap it in a clean kitchen towel. Avoid plastic wrap as it softens the crust. You can also slice the entire loaf and freeze individual pieces — simply toast from frozen for fresh-baked flavor anytime. This bread stays fresh at room temperature for up to 3 days.
Serving Ideas
- Serve it warm with salted butter and a drizzle of honey for breakfast.
- Toast and top with soft cheese, smoked salmon, or sliced avocado for a hearty lunch.
- Slice and dip into olive oil with herbs for a dinner party starter.
- Use leftovers for French toast or bread pudding the next day.
What Makes This Recipe Special
Many sourdough recipes stick to the basics — and that’s fine — but this one stands out because of how approachable and flexible it is. You don’t need fancy equipment or years of practice. The olive oil and honey provide a touch of warmth and sweetness that makes the bread feel more homey and accessible. And the cold bake method takes away the pressure of preheating and timing, making this ideal for busy home bakers.
Baking with Confidence
If you’ve ever felt unsure about trying sourdough, this recipe is your invitation. It’s forgiving, beginner-friendly, and the results are stunning. You’ll learn by doing, and you’ll build confidence along the way. This is the kind of bread that reminds you how rewarding baking can be — and how nourishing it is to create something real, by hand, for yourself or your family.
Little Changes, Big Impact
Don’t be afraid to personalize the recipe! A few simple tweaks can change the flavor profile completely.
- Swap 100g of the flour for rye or whole wheat flour for a deeper, earthier flavor.
- Mix in dried herbs like rosemary or thyme for an aromatic touch.
- Add orange zest or chopped nuts for a seasonal variation.
- Top with oats or seeds for added texture and a beautiful finish.
Frequently Asked Questions (FAQ)
H3: Can I use all-purpose flour instead of bread flour?
Yes, though bread flour yields a chewier crumb with better structure. All-purpose flour will work but might result in a slightly softer loaf.
H3: What if I don’t have pink salt?
Fine sea salt is a perfect substitute. Just measure by weight (15g) to maintain balance.
H3: Why bake from a cold oven?
This method gives the dough a gentler heat-up phase, allowing better oven spring and crust formation. It’s also less stressful because there’s no rush to preheat.
H3: Can I skip the overnight proof?
It’s possible, but the flavor and texture won’t be as complex. If you’re short on time, allow the shaped loaf to proof at room temp until puffy, then bake.
H3: How do I know if my starter is active enough?
Your starter should double in size within 4–6 hours after feeding and be full of bubbles. If it passes the “float test” (a spoonful floats in water), it’s ready to bake with.
Conclusion
Baking bread is more than just following a recipe—it’s an experience, a ritual, and a gift you give to yourself and others. This sourdough with olive oil and honey captures all of that. It’s simple enough to try on a weekend, yet special enough to become your new go-to loaf. Whether you’re enjoying it with a hot cup of coffee or serving it at the dinner table, this bread brings warmth and joy to your kitchen. Give it a try — and don’t be surprised if it becomes a family favorite.
Print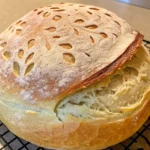
Classic Artisan Sourdough with Olive Oil and Honey
- Total Time: ~18 hours
- Yield: 1 large round loaf (8–10 slices)
- Diet: Vegetarian
Description
There’s something deeply satisfying about baking your own bread from scratch. The smell that fills the kitchen, the golden crust fresh out of the oven, and that first warm slice with a little butter — it’s more than just food. It’s a moment. This sourdough recipe is one of those special ones that you’ll want to make again and again. What makes it stand out is the gentle sweetness from honey and the soft texture from olive oil, creating a loaf that’s hearty yet delicate, rustic yet refined. It’s ideal for women who enjoy baking with purpose — whether that’s to nourish loved ones, experiment in the kitchen, or simply enjoy a peaceful morning with a homemade slice of bread.
Ingredients
This dough comes together with just a few everyday ingredients, but each one plays an important role:
-
345g water – Room temperature works best; filtered water is even better if your tap water is heavily chlorinated.
-
15g olive oil – Adds tenderness to the crumb and a subtle richness that elevates the flavor.
-
15g honey – Brings a touch of sweetness that balances the sourdough’s natural tang and helps deepen the crust’s color during baking.
-
600g bread flour – High-protein flour like King Arthur Bread Flour gives the dough strength and structure.
-
15g Himalayan pink sea salt – Adds flavor and helps regulate the fermentation process.
150g active sourdough starter – Make sure it’s bubbly and recently fed (within 4–6 hours) to give your bread a good rise and that signature tang.
Note: If you don’t have a kitchen scale, this is a great moment to invest in one — it makes a world of difference in sourdough baking.
Instructions
In a large mixing bowl, whisk together the sourdough starter, water, olive oil, and honey until well blended. Slowly add in the bread flour and salt. Use your hands or a sturdy spoon to mix until all flour is incorporated. The dough will be sticky and shaggy, but that’s expected.
Cover the bowl with a damp towel or plastic wrap and let it sit for 30 minutes. This resting period, known as autolyse, allows the flour to fully absorb the water, which makes kneading easier and improves the dough’s elasticity.
Over the next two hours, complete four sets of stretch and folds. Every 30 minutes, gently stretch one side of the dough upward and fold it over to the opposite side. Turn the bowl and repeat this process on all four sides. You’ll notice the dough becoming smoother and stronger with each round.
Let the dough ferment at room temperature until it rises by about 75%. This may take 4 to 6 hours, depending on how warm your kitchen is. The dough should look puffed and feel airy when you press a finger into it.
Once fermentation is complete, gently turn the dough onto a lightly floured surface. Shape it into a tight round loaf using gentle movements to preserve air bubbles. Place it into a floured banneton or a bowl lined with a well-floured towel. Cover and refrigerate for 10–12 hours — this long, cold proof helps develop flavor and gives the dough structure.
Preheat nothing — this recipe uses a cold start. Place the cold dough directly into a cold Dutch oven, score the top with a sharp blade or bread lame, then cover with the lid and place in the cold oven. Set the oven to 450°F and bake for 60 minutes. This slow, even rise creates an incredibly airy and beautifully blistered crust.
Remove the Dutch oven and let the bread cool on a wire rack. The internal temperature should be 205°F to 210°F for a fully baked loaf. Resist the temptation to slice right away — resting helps the crumb set properly.
Notes
A rustic artisan sourdough loaf enhanced with olive oil and honey. Baked using a cold oven and cold Dutch oven method for a beautifully risen crust and tender crumb. Perfect for beginners and experienced bakers alike.
- Prep Time: 30 minutes
- Folding & Bulk Fermentation Time:: 5–6 hours
- Cook Time: 60 minutes
- Category: Bread
- Method: Cold Oven Sourdough Baking
- Cuisine: American-European rustic
Nutrition
- Serving Size: 1 slice (approx. 90g)
- Calories: ~200 kcal
- Sugar: 1.2g
- Sodium: 350mg
- Fat: 3.2g
- Saturated Fat: 0.5g
- Unsaturated Fat: 2.6g
- Trans Fat: 0g
- Carbohydrates: 38g
- Fiber: 1.5g
- Protein: 5g
- Cholesterol: 0mg


This is my family’s favorite. It’s the only recipe that I’ve had great results and the taste is awesome!!
I made this recipe both with 500g flour and 600g flour.
Both turned out beautifully. Actually the 500g of flour was a lot lighter. But both tasted beautiful. So much easier to get a good loaf every time. Thankyou.