

Introduction to Rice Krispy Treat No-Bake Cheesecake
If you’re like me and love effortless desserts, you’re in for a treat! This Rice Krispy Treat No-Bake Cheesecake is the perfect solution for busy moms and professionals who crave something sweet without losing precious time in the kitchen.
Not only is it easy to whip up without any baking, but it also brings a wave of nostalgia with its crispy, crunchy crust made from everyone’s favorite cereal.
Just imagine a delightful cheesecake that’s as simple as it is delicious—great for gatherings, family dinners, or just a cozy night in!
Why You’ll Love This Rice Krispy Treat No-Bake Cheesecake
One of the best things about this Rice Krispy Treat No-Bake Cheesecake is how easy it is to prepare. With just a few simple steps, you’ll create a creamy dream that melts in your mouth—no oven required!
The crispy Rice Krispies bring back childhood memories, making every bite a sweet reminder of days gone by. It’s like a hug from the inside out, perfect for sharing with family and friends!
Ingredients for Rice Krispy Treat No-Bake Cheesecake
Let’s get down to the fun part! Here’s what you’ll need to create this delightful Rice Krispy Treat No-Bake Cheesecake. Each ingredient plays its own special role in making this dessert a hit!
- Rice Krispies cereal: The star of our crust! They provide that delightful crunch that perfectly complements the creamy filling.
- Salted butter: This helps bind the cereal together and adds a hint of richness to the crust.
- Miniature marshmallows: They melt beautifully, adding sweetness and that classic Rice Krispy Treat flavor.
- Cream cheese: Essential for the cheesecake filling, giving it that smooth and luscious texture we all love.
- Granulated sugar: This sweetens the cream cheese, ensuring each bite delivers just the right amount of sweetness.
- Pure vanilla extract: A splash of this fragrant extract elevates the flavor profile, making it truly divine!
- Marshmallow crème: Think of it as the icing on the cake! It adds an extra layer of sweetness and creaminess.
- Cool Whip: This light, airy topping makes our filling decadent but easy to whip together.
- Whipped cream: For garnish, it provides a festive touch that’s hard to resist!
- Cubed Rice Krispy Treats: Optional, but oh-so-fun! These little squares can be sprinkled on top for extra crunch and nostalgia.
If you’re looking for substitutions, consider using gluten-free Rice Krispies for a gluten-friendly version. You can also lighten things up by opting for reduced-fat cream cheese or sugar alternatives.
Don’t worry about measuring right now; exact quantities are available for printing at the bottom of the article!
How to Make Rice Krispy Treat No-Bake Cheesecake
Ready to dive into the fun part? Making this Rice Krispy Treat No-Bake Cheesecake is simpler than keeping track of a busy schedule! Just follow these straightforward steps, and you’ll have a delightful dessert that everyone will love.
Step 1: Prepare the Springform Pan
Start by greasing your springform pan with some nonstick spray. This will ensure that your cheesecake slides out smoothly! It’s an essential step to avoid any messy surprises later on.
Step 2: Make the Rice Krispy Crust
Next, grab a medium saucepan and melt the salted butter along with the miniature marshmallows over low heat. Keep stirring until it’s all melted and smooth. Then, pour this gooey goodness over the Rice Krispies cereal in a large bowl. The mix should coat the cereal well, creating that irresistible crunch.
Step 3: Press the Mixture into the Pan
Once your Rice Krispy mixture is ready, it’s time to press it into the prepared pan. Using a greased glass or spatula, compact the cereal down firmly, spreading it evenly across the bottom and slightly up the sides. This crust will be the sturdy base of your delightful no-bake cheesecake!
Step 4: Create the Cheesecake Filling
Now for the creamy part! In a stand mixer, beat the softened cream cheese, granulated sugar, and pure vanilla extract for about a minute until it’s smooth. Then, add the marshmallow crème and give it another mix. The final touch? Gently fold in the thawed Cool Whip. This will keep your filling light and airy.
Step 5: Assemble the Cheesecake
Pour your luscious cheesecake filling over the set Rice Krispy crust. Use an offset spatula or the back of a spoon to smooth out the top. This is the moment your no-bake cheesecake really begins to shine!
Step 6: Chill the Cheesecake
Pop your cheesecake in the refrigerator for at least two hours. This chilling time is crucial! It helps the filling firm up, allowing for perfect slices when you’re ready to serve.
Step 7: Garnish and Serve
When it’s finally time to enjoy your masterpiece, pipe or dollop some whipped cream around the edge. For that playful touch, sprinkle cubed Rice Krispy Treats on top. Carefully release the springform collar and slice with a warm knife for clean cuts that will impress your family and friends!
Tips for Success
- Let the butter and marshmallows cool slightly before mixing them with the Rice Krispies to avoid a sticky mess.
- Use a nonstick spatula or greased glass to press the crust down evenly for a sturdy base.
- Be gentle when folding in the Cool Whip to maintain that light, airy texture in your filling.
- Refrigerate for longer if your cheesecake still feels soft; patience is key!
- Keep a warm knife handy to get clean, smooth slices when serving.
Equipment Needed for Rice Krispy Treat No-Bake Cheesecake
- Springform pan: This is essential for easily removing the cheesecake once it’s set. If you don’t have one, a regular pie dish works in a pinch.
- Mixing bowls: A couple of different sizes will help keep things organized while mixing.
- Medium saucepan: For melting the butter and marshmallows together smoothly.
- Spatula: A sturdy spatula will help in both mixing and smoothing the filling.
- Offset spatula or large spoon: For spreading the cheesecake filling evenly on top.
Variations of Rice Krispy Treat No-Bake Cheesecake
One of the best things about this Rice Krispy Treat No-Bake Cheesecake is how easily you can customize it! Here are a few fun variations to inspire your creativity:
- Chocolate Lovers: Stir in ½ cup of mini chocolate chips into the cheesecake filling for a rich twist, or drizzle melted chocolate over the top before serving.
- Nutty Delight: Add ½ cup of crushed nuts, like pecans or almonds, to the crust for an added crunch. You can also sprinkle some on top for extra flair!
- Fruity Freshness: Incorporate fresh fruit like strawberries or raspberries into the filling, or top your cheesecake with a generous helping of seasonal berries for a refreshing taste.
- Gluten-Free Option: Use gluten-free Rice Krispies to whip up a delightful dessert everyone can enjoy, without sacrificing taste.
- Marshmallow Madness: Fold in extra marshmallow crème directly into the filling for an ultra-sweet, fluffy consistency that will truly elevate every bite!
Feel free to mix and match these ideas to make your Rice Krispy Treat No-Bake Cheesecake uniquely yours! The possibilities are endless!
Serving Suggestions for Rice Krispy Treat No-Bake Cheesecake
When it comes to presentation and pairing, this Rice Krispy Treat No-Bake Cheesecake shines even brighter! Here are some delightful suggestions to enhance your dessert experience:
- Fresh Berries: Serve with a side of strawberries, blueberries, or raspberries for a refreshing contrast.
- Chocolate Drizzle: A drizzle of chocolate or caramel sauce can add a beautiful touch to each slice.
- Coffee or Tea: Pair with a warm cup of coffee or herbal tea to complement the sweetness.
- Colorful Sprinkles: For a festive look, scatter colorful sprinkles on top just before serving.
- Ice Cream Scoop: A scoop of vanilla or chocolate ice cream on the side takes indulgence to a new level!
These accompanying treats will not only elevate your cheesecake but also create an inviting atmosphere for everyone to enjoy!
FAQs about Rice Krispy Treat No-Bake Cheesecake
Can I make this Rice Krispy Treat No-Bake Cheesecake ahead of time?
Absolutely! This dessert is perfect for making in advance. You can prepare it a day or two ahead and store it in the fridge, allowing the flavors to meld beautifully. Just keep it covered to maintain its freshness.
How should I store leftovers?
Store any leftover cheesecake in an airtight container in the refrigerator. It stays delicious for about 3 to 4 days. However, the crust may soften a bit over time, but it will still taste amazing!
Can I freeze the cheesecake?
Yes, you can freeze this Rice Krispy Treat No-Bake Cheesecake! Wrap it tightly in plastic wrap, then place it in a freezer-safe container. It freezes well for up to a month. Just thaw overnight in the fridge before serving!
What’s the best way to serve this cheesecake?
Serve the cheesecake chilled, straight from the fridge. A warm knife will help you slice through smoothly, making for beautiful presentation. Don’t forget to add that whipped cream and cubed Rice Krispy Treats for a fun finishing touch!
Can I customize the flavor of the cheesecake?
Definitely! Feel free to play around with flavors by adding ingredients like chocolate chips or crushed fruit. You can even swap out the vanilla extract for almond extract for a unique twist in flavor. The choices are endless!
Final Thoughts
This Rice Krispy Treat No-Bake Cheesecake isn’t just a dessert; it’s a wonderful way to create memories with loved ones!
Sharing it at family gatherings or special occasions turns every bite into a moment of joy, laughter, and shared delight.
I cherish the smiles and happy sighs from my family when I serve this sweet treat, knowing it’s both simple to whip up and a total crowd-pleaser.
So, whether it’s a birthday celebration or a cozy evening at home, this cheesecake brings everyone together, making those sweet, memorable moments even sweeter!
Print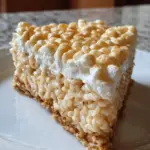
Rice Krispy Treat No-Bake Cheesecake
- Total Time: 2 hours 30 minutes
- Yield: 8-10 servings 1x
- Diet: Vegetarian
Description
A delicious no-bake cheesecake featuring a crispy Rice Krispy crust, creamy filling, and optional fun garnishes.
Ingredients
- 6 cups Rice Krispies cereal
- ¼ cup salted butter
- 1 (10 oz) bag miniature marshmallows
- 1 (8 oz) block cream cheese, softened
- ½ cup granulated sugar
- 1 tsp pure vanilla extract
- 1 (7 oz) jar marshmallow crème (e.g., Fluff)
- 1 (8 oz) tub Cool Whip, thawed
- Whipped cream (for garnish)
- Cubed Rice Krispy Treats (for garnish)
Instructions
- Generously grease a 9- or 10-inch springform pan with nonstick spray. Set aside.
- In a large bowl, add the Rice Krispies cereal. In a medium saucepan over low heat, melt the butter and marshmallows together, stirring constantly until smooth and fully combined. Immediately pour this mixture over the cereal and stir until evenly coated.
- Transfer the sticky cereal mixture into the prepared springform pan. Using a greased glass or spatula, firmly press it into the bottom and slightly up the sides to create a sturdy crust. Let it set at room temperature.
- In a stand mixer or large bowl, beat the softened cream cheese, sugar, and vanilla until smooth and creamy (about 1 minute). Add the marshmallow crème and mix until fully incorporated. Gently fold in the Cool Whip by hand using a spatula.
- Pour the filling into the set crust and smooth the top with an offset spatula or the back of a spoon.
- Refrigerate for at least 2 hours, or until the filling is firm and holds its shape when sliced.
- Before serving, pipe or dollop whipped cream around the edge and top with cubed Rice Krispy Treats for a playful finish. Carefully release the springform collar and slice with a warm knife for clean cuts.
Notes
- Let the cheesecake set in the refrigerator to ensure perfect slicing.
- For the best texture, fold in the Cool Whip gently.
- Customize toppings as desired, such as sprinkles or chocolate chips.
- Prep Time: 30 minutes
- Cook Time: 0 minutes
- Category: Dessert
- Method: No-Bake
- Cuisine: American
Nutrition
- Serving Size: 1 slice
- Calories: 320
- Sugar: 18g
- Sodium: 200mg
- Fat: 15g
- Saturated Fat: 9g
- Unsaturated Fat: 0g
- Trans Fat: 0g
- Carbohydrates: 39g
- Fiber: 1g
- Protein: 3g
- Cholesterol: 30mg


