

Introduction to No-Bake Peanut Butter Lasagna
Hey there, fellow dessert lovers! If you’re anything like me, you know that life can get pretty hectic. That’s why I’m excited to share this No-Bake Peanut Butter Lasagna with you. It’s an absolute game-changer, a delightful treat that comes together effortlessly without turning on the oven. This recipe is not just simple; it’s also a luscious indulgence that will impress your loved ones. Whether you’re hosting a gathering or just craving something sweet, this decadent dessert is your go-to solution for a busy day, combining flavors that’ll make your heart sing!
Why You’ll Love This No-Bake Peanut Butter Lasagna
This No-Bake Peanut Butter Lasagna is the dream dessert for busy moms and professionals alike. It’s ridiculously easy to whip up, taking just 30 minutes of your time. You won’t even need to turn on your oven! Plus, the rich, creamy layers of peanut butter and chocolate create a mouthwatering flavor explosion that will satisfy any sweet tooth. It’s a guaranteed crowd-pleaser, perfect for sharing or enjoying all by yourself!
Ingredients for No-Bake Peanut Butter Lasagna
Gathering the right ingredients is half the fun of making this No-Bake Peanut Butter Lasagna! Each component brings something special to the table. Here’s what you’ll need:
- Crushed graham crackers (or Nutter Butters): These create the crust. Graham crackers offer a classic taste, while Nutter Butters add a delightful peanut flavor.
- Chopped salted peanuts: A crunchy addition that enhances the nutty flavor. They add texture and a bit of saltiness to balance the sweet layers.
- Unsalted butter: This binds the crust together, giving it that buttery goodness. If you’re watching your sodium, using unsalted butter is the way to go.
- Semi-sweet chocolate chips: For the chocolate ganache layer, these chips melt beautifully, giving that deep chocolate flavor everyone loves.
- Heavy cream: Vital for making the ganache smooth and rich. It adds that luxurious mouthfeel that complements the chocolate perfectly.
- Creamy peanut butter: The star of the dessert! Choose a good-quality brand for the best flavor.
- Softened cream cheese: This gives the peanut butter cheesecake layer its creamy texture. Make sure it’s at room temperature for easy mixing.
- Powdered sugar: Sweetness without the gritty texture of granulated sugar. It helps to create a silky filling.
- Vanilla extract: A splash of vanilla elevates the flavors significantly, providing a warming aroma that blends beautifully with the peanut butter.
- Whipped topping: This is key for both the cheesecake layer and the final whipped topping. You can use store-bought or make homemade if you have time!
- Instant chocolate pudding mix: Creates the chocolate mousse layer. It thickens quickly and adds a delicious chocolatey taste.
- Cold milk: For mixing with the pudding to achieve the desired mousse consistency. Whole milk will give a richer flavor, but any milk will do.
- Melted peanut butter: This garnishes the top and adds a beautiful finish that you won’t want to skip!
- Mini chocolate chips & chopped roasted peanuts: These are for sprinkling on top, adding extra crunch and sweetness. You can even throw in some crushed pretzels or peanut butter chips for variety!
For exact quantities, check the end of the article where you can also find a printable version. Get ready to indulge in this heavenly dessert!
How to Make No-Bake Peanut Butter Lasagna
Making this No-Bake Peanut Butter Lasagna is as easy as pie—well, even easier since you won’t be baking! Follow these simple steps to create a dessert that will make you the star of any gathering.
Step 1: Make the Crust
Start by mixing your crushed graham crackers (or Nutter Butters, if you’re feeling adventurous) with chopped salted peanuts and melted butter. It should look crumbly yet sticky! This mixture needs to be pressed firmly into the bottom of your baking dish. I like to use the bottom of a glass to get a solid base. It’s like building a sturdy foundation for a delicious dessert skyscraper!
Step 2: Make the Chocolate Ganache
Now for the chocolate! In a small saucepan, heat the heavy cream until it begins to simmer. Pour this hot cream over your semi-sweet chocolate chips in a heatproof bowl and let it sit for 2-3 minutes. Stir gently until smooth and glossy. This ganache is pure chocolate bliss! Pour it evenly over the crust and pop it in the fridge for about 15-20 minutes. This will give it just the right amount of time to set slightly before the next layer.
Step 3: Prepare the Peanut Butter Cheesecake Layer
Grab a large bowl to mix your creamy peanut butter, softened cream cheese, powdered sugar, and vanilla extract. Beat them together until smooth and creamy—heavenly, right? Now, gently fold in the whipped topping to keep the mixture light and fluffy. Spread this delicious layer over the chilled chocolate ganache. Smooth it out with a spatula for that picture-perfect look!
Step 4: Make the Chocolate Mousse Layer
In another bowl, whisk together the instant chocolate pudding mix with cold milk until it thickens up in about 2 minutes. It’s like magic! Once it’s nice and thick, fold in more whipped topping to create that mousse-like texture. Carefully spoon this chocolatey goodness over the peanut butter cheesecake layer, creating a beautiful contrast.
Step 5: Add the Whipped Topping Layer
It’s time to add the final touch! Spread the remaining whipped topping evenly over the top of the dessert. Smooth the surface with your spatula, and don’t be shy about making it look as lovely as can be. Your dessert deserves it!
Step 6: Decorate with Toppings
Now comes the fun part—decorating! Drizzle melted peanut butter across the top for that extra oomph. Sprinkle mini chocolate chips and chopped roasted peanuts for added texture and flavor. If you’re feeling bold, toss on some crushed pretzels for a sweet and salty vibe. Once decorated, let your masterpiece chill in the refrigerator for at least 4 hours (or better yet, overnight) for the best texture and flavor. The wait will be so worth it!
Tips for Success
- Chill the layers: Allow each layer to set in the fridge before adding the next for clean edges.
- Make it ahead: Prepare a day in advance for best flavor and texture, letting the ingredients meld together.
- Storage: Keep leftovers covered in the fridge, though they’ll disappear quickly.
- Experiment: Swap out toppings or layer flavors based on what you have—get creative!
- Smaller portions: This dessert is rich, so serving smaller slices is ideal.
Equipment Needed
- 9×13-inch baking dish: A glass or metal one works perfectly.
- Mixing bowls: Use a large bowl for mixing and a medium bowl for the chocolate mousse.
- Spatula: A rubber or silicone spatula helps in spreading the layers.
- Whisk: Whisking the pudding mix quickly yields a smooth texture.
- Measuring cups and spoons: Essential for precise ingredient measurement.
Variations of No-Bake Peanut Butter Lasagna
- Healthier crust: Swap out graham crackers for crushed oats or almond flour for a gluten-free option.
- Nut-free version: Replace peanut butter with sun butter or soy nut butter for those with nut allergies.
- Dark chocolate twist: Use dark chocolate chips instead of semi-sweet for a richer flavor.
- Fruit addition: Layer in fresh banana slices or strawberries for a fruity twist in between layers.
- Vegan alternative: Use coconut cream and dairy-free chocolate for a completely vegan-friendly option.
Serving Suggestions for No-Bake Peanut Butter Lasagna
- Pair with a scoop of vanilla ice cream for a heavenly contrast.
- Serve alongside fresh berries for a pop of color and freshness.
- To impress, garnish individual servings with a dollop of whipped cream.
- Offer strong coffee or a glass of milk as a delightful drink pairing.
FAQs about No-Bake Peanut Butter Lasagna
As you dive into the delicious world of No-Bake Peanut Butter Lasagna, you might have a question or two. Let’s clear up some common queries!
Can I make this No-Bake Peanut Butter Lasagna ahead of time?
Absolutely! In fact, making it a day ahead often results in better flavor as the layers meld together beautifully. Just make sure to cover it well in the fridge!
How long will the No-Bake Peanut Butter Lasagna last in the fridge?
When stored properly in an airtight container, your No-Bake Peanut Butter Lasagna should be good for about 3-4 days. However, trust me, it’s likely to disappear much faster!
What if I don’t have whipped topping?
No worries! You can easily whip up homemade whipped cream using heavy cream, sugar, and vanilla extract. Just beat it until soft peaks form, and you’ll have a delightful alternative!
Can I freeze No-Bake Peanut Butter Lasagna?
Yes, you can! Freezing changes the texture slightly but still tastes great. Just be sure to cover it well with plastic wrap or foil before freezing to avoid freezer burn.
What if I have dietary restrictions? Are there alternatives?
Definitely! There are plenty of ways to customize this dessert. Use dairy-free options for a vegan twist or swap peanut butter for sun butter if allergies are a concern. Your taste buds are your only limit!
Final Thoughts
This No-Bake Peanut Butter Lasagna is more than just dessert; it’s a sweet memory waiting to happen. Picture gathering around the table with family and friends, everyone diving into this indulgent treat together. The layers of creamy peanut butter and rich chocolate create a symphony of flavors that’ll have everyone smiling. Plus, this recipe makes it easy to bake up joy even on the busiest days. Each bite is a reminder that happiness can come from simple pleasures. So grab your ingredients, and let’s create something beautiful and delicious that brings everyone together!
Print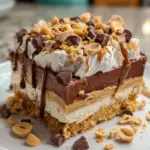
No-Bake Peanut Butter Lasagna
- Total Time: 4 hours 30 minutes
- Yield: 12 servings 1x
- Diet: Vegetarian
Description
A decadent and creamy No-Bake Peanut Butter Lasagna layered with chocolate ganache, peanut butter cheesecake, chocolate mousse, and topped with whipped cream and peanuts.
Ingredients
- FOR THE CRUST LAYER
- 2 cups crushed graham crackers (or Nutter Butters for extra peanut flavor)
- ½ cup salted peanuts, chopped
- ½ cup unsalted butter, melted
- FOR THE CHOCOLATE GANACHE LAYER
- 1 ½ cups semi-sweet chocolate chips
- ¾ cup heavy cream
- FOR THE PEANUT BUTTER CHEESECAKE LAYER
- 1 cup creamy peanut butter
- 8 oz cream cheese, softened
- 1 cup powdered sugar
- 1 tsp vanilla extract
- 1 ½ cups whipped topping (or homemade whipped cream)
- FOR THE CHOCOLATE MOUSSE LAYER
- 1 (3.9 oz) box instant chocolate pudding mix
- 1 ¾ cups cold milk
- 1 cup whipped topping
- FOR THE WHIPPED TOPPING LAYER
- 2 cups whipped topping
- FOR THE TOPPINGS
- ⅓ cup melted peanut butter (for drizzling)
- ¼ cup mini chocolate chips
- ¼ cup chopped roasted peanuts
- Optional: crushed pretzels or peanut butter chips
Instructions
- MAKE THE CRUST: In a mixing bowl, stir together crushed graham crackers, chopped peanuts, and melted butter until evenly combined. Press the mixture firmly into the bottom of a 9×13-inch baking dish, using the bottom of a glass or measuring cup to compress it tightly. Freeze the crust for 15 minutes to firm up while preparing the next layer.
- MAKE THE CHOCOLATE GANACHE: In a small saucepan or microwave-safe container, heat the heavy cream until it just begins to simmer. Pour the hot cream over the chocolate chips in a heatproof bowl and let sit for 2 to 3 minutes. Stir gently until the chocolate is completely melted and the ganache is smooth and glossy. Pour the ganache over the chilled crust and spread it out evenly. Refrigerate for 15 to 20 minutes to allow it to set slightly.
- MAKE THE PEANUT BUTTER CHEESECAKE LAYER: In a large bowl, beat together peanut butter, softened cream cheese, powdered sugar, and vanilla extract until smooth and creamy. Gently fold in the whipped topping until the mixture is light and fluffy. Spread this layer over the chilled ganache, smoothing it out with a spatula.
- MAKE THE CHOCOLATE MOUSSE LAYER: In a medium bowl, whisk together the instant pudding mix and cold milk until thickened, about 2 minutes. Fold in the whipped topping to create a mousse-like texture. Carefully spread this layer over the peanut butter cheesecake layer.
- ADD THE WHIPPED TOPPING LAYER: Spread the remaining whipped topping evenly over the top of the dessert, using a spatula to smooth the surface.
- DECORATE WITH TOPPINGS: Drizzle melted peanut butter across the top of the whipped layer. Sprinkle with mini chocolate chips, chopped peanuts, and any additional toppings such as crushed pretzels or peanut butter chips. Chill the dessert in the refrigerator for at least 4 hours, or overnight for best texture and flavor.
Notes
- For best results, chill overnight.
- Feel free to customize the toppings based on your preference.
- This dessert is rich, so small portions are recommended.
- Prep Time: 30 minutes
- Cook Time: 0 minutes
- Category: Dessert
- Method: No-Bake
- Cuisine: American
Nutrition
- Serving Size: 1 piece
- Calories: 320
- Sugar: 22g
- Sodium: 190mg
- Fat: 20g
- Saturated Fat: 10g
- Unsaturated Fat: 7g
- Trans Fat: 0g
- Carbohydrates: 30g
- Fiber: 2g
- Protein: 5g
- Cholesterol: 30mg


