Description
When I first began baking sourdough bread, I followed the traditional route using a Dutch oven. It gave me that rustic round shape and a hearty crust—but there was one thing I couldn’t quite get over: the size limitations. One loaf at a time just didn’t work for my needs, especially when I wanted to share or freeze extras.
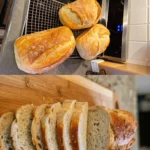
That’s when I made the switch to loaf pans, and it completely changed the game. Not only does it allow me to bake three or even four loaves in one go, but it also gives my bread a more uniform, easy-to-slice shape that’s perfect for everyday use.
The best part? You can cold-proof directly in the loaf pan, which makes the whole process simpler and more flexible. Whether you’re making bread for your family, neighbors, or just your freezer, this method brings the joy of sourdough baking to a whole new level.
Ingredients
Here are the basic ingredients you’ll need to get started with this sourdough loaf recipe. They’re simple, but each plays an important role:
-
120g active sourdough starter
Your starter should be bubbly and recently fed—ideally within the last 4 to 12 hours. This ensures it’s strong enough to rise your dough. -
350ml lukewarm water
The water should feel slightly warm to the touch—not hot. Aim for around 80°F (27°C) to encourage fermentation. -
500g bread flour or all-purpose flour
Bread flour gives a chewier texture and better rise, but all-purpose flour also works well if that’s what you have on hand. -
2 tablespoons fine sea salt
Don’t skip this—it adds flavor and helps control fermentation. Fine salt blends into the dough more evenly than coarse varieties.
This short and sweet list is all you need to create a flavorful, crusty, and beautifully shaped sourdough loaf.
Instructions
In a large bowl, stir the starter and water together until well combined. Add the flour and salt, then mix with a wooden spoon or your hands until it forms a shaggy, slightly sticky dough. Don’t worry if it’s not perfectly smooth yet—this stage is just about combining everything.
Cover the bowl with a clean towel or plastic wrap and let it sit at room temperature for 1 hour. This rest gives the flour time to absorb the water and starts the gluten development process.
Over the next 2 hours, you’ll perform 4 sets of stretch and folds, spaced 30 minutes apart. To do this, wet your hands, grab one edge of the dough, gently pull it upward without tearing, and fold it back over the rest of the dough. Repeat on all four sides. This technique strengthens the gluten structure without kneading.
Once all folds are complete, let the dough sit for another 4 to 8 hours, depending on room temperature. It should rise noticeably, appear puffier, and show some bubbles under the surface. A well-risen dough will jiggle slightly when you nudge the bowl.
Turn your dough out onto a lightly floured surface. Shape it gently into loaves, trying not to deflate it too much. Place each one into a parchment-lined loaf pan. Loaf pans should be about 8.5″ x 4.5″ in size.
Cover the pans with plastic wrap or a damp towel and place them in the fridge for 12 to 48 hours. This long, cold rest helps develop flavor and gives the dough strength for baking.
Take the loaves out and let them sit at room temperature for 1 hour. Meanwhile, preheat your oven to 500°F with the loaf pans inside. When ready, score the tops of the loaves using a sharp knife or bread lame, then reduce the oven temperature to 450°F, cover the pans (with foil or another loaf pan), and bake for 30 minutes.
After that, remove the cover and bake for another 15 minutes to develop a rich golden crust.
Once baked, carefully remove the loaves from the pans and let them cool on a wire rack for at least an hour. This step is crucial—the cooling period allows the crumb inside to finish setting.
Notes
This method is perfect for batch baking and ideal for those who want an easier, more flexible approach to sourdough. Cold proofing in loaf pans allows you to bake up to four loaves at once with beautiful structure and texture.
- Prep Time: 1 hour (mixing, folds, and shaping)
- Bulk + Cold Proofing: 4 to 8 hours room temperature bulk fermentation 12 to 48 hours cold proof in the fridge
- Cook Time: 45 minutes (30 minutes covered + 15 minutes uncovered)
- Category: Bread, Baking
- Method: Sourdough, Oven-Baked
- Cuisine: American, Artisan-style
Nutrition
- Serving Size: 1 slice
- Calories: 120 kcal
- Sugar: 0.2 g
- Sodium: 230 mg
- Fat: 0.5 g
- Saturated Fat: 0.1 g
- Unsaturated Fat: 0.3 g
- Trans Fat: 0g
- Carbohydrates: 24 g
- Fiber: 1.2 g
- Protein: 4 g
- Cholesterol: 0mg