
Introduction to Decadent Red Velvet Oreo Cheesecake
Have you ever craved a dessert that combines the rich flavors of red velvet cake with the creamy goodness of cheesecake? If so, the Decadent Red Velvet Oreo Cheesecake is just what you need. This delightful treat is not only visually stunning but also a feast for the taste buds. With its vibrant red color and luscious layers, it’s perfect for special occasions or just a cozy night in. Let’s dive into what makes this dessert so special!
What Makes Red Velvet Unique?
Red velvet cake is a classic that stands out for its unique flavor and striking appearance. The cake is typically made with cocoa powder, which gives it a subtle chocolate taste. But what really sets it apart is the addition of buttermilk and vinegar, which create a tender crumb and a slight tang. This combination results in a flavor profile that’s both rich and refreshing.
The vibrant red color comes from either food coloring or natural ingredients like beet juice. This eye-catching hue makes red velvet a favorite for celebrations. Have you noticed how it instantly brightens up any dessert table? It’s hard to resist a slice of this beauty!

Ingredients for Decadent Red Velvet Oreo Cheesecake
When it comes to desserts, few can rival the rich and indulgent flavor of a Decadent Red Velvet Oreo Cheesecake. This delightful treat combines the classic flavors of red velvet cake with creamy cheesecake and a crunchy Oreo crust. If you’re ready to whip up this mouthwatering dessert, let’s dive into the ingredients you’ll need!
Essential Ingredients
To create this cheesecake masterpiece, you’ll need a few essential ingredients. Each component plays a vital role in achieving that perfect balance of flavors and textures. Let’s break it down.
For the Red Velvet Cake Layer
The red velvet cake layer is what gives this cheesecake its signature color and flavor. Here’s what you’ll need:
- 1 ½ cups all-purpose flour
- 1 cup granulated sugar
- 1 teaspoon baking soda
- 1 teaspoon cocoa powder
- ½ teaspoon salt
- 1 cup vegetable oil
- 1 cup buttermilk
- 2 large eggs
- 2 tablespoons red food coloring
- 1 teaspoon vanilla extract
- 1 teaspoon white vinegar
Have you ever wondered why red velvet cake is so special? It’s all about that unique flavor profile, which is a delightful mix of chocolate and vanilla, paired with a hint of tanginess from the buttermilk.
For the Cheesecake Filling
The cheesecake filling is the star of the show. It’s creamy, rich, and oh-so-delicious! Here’s what you’ll need:
- 24 ounces cream cheese, softened
- 1 cup granulated sugar
- 3 large eggs
- 1 teaspoon vanilla extract
- ½ cup sour cream
- ½ cup heavy cream
As a matter of fact, the combination of cream cheese and sour cream gives the filling that luscious texture. You’ll want to make sure your cream cheese is softened to avoid lumps. Trust me, nobody wants a lumpy cheesecake!
For the Oreo Crust
The crust is where the magic begins. It adds a delightful crunch that complements the creamy filling. Here’s what you’ll need:
- 24 Oreo cookies, crushed
- ½ cup unsalted butter, melted
Interestingly enough, using Oreo cookies for the crust not only adds flavor but also makes the preparation super simple. Just crush, mix, and press into the pan!
Optional Ingredients for Extra Flavor
If you’re feeling adventurous, there are plenty of optional ingredients you can add to take your Decadent Red Velvet Oreo Cheesecake to the next level. Here are a few ideas:
- Chocolate chips for added richness
- Crushed peppermint candies for a festive twist
- Chopped nuts for a crunchy texture
- Fruit toppings like raspberries or strawberries for a fresh contrast
Why not toss in some chocolate chips if you’re a chocolate lover? Or, if you’re making this for a holiday gathering, crushed peppermint candies can add a fun seasonal touch. The possibilities are endless!
In conclusion, gathering these ingredients is the first step toward creating a show-stopping dessert. With the right mix of flavors and textures, your Decadent Red Velvet Oreo Cheesecake will surely impress everyone at the table. Happy baking!
Step-by-Step Instructions to Create Decadent Red Velvet Oreo Cheesecake
If you’re looking for a dessert that’s both stunning and delicious, you’ve come to the right place! This Decadent Red Velvet Oreo Cheesecake combines the rich flavors of red velvet cake with the creamy goodness of cheesecake, all sitting on a crunchy Oreo crust. It’s a showstopper for any occasion, and trust me, your friends and family will be begging for seconds. Let’s dive into the step-by-step instructions to create this delightful treat!
Preparing the Oreo Crust
First things first, let’s get that crust ready. The Oreo crust is simple yet oh-so-delicious. You’ll need about 24 Oreo cookies and some melted butter. Start by preheating your oven to 350°F (175°C). Then, crush the Oreo cookies into fine crumbs. You can do this by placing them in a zip-top bag and smashing them with a rolling pin or using a food processor if you have one handy.
Once you have your crumbs, mix them with about 5 tablespoons of melted butter. This mixture should hold together when pressed. Now, press the crumb mixture firmly into the bottom of a 9-inch springform pan. Make sure it’s even and compact. Bake it in the preheated oven for about 10 minutes. This step helps to set the crust and gives it a nice crunch. After baking, let it cool while you prepare the next layers.
Making the Red Velvet Cake Layer
Now, let’s whip up that luscious red velvet cake layer! You’ll need 1 cup of all-purpose flour, 1 cup of sugar, 1/2 cup of vegetable oil, 1/2 cup of buttermilk, 1 large egg, 1 tablespoon of cocoa powder, 1 teaspoon of vanilla extract, and a few drops of red food coloring. It’s worth noting that the food coloring is what gives this cake its signature hue!
In a mixing bowl, combine the sugar, oil, and egg. Mix until it’s smooth. Then, add the buttermilk, vanilla, and red food coloring. Stir until everything is well combined. In another bowl, whisk together the flour and cocoa powder. Gradually add the dry ingredients to the wet mixture, stirring until just combined. You don’t want to overmix it; a few lumps are perfectly fine!
Pour the red velvet batter over the cooled Oreo crust. Spread it evenly, and then pop it in the oven at 350°F (175°C) for about 20-25 minutes. You’ll know it’s done when a toothpick inserted in the center comes out clean. Let it cool completely before moving on to the cheesecake filling.
Crafting the Cheesecake Filling
Now for the star of the show—the cheesecake filling! You’ll need 16 ounces of cream cheese (softened), 1 cup of sugar, 1 teaspoon of vanilla extract, and 3 large eggs. Start by beating the softened cream cheese in a large bowl until it’s smooth and creamy. This step is crucial; nobody wants a lumpy cheesecake!
Gradually add the sugar and vanilla, mixing until well combined. Then, add the eggs one at a time, mixing just until incorporated. It’s important not to overmix at this stage, as it can lead to cracks in your cheesecake later. Once everything is blended, pour the cheesecake filling over the cooled red velvet layer. Smooth it out with a spatula for an even finish.
Assembling the Layers
With the crust, red velvet layer, and cheesecake filling ready, it’s time to assemble! Carefully pour the cheesecake filling over the red velvet layer. Make sure it’s evenly distributed. If you’re feeling adventurous, you can swirl the cheesecake filling into the red velvet layer for a marbled effect. Just use a knife to gently swirl it around. It adds a beautiful touch!
Once you’re satisfied with the layers, it’s time to bake the cheesecake. Place the springform pan in the oven at 325°F (160°C) for about 50-60 minutes. You want the edges to be set, but the center should still have a slight jiggle. This will ensure a creamy texture. After baking, turn off the oven and crack the door open. Let the cheesecake cool in the oven for about an hour. This helps prevent cracks from forming.
Baking and Cooling Process
After the cheesecake has cooled in the oven, remove it and let it cool to room temperature. Then, cover it with plastic wrap and refrigerate for at least 4 hours, or overnight if you can wait! The chilling process allows the flavors to meld beautifully.
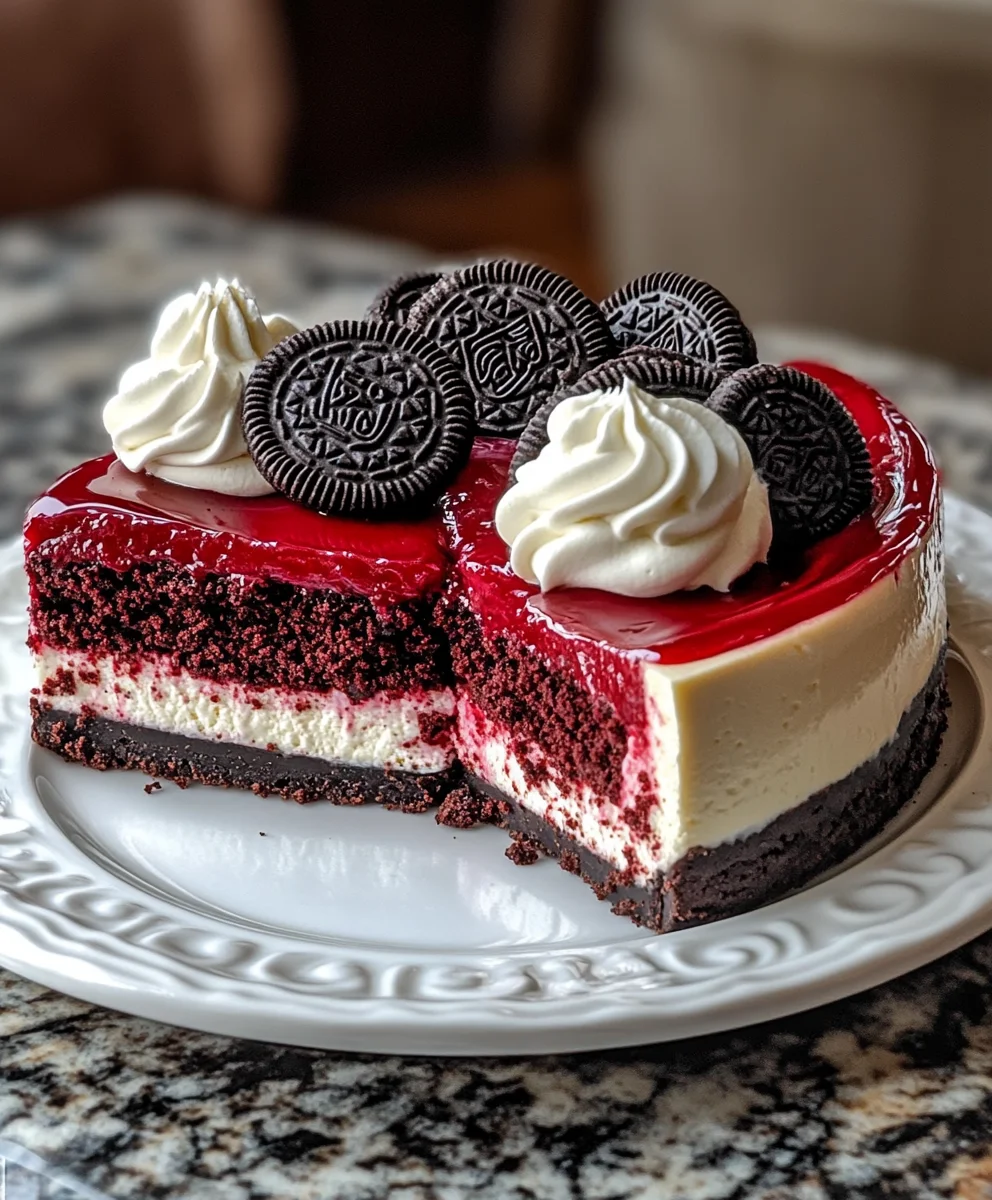
When you’re ready to serve, carefully remove the sides of the springform pan. You can garnish the top with whipped cream, crushed Oreos, or even some chocolate shavings for an extra touch. Have you ever wondered how something so beautiful can taste so good? This cheesecake is proof that it can!
And there you have it! Your Decadent Red Velvet Oreo Cheesecake is ready to impress. Enjoy every bite, and don’t forget to share your creation with friends and family. They’ll be so glad you did!

Tips for Perfecting Your Decadent Red Velvet Oreo Cheesecake
If you’re looking to impress your friends and family with a dessert that’s both stunning and delicious, a Decadent Red Velvet Oreo Cheesecake is the way to go. This rich, creamy treat combines the classic flavors of red velvet cake with the delightful crunch of Oreos. But, like any recipe, there are some tips and tricks to ensure your cheesecake turns out perfectly every time. Let’s dive into some essential advice!
Common Mistakes to Avoid
When making your cheesecake, it’s easy to make a few common mistakes. First, be careful not to overmix your batter. Overmixing can introduce too much air, leading to cracks in your cheesecake. Instead, mix just until the ingredients are combined. Also, remember to use room temperature ingredients. Cold cream cheese can create lumps, which nobody wants in their cheesecake!
Another mistake is not preparing your pan properly. Always line the bottom of your springform pan with parchment paper and grease the sides. This will help your cheesecake come out smoothly. Lastly, avoid skipping the water bath. This technique helps regulate the temperature and keeps your cheesecake from drying out. Trust me, it’s worth the extra effort!
Storage Tips for Freshness
After you’ve made your Decadent Red Velvet Oreo Cheesecake, you’ll want to keep it fresh for as long as possible. The best way to store it is in the refrigerator. Cover it tightly with plastic wrap or aluminum foil to prevent it from absorbing any odors from the fridge. It can last up to a week, but I bet it won’t last that long!
If you want to keep it longer, consider freezing it. Just slice it into individual pieces and wrap each slice in plastic wrap, then place them in an airtight container. When you’re ready to enjoy a slice, let it thaw in the fridge overnight. It’s like having a little piece of heaven waiting for you!
Serving Suggestions
Now that your cheesecake is ready, how do you serve it? There are so many fun ways to present this dessert! For a classic touch, serve it plain with a dollop of whipped cream on top. If you’re feeling adventurous, drizzle some chocolate or cream cheese frosting over the top. You could even sprinkle crushed Oreos for an extra crunch!
Have you ever thought about pairing your cheesecake with a scoop of vanilla ice cream? The combination of warm and cold is simply divine. Or, for a festive touch, add some fresh berries on the side. They not only look beautiful but also add a refreshing contrast to the rich cheesecake.
As a matter of fact, you can even turn this cheesecake into a showstopper for special occasions. Just add some edible glitter or colorful sprinkles on top. It’s all about making it your own!
Nutritional Information for Decadent Red Velvet Oreo Cheesecake
If you’re a fan of desserts that are both rich and delightful, the Decadent Red Velvet Oreo Cheesecake is sure to catch your attention. This indulgent treat combines the classic flavors of red velvet cake with the creamy goodness of cheesecake and the crunch of Oreos. But before you dive into a slice, it’s important to know what you’re getting in terms of nutrition. Let’s break it down!
Nutritional Breakdown (per 100g)
Understanding the nutritional content can help you enjoy this dessert in moderation. Here’s a quick look at what’s packed into every 100 grams of this luscious cheesecake:
| Nutrient | Amount |
|---|---|
| Calories | 350 |
| Protein | 6g |
| Carbohydrates | 45g |
| Fat | 18g |
| Sugar | 25g |
As you can see, this cheesecake is quite calorie-dense, which is typical for desserts. The sugar content is also on the higher side, so it’s best enjoyed as an occasional treat rather than a daily indulgence. Have you ever wondered how you can balance enjoying such a rich dessert while keeping an eye on your nutrition? It’s all about moderation!
When you take a bite of this cheesecake, you’ll notice the creamy texture and the delightful crunch from the Oreos. It’s a dessert that can make any occasion feel special. Just remember, a small slice can satisfy your sweet tooth without going overboard on calories. So, go ahead and treat yourself, but maybe save the second slice for another day!
Frequently Asked Questions about Decadent Red Velvet Oreo Cheesecake
If you’re a fan of desserts that are both rich and visually stunning, then the Decadent Red Velvet Oreo Cheesecake is likely on your radar. This delightful treat combines the classic flavors of red velvet cake with the creamy goodness of cheesecake and the crunch of Oreos. But before you dive into making this dessert, you might have some questions. Let’s tackle those common queries to help you create the perfect cheesecake!
Can I make Decadent Red Velvet Oreo Cheesecake ahead of time?
Absolutely! In fact, making this cheesecake ahead of time can enhance its flavors. The cheesecake needs to chill for at least four hours, but overnight is even better. This allows the flavors to meld beautifully. Just be sure to cover it well with plastic wrap or foil to keep it fresh. When you’re ready to serve, you can add any toppings, like whipped cream or chocolate drizzle, right before presenting it to your guests.
What can I substitute for cream cheese in the cheesecake filling?
If you’re looking for a cream cheese alternative, there are a few options. Mascarpone cheese is a great choice; it’s creamy and has a mild flavor. Greek yogurt can also work, giving a tangy taste while keeping the cheesecake light. For a dairy-free option, try using cashew cream or a vegan cream cheese. Just keep in mind that the texture and flavor might vary slightly, but it can still be delicious!
How do I know when the cheesecake is done baking?
Knowing when your cheesecake is done can be tricky. A good rule of thumb is to look for a slight jiggle in the center. The edges should be set, while the middle remains a bit wobbly. It’s worth noting that the cheesecake will continue to firm up as it cools. If you’re using a water bath, it can help prevent cracks and ensure even baking. So, keep an eye on it, and trust your instincts!
Can I freeze Decadent Red Velvet Oreo Cheesecake?
Yes, you can freeze this cheesecake! Just make sure it’s completely cooled before wrapping it tightly in plastic wrap and then aluminum foil. This will help prevent freezer burn. When you’re ready to enjoy it, let it thaw in the refrigerator overnight. It’s a great way to have a delicious dessert ready for unexpected guests or special occasions!
What are some variations of this recipe?
There are so many fun ways to put your spin on the Decadent Red Velvet Oreo Cheesecake! For instance, you could add a layer of chocolate ganache on top for an extra indulgent touch. Feeling adventurous? Try mixing in some crushed peppermint candies for a festive twist. You could even swap out the Oreos for another cookie, like chocolate chip or peanut butter cookies. The possibilities are endless, so don’t hesitate to get creative!
Conclusion: Indulging in Decadent Red Velvet Oreo Cheesecake
As we wrap up our journey into the world of the Decadent Red Velvet Oreo Cheesecake, it’s clear that this dessert is more than just a treat; it’s an experience. The rich, velvety texture combined with the crunch of Oreo cookies creates a delightful contrast that’s hard to resist. Whether you’re celebrating a special occasion or simply treating yourself, this cheesecake is sure to impress.
Final Thoughts on Enjoying This Dessert
When you take that first bite of the Decadent Red Velvet Oreo Cheesecake, you’ll understand why it’s a favorite among dessert lovers. The creamy filling, paired with the chocolatey crust, makes for a perfect balance of flavors. Have you ever thought about how a dessert can evoke such joy? It’s all in the details—from the way it looks to the way it tastes. And let’s not forget the vibrant red color that adds a festive touch to any table.
Sharing this cheesecake with friends and family can turn an ordinary gathering into something memorable. Imagine the smiles on their faces as they savor each bite. It’s moments like these that make baking worthwhile. So, don’t hesitate to whip up this delightful dessert and create lasting memories.
Encouragement to Experiment with the Recipe
Now, here’s where the fun really begins! While the classic recipe is fantastic, why not put your own spin on it? You could add a layer of chocolate ganache on top for an extra touch of indulgence. Or, if you’re feeling adventurous, try mixing in some crushed peppermint candies for a refreshing twist. The possibilities are endless!
As a matter of fact, the first time I made this cheesecake, I accidentally grabbed the wrong food coloring and ended up with a bright pink dessert. Surprisingly, everyone loved it! It just goes to show that sometimes, happy accidents can lead to delicious results. So, don’t be afraid to experiment. You might just discover a new favorite variation of this already amazing cheesecake.
In conclusion, the Decadent Red Velvet Oreo Cheesecake is not just a dessert; it’s a canvas for your creativity. So, roll up your sleeves, gather your ingredients, and let your imagination run wild. Happy baking!
Print
Decadent Red Velvet Oreo Cheesecake: A Must-Try Dessert Recipe
- Total Time: 1 hour 20 minutes
- Yield: 10 servings 1x
Description
Have you ever craved a dessert that combines the rich flavors of red velvet cake with the creamy goodness of cheesecake? If so, the Decadent Red Velvet Oreo Cheesecake is just what you need. This delightful treat is not only visually stunning but also a feast for the taste buds. With its vibrant red color and luscious layers, it’s perfect for special occasions or just a cozy night in. Let’s dive into what makes this dessert so special!
Ingredients
For the Crust
24 Oreo cookies, crushed
4 tbsp unsalted butter, melted
For the Cheesecake Filling
16 oz cream cheese, softened
1 cup granulated sugar
3 large eggs
1 tsp vanilla extract
1/4 cup cocoa powder
1/4 cup red food coloring
For the Topping
8 Oreo cookies, crushed (optional)
Whipped cream (optional)
Instructions
Prepare the Crust:
Mix crushed Oreos with melted butter until combined.
Press the mixture firmly into the bottom of a springform pan. Chill for 15 minutes.
Make the Filling:
Beat cream cheese and sugar until smooth. Add eggs one at a time, mixing well after each.
Stir in vanilla, cocoa powder, and red food coloring until fully combined.
Assemble and Bake:
Pour the filling over the chilled crust.
Bake at 325°F (160°C) for 55-60 minutes or until the center is slightly jiggly.
Cool to room temperature, then chill in the refrigerator for at least 4 hours or overnight.
Add Toppings (Optional):
Garnish with crushed Oreos and whipped cream before serving.
Notes
For best results, use gel food coloring for vibrant color.
Ensure all ingredients are at room temperature to avoid lumps.
Store leftovers in the fridge for up to 3 days.
- Prep Time: 20 minutes
- Cook Time: 60 minutes
Nutrition
- Calories: 420
- Sugar: 28g
- Fat: 25g


