
Introduction to Chocolate Colada Recipe
Ah, the Chocolate Colada! Just saying the name makes my heart flutter with excitement. This delightful drink is like a tropical vacation in a glass, but with a rich, chocolatey twist that makes it feel like a special dessert. I remember the first time I stumbled upon this recipe. It was a warm summer evening, and I was hosting a small gathering with friends. I wanted to impress them with something unique, something that would make them smile and say, “Wow, this is amazing!”
As I flipped through my recipe book, I found the Chocolate Colada recipe, and it felt like a light bulb went off in my head. I gathered the ingredients, and as I blended the chocolate ice cream with the chocolate vodka and dark crème de cacao, the kitchen filled with a sweet, inviting aroma. The anticipation was palpable. When I served it, topped with whipped cream and a cherry, my friends’ eyes lit up. It was a hit!
This drink is perfect for any celebration, whether it’s a birthday, a summer barbecue, or just a cozy night in. The combination of chocolate and coconut is like a dance party for your taste buds. Plus, it’s so easy to make! You don’t need to be a master mixologist to whip up this delightful concoction. Just a blender and a few simple ingredients, and you’re on your way to creating a drink that feels indulgent and special.
So, if you’re ready to treat yourself and your loved ones to something truly delicious, let’s dive into the Chocolate Colada recipe. Trust me, once you try it, you’ll want to make it again and again!

Ingredients for Chocolate Colada Recipe
Before we dive into the fun of blending, let’s gather our ingredients. Having everything ready makes the process smoother and more enjoyable. I always find that when I have my ingredients laid out, it feels like I’m preparing for a little culinary adventure. Here’s what you’ll need for the Chocolate Colada recipe:
Main Ingredients
- 2 oz Chocolate vodka: This is the star of our show! The chocolate vodka adds a rich, velvety flavor that pairs beautifully with the other ingredients. I recommend using a high-quality brand for the best taste.
- 2 oz Dark crème de cacao: This liqueur brings a deep chocolate flavor that enhances the overall richness of the drink. Look for a dark variety to get that intense chocolate experience.
- 1 oz Pina colada mix: This adds a tropical flair to our cocktail. You can find pre-made mixes at the store, or you can make your own with coconut cream and pineapple juice for a fresher taste.
- 4 scoops Chocolate ice cream: The creamy texture of chocolate ice cream is what makes this drink feel like a dessert. I love using a premium brand that uses real cocoa for the best flavor.
Optional Add-ons
- Chocolate shavings: For garnish, these add a touch of elegance and extra chocolatey goodness. You can easily make them by using a vegetable peeler on a chocolate bar.
- Whipped cream: A generous swirl on top makes everything feel more indulgent. You can use store-bought or whip your own for a fresher taste.
- Fresh cherries: A cherry on top not only looks pretty but also adds a pop of color and a hint of tartness that balances the sweetness of the drink.
- Other liqueurs: Feel free to experiment! Adding a splash of coconut rum can enhance the tropical vibe, or a hint of coffee liqueur can deepen the flavor profile.
When selecting your ingredients, I always recommend going for quality over quantity. A good chocolate vodka or crème de cacao can elevate your Chocolate Colada from good to absolutely divine. So, take a moment to choose wisely, and let’s get ready to blend!
How to Prepare Chocolate Colada Recipe
Now that we have our ingredients ready, it’s time to embark on the fun part—preparing our Chocolate Colada! I always feel a rush of excitement when I start blending. It’s like a mini adventure in my kitchen. Let’s break it down step by step, so you can create this delightful drink with ease.
Step 1: Gather Your Ingredients
First things first, let’s make sure we have everything we need. I like to lay out all my ingredients on the counter. It not only keeps me organized but also makes the process feel more like a celebration.
Tips for Ingredient Quality
- Choose high-quality chocolate vodka and dark crème de cacao. The better the ingredients, the richer your drink will taste.
- If you’re making your own pina colada mix, use fresh pineapple juice and real coconut cream for a vibrant flavor.
- Opt for premium chocolate ice cream. It makes a world of difference in texture and taste!
Step 2: Blend the Base
Now, let’s get blending! This is where the magic happens. I love watching the ingredients come together in a whirl of chocolatey goodness.
Tips for Achieving the Perfect Consistency
- Start by adding the chocolate ice cream to the blender first. It helps create a creamy base.
- Pour in the chocolate vodka, dark crème de cacao, and pina colada mix. Make sure to add them in this order for the best blend.
- Blend on medium speed until everything is smooth and creamy. If it’s too thick, you can add a splash of milk to loosen it up.
Step 3: Add Chocolate and Coconut
Once your base is blended, it’s time to enhance those flavors! This step is all about making your Chocolate Colada sing.
Tips for Flavor Enhancement
- If you want to take it up a notch, consider adding a splash of coconut rum. It adds a delightful tropical twist!
- For an extra chocolate kick, toss in a few chocolate chips before blending again. It’s like a surprise in every sip!
- Don’t forget to taste! Adjust the sweetness by adding a little more pina colada mix if needed.
Step 4: Chill and Serve
Now that your Chocolate Colada is perfectly blended, it’s time to serve it up! I always get excited at this stage because it’s when the drink transforms into a beautiful creation.
Tips for Presentation
- Pour the blended mixture into a hurricane glass for that classic tropical look.
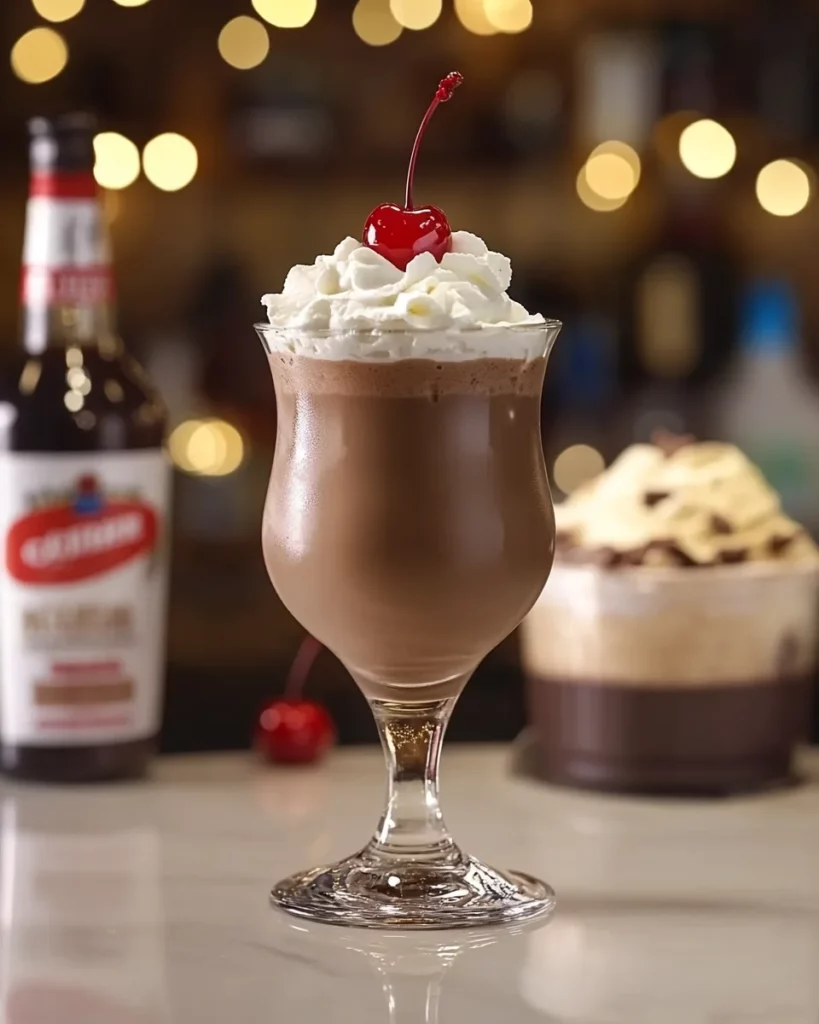
- Top it off with a generous swirl of whipped cream. It adds a lovely creaminess and makes it feel extra special.
- Don’t forget the cherry and chocolate shavings! They not only look stunning but also add a delightful crunch.
And there you have it! Your Chocolate Colada is ready to be enjoyed. I can already imagine the smiles on your friends’ faces as they take their first sip. Cheers to delicious adventures in the kitchen!
Equipment Needed for Chocolate Colada Recipe
Before we dive into the blending bliss, let’s talk about the equipment you’ll need to whip up this delightful Chocolate Colada. Having the right tools makes the process smoother and more enjoyable. I always find that when I’m well-equipped, my culinary adventures feel like a breeze. Here’s what you’ll need:
- Blender: This is the star of the show! A good blender is essential for achieving that smooth, creamy texture. I recommend using a high-powered blender if you have one, as it can handle the ice cream and other ingredients effortlessly. If you don’t have a blender, a food processor can work in a pinch, but you might need to blend in smaller batches.
- Hurricane Glass: This iconic glass is perfect for serving your Chocolate Colada. Its curved shape not only looks beautiful but also enhances the drinking experience. If you don’t have hurricane glasses, any tall glass will do. Just make sure it can hold all that deliciousness!
- Measuring Jigger or Cup: Precision is key in cocktail making. A measuring jigger or cup will help you pour the right amounts of chocolate vodka, dark crème de cacao, and pina colada mix. If you don’t have one, a regular kitchen measuring cup can work just fine.
- Spoon or Spatula: You’ll need a spoon or spatula to scoop out the chocolate ice cream. I always find it helpful to have a sturdy spatula on hand to scrape down the sides of the blender, ensuring everything gets blended evenly.
- Ice Cream Scoop: While not strictly necessary, an ice cream scoop makes it easier to get those perfect scoops of chocolate ice cream. Plus, it adds a bit of fun to the process!
With these tools in your kitchen arsenal, you’re all set to create a Chocolate Colada that will impress everyone. Remember, the right equipment can make all the difference, so gather your tools and let’s get blending!
Variations of Chocolate Colada Recipe
As a passionate home cook, I love experimenting with recipes to create new and exciting flavors. The Chocolate Colada is a fantastic base that can be easily adapted to suit your taste or the occasion. Here are some delightful variations that I’ve tried and absolutely adored. Each twist adds a unique flair to this already indulgent drink!
Mint Chocolate Colada
If you’re a fan of mint, this variation is for you! Simply add a few fresh mint leaves to the blender along with the other ingredients. The mint adds a refreshing burst that complements the chocolate beautifully. It’s like sipping on a chocolatey mojito! You can also use mint chocolate vodka for an extra kick.
Fruit-Infused Chocolate Colada
For a fruity twist, consider adding some fresh or frozen fruit. I love using ripe bananas or strawberries. Just toss in a banana or a handful of strawberries before blending. The fruit adds a natural sweetness and a lovely texture. Plus, it makes the drink feel even more tropical!
Spicy Chocolate Colada
If you’re feeling adventurous, why not spice things up? Add a pinch of cayenne pepper or a dash of cinnamon to the blender. The heat from the spices contrasts beautifully with the sweetness of the chocolate and coconut. It’s a surprising and delightful combination that will leave your taste buds dancing!
Nutty Chocolate Colada
For those who love a nutty flavor, try adding a tablespoon of almond or hazelnut liqueur. This addition brings a rich, nutty depth to the drink. You can also sprinkle some crushed nuts on top as a garnish for added texture and flavor. It’s like a chocolate-covered nut treat in a glass!
Vegan Chocolate Colada
For a vegan-friendly version, swap out the chocolate ice cream for a dairy-free alternative made from coconut or almond milk. You can also use a plant-based chocolate vodka. This way, you can enjoy the same delicious flavors while keeping it plant-based. Trust me, it’s just as creamy and satisfying!
These variations are just the tip of the iceberg! The beauty of the Chocolate Colada is that it’s versatile and open to interpretation. I encourage you to get creative and make it your own. Whether you’re hosting a party or enjoying a quiet evening at home, these twists will surely impress your guests and elevate your cocktail game. So, grab your blender and let the flavor adventures begin!
Cooking Notes for Chocolate Colada Recipe
As I’ve whipped up my fair share of Chocolate Coladas, I’ve learned a few valuable lessons along the way. These cooking notes are here to help you avoid common pitfalls and make the most of your delicious creation. Whether you’re a seasoned pro or a novice in the kitchen, these tips will ensure your Chocolate Colada turns out perfectly every time!
Common Pitfalls
- Over-blending: It’s easy to get carried away with the blender, but over-blending can lead to a watery texture. Blend just until smooth and creamy. If you notice it’s getting too thin, stop blending and serve immediately!
- Ingredient Ratios: The balance of flavors is key. If you find your Chocolate Colada too sweet, try reducing the amount of pina colada mix. Conversely, if it’s too strong, a little extra ice cream can help mellow it out.
- Temperature Matters: Make sure your chocolate ice cream is slightly softened before blending. If it’s too hard, it can be tough on your blender and may not blend smoothly. Let it sit out for a few minutes before scooping.
Adjustments for Dietary Preferences
- Gluten-Free: Good news! This recipe is naturally gluten-free, so you can enjoy it without worry. Just double-check the labels on your liqueurs to ensure they’re gluten-free.
- Dairy-Free: For a dairy-free version, swap the chocolate ice cream for a coconut or almond milk-based alternative. There are some fantastic dairy-free chocolate ice creams available that taste just as rich and creamy!
- Lower Sugar Options: If you’re looking to cut back on sugar, consider using sugar-free chocolate vodka and crème de cacao. You can also make your own pina colada mix using fresh pineapple and coconut milk, which allows you to control the sweetness.
Storage Tips
While I highly recommend enjoying your Chocolate Colada fresh, I understand that sometimes life gets in the way. If you have leftovers, here’s how to store them:
- Refrigeration: You can store any leftover blended Chocolate Colada in an airtight container in the fridge for up to 24 hours. Just give it a good stir before serving again, as it may separate.
- Freezing: If you want to save it for a later date, consider pouring the mixture into ice cube trays. Once frozen, you can blend the cubes again for a quick treat. Just remember, the texture may change slightly after freezing.
With these cooking notes in your back pocket, you’re well-equipped to tackle the Chocolate Colada recipe with confidence. Remember, cooking is all about experimenting and having fun. So, don’t be afraid to make adjustments and find what works best for you. Happy blending!
Serving Suggestions for Chocolate Colada Recipe
Now that you’ve crafted your delicious Chocolate Colada, it’s time to think about how to serve it up! Presentation and pairing can elevate your drink from delightful to unforgettable. I always enjoy putting a little extra thought into how I present my creations, and I’m excited to share some of my favorite serving suggestions with you!
Ideal Pairings
The Chocolate Colada is a rich and indulgent drink, so pairing it with the right snacks or desserts can create a harmonious experience. Here are some of my go-to pairings:
- Chocolate-Dipped Fruits: Fresh strawberries, bananas, or pineapple slices dipped in chocolate make for a perfect match. The fruity freshness balances the richness of the drink beautifully.
- Coconut Macaroons: These chewy, sweet treats echo the tropical flavors of the pina colada mix. Plus, their texture complements the smoothness of the Chocolate Colada.
- Cheesecake Bites: Mini cheesecake bites, especially chocolate or coconut-flavored, are a delightful addition. They add a creamy element that pairs wonderfully with the drink.
- Spiced Nuts: A bowl of spiced or candied nuts can provide a crunchy contrast to the smooth drink. The saltiness of the nuts enhances the sweetness of the Chocolate Colada.
Garnishes That Wow
Garnishing your Chocolate Colada is like adding the cherry on top—literally! Here are some fun ideas to make your drink visually stunning:
- Chocolate Shavings: As mentioned earlier, a sprinkle of chocolate shavings adds elegance and extra chocolatey goodness. It’s a simple touch that makes a big impact!
- Toasted Coconut Flakes: For a tropical vibe, sprinkle some toasted coconut flakes on top of the whipped cream. It adds a lovely crunch and enhances the coconut flavor.
- Mint Leaves: A sprig of fresh mint not only looks beautiful but also adds a refreshing aroma. It’s a great way to hint at the minty variations we discussed earlier!
- Colorful Straws: Using fun, colorful straws can make your drink feel festive. I love using striped or patterned straws to add a playful touch to my cocktails.
Occasions for Serving
The Chocolate Colada is versatile enough to fit a variety of occasions. Here are some ideas for when to serve this delightful drink:
- Summer Gatherings: Whether it’s a backyard barbecue or a pool party, the Chocolate Colada is a refreshing treat that will impress your guests.
- Celebratory Events: Birthdays, anniversaries, or any special occasion calls for a celebratory drink. The Chocolate Colada feels indulgent and festive, making it perfect for toasting.
- Girls’ Night In: Hosting a cozy night with friends? This drink is a fun and delicious way to kick off the evening. Pair it with some sweet treats and laughter!
- Holiday Parties: With its rich flavors, the Chocolate Colada can be a delightful addition to holiday gatherings. Consider serving it during winter festivities for a unique twist on traditional drinks.
With these serving suggestions, you’re all set to impress your friends and family with your Chocolate Colada. Remember, the joy of cooking and mixing drinks lies in creativity and sharing delightful experiences. So, gather your loved ones, raise your glasses, and enjoy every sip of this delicious concoction!
Tips for Perfecting Your Chocolate Colada Recipe
As I’ve enjoyed making the Chocolate Colada time and time again, I’ve picked up a few expert tips that can truly elevate this already delightful drink. Whether you’re a seasoned home cook or just starting your culinary journey, these hacks will help you create a Chocolate Colada that’s not just good, but absolutely unforgettable!
Choose Quality Ingredients
First and foremost, the quality of your ingredients can make a world of difference. I always opt for premium chocolate vodka and dark crème de cacao. The richer the flavors, the more indulgent your drink will be. If you can, try to find artisanal brands that use real cocoa and natural ingredients. Trust me, your taste buds will thank you!
Experiment with Ice Cream
While chocolate ice cream is the classic choice, don’t be afraid to experiment! I’ve had great success using different flavors like coconut or even mint chocolate chip. Each variation brings a unique twist to the drink. If you’re feeling adventurous, try blending in a scoop of vanilla ice cream for a creamier texture!
Chill Your Glasses
Presentation is key, and serving your Chocolate Colada in a chilled glass can enhance the experience. I like to pop my hurricane glasses in the freezer for about 15 minutes before serving. This simple step keeps your drink colder for longer and adds a touch of elegance to your presentation.
Layer Your Flavors
For an extra layer of flavor, consider adding a splash of flavored syrup. A hint of coconut syrup or even a drizzle of chocolate syrup inside the glass before pouring in the drink can create a beautiful visual effect and enhance the taste. It’s like a little surprise with every sip!
Don’t Skip the Garnish
Garnishing your Chocolate Colada is not just for looks; it adds to the overall flavor experience. I always recommend a generous swirl of whipped cream, but you can also sprinkle some crushed nuts or toasted coconut flakes on top. These little touches not only make your drink look stunning but also add delightful textures and flavors.
Serve Immediately
Chocolate Coladas are best enjoyed fresh. The longer they sit, the more the ice cream melts, which can change the texture. I always make sure to serve them right after blending. If you’re making multiple servings, blend in batches to keep everything nice and creamy.
Get Creative with Flavors
Don’t be afraid to think outside the box! Adding a splash of flavored liqueurs, like hazelnut or coffee, can create a whole new flavor profile. I’ve even tried adding a hint of orange liqueur for a citrusy twist. The possibilities are endless, and experimenting can lead to delightful surprises!
With these tips in your back pocket, you’re well on your way to mastering the Chocolate Colada recipe. Remember, cooking is all about having fun and exploring new flavors. So, gather your ingredients, get creative, and enjoy every delicious sip of your Chocolate Colada adventure!
Breakdown of Time for Chocolate Colada Recipe
As a passionate home cook, I know that timing can make all the difference in the kitchen. When it comes to whipping up a delightful Chocolate Colada, having a clear idea of the time involved helps keep everything organized and stress-free. Here’s a simple breakdown of the time you’ll need to create this delicious drink:
Prep Time
10 minutes. This includes gathering your ingredients, measuring them out, and setting up your equipment. I always find that taking a few moments to prepare makes the blending process much smoother and more enjoyable.
Cooking Time
5 minutes. You’ll blend the ingredients until smooth, pour them into your hurricane glass, and add your garnishes. It’s a fast and fun process that leaves you with a delicious drink in no time!
Total Time
15 minutes from start to finish. That’s right! In just a quarter of an hour, you can create a rich and indulgent Chocolate Colada that’s sure to impress your friends and family. It’s perfect for those moments when you want to whip up something special without spending hours in the kitchen.
So, whether you’re preparing for a gathering or just treating yourself to a delightful evening, this time breakdown will help you plan your Chocolate Colada adventure with ease. Now, let’s get blending and enjoy every delicious sip!
Nutritional Information for Chocolate Colada Recipe
As a passionate home cook, I believe it’s important to know what goes into our delicious creations. The Chocolate Colada is a delightful treat, but like any indulgent dessert, it’s good to be aware of its nutritional content. Here’s a detailed breakdown of the nutritional information for one serving of the Chocolate Colada, based on the ingredients listed in the recipe.
Calories
450 calories. This makes it a rich and satisfying drink, perfect for special occasions or a sweet treat after dinner.
Fats
20 grams, with about 10 grams of saturated fat. Most of this comes from the chocolate ice cream and the crème de cacao. While it’s a higher fat content, it’s important to remember that this drink is meant to be enjoyed in moderation.
Carbohydrates
60 grams per serving. This includes sugars, which account for approximately 50 grams. The sweetness primarily comes from the chocolate vodka, crème de cacao, and the pina colada mix. If you’re looking to reduce sugar, consider using sugar-free alternatives for the liqueurs or making your own pina colada mix.
Protein
6 grams of protein, mainly from the chocolate ice cream. While it’s not a significant source of protein, every little bit helps, especially when you’re enjoying a dessert-like cocktail!
Vitamins and Minerals
While the Chocolate Colada isn’t a health drink, it does offer some vitamins and minerals. The chocolate ice cream provides calcium, and the coconut in the pina colada mix adds some potassium. However, it’s best to enjoy this drink as an occasional treat rather than a regular part of your diet.
In summary, the Chocolate Colada is a deliciously indulgent cocktail that packs a flavorful punch. Knowing the nutritional information can help you enjoy it mindfully. So, whether you’re celebrating a special occasion or simply treating yourself, savor every sip of this delightful drink! Cheers to delicious adventures in the kitchen!
Frequently Asked Questions about Chocolate Colada Recipe
As I’ve shared my love for the Chocolate Colada, I’ve noticed that many people have questions about this delightful drink. Whether you’re a first-time maker or a seasoned pro, it’s always good to have some answers at your fingertips. Here are some of the most common queries I’ve encountered, along with my personal insights to help you navigate your Chocolate Colada adventure!
Can I make a non-alcoholic version of the Chocolate Colada?
Absolutely! If you want to enjoy the flavors without the alcohol, simply omit the chocolate vodka and dark crème de cacao. You can replace them with chocolate syrup or a chocolate-flavored soda for that rich taste. The pina colada mix and chocolate ice cream will still give you that creamy, tropical vibe. It’s a fun way to include everyone in the celebration!
What can I substitute for chocolate vodka?
If you don’t have chocolate vodka on hand, don’t worry! You can use regular vodka and add a tablespoon of chocolate syrup to achieve a similar flavor. Alternatively, a coffee liqueur can add a unique twist while still complementing the chocolate. Just remember to adjust the sweetness to your liking!
How can I make this recipe dairy-free?
Making a dairy-free Chocolate Colada is easy! Simply swap the chocolate ice cream for a dairy-free alternative made from coconut or almond milk. There are some fantastic dairy-free chocolate ice creams available that taste just as rich and creamy. Just ensure that your chocolate vodka and crème de cacao are also dairy-free!
Can I prepare the Chocolate Colada in advance?
While I recommend enjoying the Chocolate Colada fresh for the best texture, you can prepare the ingredients in advance. Blend everything except the ice cream and store it in the fridge for up to 24 hours. When you’re ready to serve, just add the ice cream and blend again. This way, you can save time during your gathering!
What’s the best way to store leftovers?
If you happen to have any leftovers (which is rare, but it happens!), you can store the blended Chocolate Colada in an airtight container in the fridge for up to 24 hours. Just give it a good stir before serving again, as it may separate. For longer storage, consider pouring the mixture into ice cube trays and freezing it. You can blend the frozen cubes later for a quick treat!
With these FAQs in mind, you’re well-equipped to tackle any questions that may arise while making your Chocolate Colada. Remember, cooking is all about exploration and having fun, so don’t hesitate to experiment and make this recipe your own. Cheers to delicious adventures in the kitchen!
Conclusion on Chocolate Colada Recipe
As I reflect on my journey with the Chocolate Colada, I can’t help but smile at the joy it brings. This delightful drink is more than just a cocktail; it’s a celebration of flavors that dance together in perfect harmony. The rich chocolate, the tropical coconut, and the creamy ice cream create a symphony of taste that transports you to a sun-soaked beach, even if you’re just in your kitchen.
What I love most about the Chocolate Colada is its versatility. Whether you’re hosting a summer gathering, celebrating a special occasion, or simply treating yourself after a long day, this drink fits the bill. It’s easy to make, requiring just a few simple ingredients and a blender. Plus, the variations are endless! From minty twists to fruity additions, you can customize it to suit your mood or the season.


