Introduction to Canned Chicken Pizza Crust
As a busy mom, I know how challenging it can be to whip up a delicious dinner after a long day. That’s why I’m excited to share my recipe for Canned Chicken Pizza Crust! This unique twist on pizza is not only quick and easy but also packed with flavor. Imagine a crust made from canned chicken that’s gluten-free and perfect for those hectic weeknights. It’s a delightful way to impress your family while keeping dinner stress-free. Trust me, once you try this, it might just become your go-to dinner solution!
Why You’ll Love This Canned Chicken Pizza Crust
This Canned Chicken Pizza Crust is a game-changer for busy nights! It’s incredibly easy to make, taking just about 10 minutes of prep time. The taste? Oh, it’s a delightful surprise! With a crispy, cheesy crust, it’s sure to please even the pickiest eaters. Plus, it’s gluten-free, making it a fantastic option for everyone at the table. You’ll love how quickly it comes together, leaving you more time to enjoy family moments!
Ingredients for Canned Chicken Pizza Crust
Gathering the right ingredients is key to making a delicious Canned Chicken Pizza Crust. Here’s what you’ll need:
- Canned Chicken: The star of the show! It provides protein and a unique texture. Look for high-quality canned chicken for the best flavor.
- Large Egg: This helps bind everything together, giving the crust its structure.
- Shredded Mozzarella Cheese: Adds that gooey, melty goodness we all love on pizza. You can use part-skim for a lighter option.
- Grated Parmesan Cheese: A sprinkle of this brings a nutty flavor that elevates the crust.
- Garlic Powder: A must for flavor! It adds a savory depth that makes every bite irresistible.
- Italian Seasoning: This blend of herbs gives your crust a classic pizza taste. Feel free to use fresh herbs if you have them!
- Salt and Pepper: Essential for seasoning. Adjust to your taste for the perfect balance.
- Pizza Sauce: Use your favorite brand or homemade sauce to spread over the crust. It’s the perfect base for toppings.
- Additional Shredded Mozzarella Cheese: More cheese means more deliciousness! Layer it on top for that cheesy finish.
- Sliced Pepperoni: A classic topping that adds a bit of spice. You can swap it for veggies or other proteins if you prefer.
For exact measurements, check the bottom of the article where you can find everything listed for easy printing. Enjoy customizing your pizza with these ingredients!

How to Make Canned Chicken Pizza Crust
Now that you have your ingredients ready, let’s dive into making this delightful Canned Chicken Pizza Crust! Follow these simple steps, and you’ll have a delicious dinner in no time.
Step 1: Preheat the Oven
First things first, preheat your oven to 400°F (200°C). This step is crucial because it ensures your crust bakes evenly and gets that lovely golden color. While the oven heats up, line a baking sheet with parchment paper. This will prevent sticking and make cleanup a breeze!
Step 2: Mix the Ingredients
In a large mixing bowl, combine the drained canned chicken, egg, 1 cup of shredded mozzarella cheese, Parmesan cheese, garlic powder, Italian seasoning, salt, and pepper. Use a fork or your hands to mix everything together until it’s well combined. You want a cohesive mixture that holds together nicely. Don’t be afraid to get your hands in there; it’s part of the fun!
Step 3: Shape the Crust
Now comes the fun part—shaping your crust! Transfer the chicken mixture onto the prepared baking sheet. With your hands or a spatula, spread and flatten the mixture into a round shape, about 1/4 inch thick. Make sure the edges are slightly thicker to hold in the toppings later. This is your canvas, so make it look good!
Step 4: Bake the Crust
Pop your crust into the preheated oven and bake for 20-25 minutes. Keep an eye on it! You’ll know it’s done when the crust turns golden brown and feels firm to the touch. This step is essential for achieving that perfect base for your pizza.
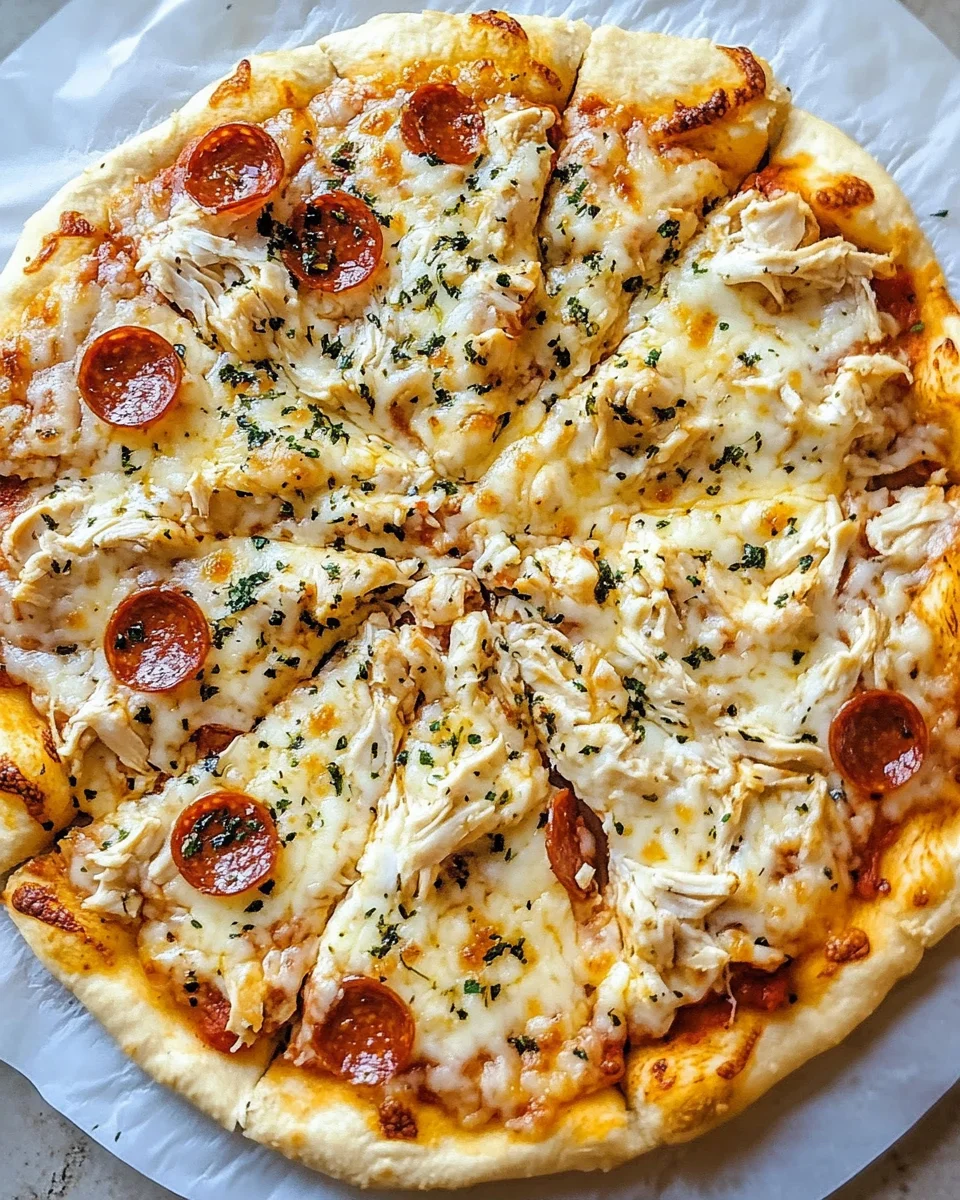
Step 5: Add Toppings
Once your crust is baked, it’s time to add the toppings! Remove it from the oven and spread the pizza sauce evenly over the top. Then, sprinkle 1 cup of shredded mozzarella cheese over the sauce. Finally, add your sliced pepperoni or any other toppings you love. Get creative here; this is where you can personalize your pizza!
Step 6: Final Bake
Return the pizza to the oven for another 10-15 minutes. This final bake is crucial for melting the cheese and bringing all those flavors together. You want the cheese to be bubbly and slightly golden. Once it’s done, let it cool for a few minutes before slicing. Trust me, the wait will be worth it!
Tips for Success
- Use high-quality canned chicken for the best flavor and texture.
- Don’t skip preheating the oven; it’s key for a crispy crust.
- Feel free to experiment with toppings—veggies, different cheeses, or even barbecue sauce!
- Let the pizza cool slightly before slicing to avoid a cheesy mess.
- Store leftovers in an airtight container for up to three days.

Equipment Needed
- Baking Sheet: A standard baking sheet works well. If you don’t have one, a pizza stone can be a great alternative.
- Parchment Paper: This helps prevent sticking. If you’re out, lightly greasing the baking sheet will do.
- Mixing Bowl: Any large bowl will suffice for mixing your ingredients.
- Spatula: Use a spatula for spreading the crust. A spoon can work in a pinch!
Variations of Canned Chicken Pizza Crust
- BBQ Chicken Pizza: Swap the pizza sauce for barbecue sauce and top with red onions and cilantro for a sweet and tangy twist.
- Veggie Delight: Load up on your favorite vegetables like bell peppers, mushrooms, and spinach for a colorful and nutritious option.
- Spicy Buffalo Chicken: Mix in some buffalo sauce with the canned chicken and top with blue cheese crumbles for a zesty kick.
- Caprese Style: Use fresh tomatoes, basil, and mozzarella for a fresh take. Drizzle with balsamic glaze before serving.
- Cheesy Garlic Crust: Add extra garlic powder and Italian herbs to the crust mixture for a flavorful base that pairs well with any topping.
Serving Suggestions for Canned Chicken Pizza Crust
- Fresh Salad: Pair your pizza with a crisp garden salad for a refreshing contrast.
- Garlic Bread: Serve with warm garlic breadsticks for a comforting meal.
- Wine Pairing: A light white wine or sparkling water complements the flavors beautifully.
- Presentation: Slice the pizza into fun shapes for kids or serve on a colorful platter.
FAQs about Canned Chicken Pizza Crust
As you embark on your culinary adventure with Canned Chicken Pizza Crust, you might have a few questions. Here are some common queries I’ve encountered, along with helpful answers!
Can I use fresh chicken instead of canned chicken?
Absolutely! If you prefer fresh chicken, just cook and shred it before mixing. Canned chicken is a time-saver, but fresh can add a lovely flavor.
Is this pizza crust gluten-free?
Yes! This Canned Chicken Pizza Crust is naturally gluten-free, making it a great option for those with gluten sensitivities. Enjoy without worry!
How do I store leftovers?
Store any leftover pizza in an airtight container in the refrigerator for up to three days. Just reheat in the oven for a few minutes to enjoy that fresh taste again!
Can I freeze the crust?
Yes, you can freeze the unbaked crust! Just shape it, wrap it tightly, and store it in the freezer. When you’re ready, bake it straight from frozen, adding a few extra minutes to the cooking time.
What toppings work best with this crust?
The beauty of this Canned Chicken Pizza Crust is its versatility! You can use classic toppings like pepperoni and mushrooms or get creative with BBQ chicken or a veggie medley. The choice is yours!
Final Thoughts
Creating a Canned Chicken Pizza Crust is more than just making dinner; it’s about bringing joy to the table. This recipe transforms a simple can of chicken into a delightful meal that sparks creativity and conversation. I love how it allows for endless customization, making it perfect for family preferences. Plus, it’s a fantastic way to sneak in some protein while keeping things gluten-free. Whether it’s a busy weeknight or a fun family gathering, this pizza crust is sure to impress. So roll up your sleeves, gather your loved ones, and enjoy the deliciousness together!
Print
Canned Chicken Pizza Crust
- Total Time: 45-50 minutes
- Yield: 4 servings 1x
- Diet: Gluten Free
Description
As a busy mom, I know how challenging it can be to whip up a delicious dinner after a long day. That’s why I’m excited to share my recipe for Canned Chicken Pizza Crust! This unique twist on pizza is not only quick and easy but also packed with flavor. Imagine a crust made from canned chicken that’s gluten-free and perfect for those hectic weeknights. It’s a delightful way to impress your family while keeping dinner stress-free. Trust me, once you try this, it might just become your go-to dinner solution!
Ingredients
- 2 cans (12.5 oz each) canned chicken, drained
- 1 large egg
- 1 cup shredded mozzarella cheese
- 1/2 cup grated Parmesan cheese
- 1 teaspoon garlic powder
- 1/2 teaspoon Italian seasoning
- Salt and pepper to taste
- 1 cup pizza sauce (for topping)
- 1 cup additional shredded mozzarella cheese (for topping)
- Sliced pepperoni (for topping)
Instructions
- Preheat your oven to 400°F (200°C). Line a baking sheet with parchment paper to avoid sticking.
- In a large mixing bowl, combine the drained canned chicken, egg, 1 cup of shredded mozzarella cheese, Parmesan cheese, garlic powder, Italian seasoning, salt, and pepper. Mix until everything is well-combined.
- Spread the chicken mixture onto the prepared baking sheet and flatten it into a crust shape, about 1/4 inch thick.
- Bake in your preheated oven for 20-25 minutes or until the crust turns golden and feels firm to the touch.
- Remove the crust from the oven and spread the pizza sauce evenly over the top.
- Sprinkle 1 cup of shredded mozzarella cheese over the sauce, then add the pepperoni slices.
- Return the pizza to the oven and bake for another 10-15 minutes until the cheese is all melty and bubbly.
- Let it cool for a few minutes before slicing and enjoy!
Notes
- Feel free to customize the toppings to your liking.
- This crust is gluten-free, making it suitable for those with gluten sensitivities.
- Store any leftovers in the refrigerator for up to 3 days.
- Prep Time: 10 minutes
- Cook Time: 35-40 minutes
- Category: Dinner
- Method: Baking
- Cuisine: American
Nutrition
- Serving Size: 1 slice
- Calories: 300
- Sugar: 2g
- Sodium: 600mg
- Fat: 15g
- Saturated Fat: 7g
- Unsaturated Fat: 5g
- Trans Fat: 0g
- Carbohydrates: 10g
- Fiber: 1g
- Protein: 25g
- Cholesterol: 70mg