
Introduction to Bird’s Nest Mini Oreo Cheesecakes Recipe
As a passionate home cook, I find joy in creating desserts that not only taste amazing but also bring a smile to everyone’s face. One of my favorite treats to whip up is the Bird’s Nest Mini Oreo Cheesecakes. These delightful little bites are perfect for spring celebrations, especially around Easter. They remind me of the joy of finding colorful eggs hidden in the garden, a tradition I cherished as a child.
When I first stumbled upon this recipe, I was captivated by the idea of transforming a classic cheesecake into a whimsical, nest-like creation. The combination of the rich, creamy filling and the crunchy Oreo crust is simply irresistible. Plus, the vibrant mini candy eggs on top add a playful touch that makes these cheesecakes a hit at any gathering.
Ingredients for Bird’s Nest Mini Oreo Cheesecakes Recipe
Before we get our hands dirty in the kitchen, let’s gather all the ingredients for these delightful Bird’s Nest Mini Oreo Cheesecakes. Having everything ready makes the process smoother and more enjoyable. Trust me, you’ll want to savor every moment of this culinary adventure!
Main Ingredients
- 20 Oreo cookies, crushed: These will form the base of our cheesecakes, providing that rich chocolatey flavor.
- 4 tablespoons unsalted butter, melted: This helps bind the crushed Oreos together, creating a delicious crust.
- 8 oz cream cheese, softened: The star of our cheesecake filling! Make sure it’s at room temperature for easy mixing.
- ½ cup powdered sugar: This adds sweetness and helps achieve that smooth texture.
- 1 teaspoon vanilla extract: A splash of vanilla elevates the flavor, making it even more delightful.
- 1 cup heavy whipping cream, whipped: This gives our cheesecake its light and airy texture. Whip it until soft peaks form for the best results.
Optional Add-ons
- 4 oz semisweet chocolate, grated or shaved: This is for the nest topping. You can use milk chocolate if you prefer a sweeter touch.
- 36 mini candy eggs: I love using Cadbury Mini Eggs or M&M eggs for a pop of color and fun. Feel free to mix and match!
- Fresh berries: If you want to add a fruity twist, consider topping your cheesecakes with fresh raspberries or strawberries.
- Mint leaves: A sprig of mint can add a refreshing touch and a splash of green to your nests.
When selecting your ingredients, I recommend using high-quality cream cheese and fresh whipping cream. It truly makes a difference in the final taste and texture of your cheesecakes. Now that we have everything ready, let’s move on to the fun part—preparing these delicious treats!

How to Prepare Bird’s Nest Mini Oreo Cheesecakes Recipe
Now that we have all our ingredients ready, it’s time to roll up our sleeves and dive into the preparation of these delightful Bird’s Nest Mini Oreo Cheesecakes. I promise, the process is just as fun as the final result! Let’s break it down step by step.
Step 1: Prepare the Oreo Crust
First things first, we need to create that delicious Oreo crust that will hold our cheesecake filling. It’s the foundation of our mini cheesecakes, so let’s make it count!
- Crush the Oreos: Place the Oreo cookies in a food processor and pulse until they are finely ground. If you don’t have a food processor, you can put them in a zip-top bag and crush them with a rolling pin. It’s a great way to relieve stress!
- Mix with Butter: In a bowl, combine the crushed Oreos with melted butter. Stir until the mixture is evenly moistened. It should resemble wet sand.
- Press into Muffin Cups: Line a muffin tin with cupcake liners. Evenly distribute the crust mixture into each liner, pressing down firmly. This step is crucial for a sturdy base!
- Chill: Place the muffin tin in the refrigerator while you prepare the cheesecake filling. This helps the crust set nicely.
Tips for Achieving the Perfect Crust
To ensure your crust is just right, make sure to press it down firmly. I like to use the bottom of a measuring cup for even pressure. If you want a thicker crust, feel free to add a few more crushed Oreos!
Step 2: Make the Cheesecake Filling
With the crust chilling, let’s move on to the star of the show—the cheesecake filling! This part is where the magic happens.
- Beat Cream Cheese & Sugar: In a large bowl, beat the softened cream cheese and powdered sugar together until smooth and fluffy. I usually use an electric mixer for this, but a whisk works too if you’re feeling strong!
- Add Vanilla: Mix in the vanilla extract until fully incorporated. The aroma will make your kitchen smell heavenly!
- Fold in Whipped Cream: Gently fold in the whipped cream. This step is key to achieving that light and airy texture. Be careful not to deflate the whipped cream!
Tips for Creamy Cheesecake Consistency
Make sure your cream cheese is at room temperature before mixing. This helps avoid lumps and ensures a smooth filling. If you find lumps, don’t hesitate to beat it a bit longer until it’s creamy!
Step 3: Assemble the Mini Cheesecakes
Now comes the fun part—assembling our mini cheesecakes! This is where you can really let your creativity shine.
- Fill the Crusts: Spoon the cheesecake mixture over the chilled crusts. Use a spatula to smooth the tops. I like to leave a little room at the top for the nest decoration.
- Chill to Set: Refrigerate the cheesecakes for at least 3 hours, or until they are firm. Patience is key here!
Tips for Layering Ingredients
For a neat finish, try to keep the filling level with the top of the crust. If you want to get fancy, you can use a piping bag to fill the crusts for a more polished look!
Step 4: Create the Bird’s Nest Topping
Once your cheesecakes are set, it’s time to create the adorable bird’s nest topping. This is where the magic truly happens!
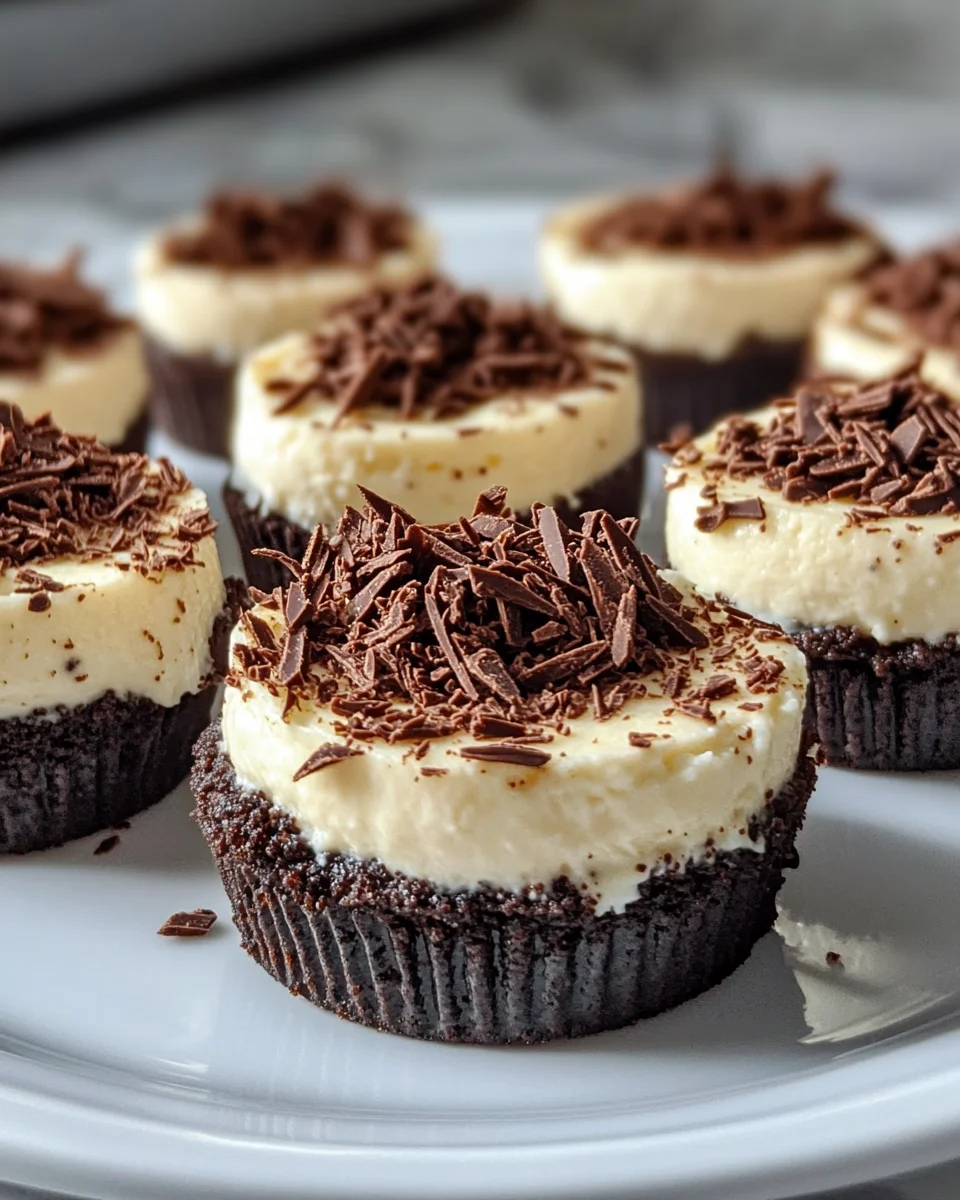
- Create the Nest: Sprinkle grated or shaved chocolate over the top of each cheesecake. This will resemble a nest and add a rich chocolate flavor.
- Add Candy Eggs: Place three mini candy eggs in the center of each cheesecake. This adds a pop of color and a fun surprise!
Tips for Decorating
Feel free to get creative with your decorations! You can use different types of chocolate or even add edible glitter for a festive touch. The more colorful, the better!
And there you have it! Your Bird’s Nest Mini Oreo Cheesecakes are now ready to chill and impress. I can already imagine the smiles on everyone’s faces when they see these delightful treats!
Equipment Needed for Bird’s Nest Mini Oreo Cheesecakes Recipe
Before we dive into the kitchen, let’s gather the essential tools needed to create these delightful Bird’s Nest Mini Oreo Cheesecakes. Having the right equipment on hand makes the process smoother and more enjoyable. Here’s what you’ll need:
- Muffin Tin: A standard muffin tin is crucial for shaping our mini cheesecakes. If you don’t have one, you can use a silicone muffin mold for easy removal.
- Cupcake Liners: These help keep the cheesecakes intact and make for easy serving. If you’re out of liners, you can lightly grease the muffin tin instead.
- Food Processor or Rolling Pin: A food processor is perfect for crushing the Oreos. If you don’t have one, a rolling pin and a zip-top bag work just as well!
- Mixing Bowls: You’ll need a couple of mixing bowls—one for the crust and another for the cheesecake filling. I recommend using a large bowl for the filling to give you plenty of room to mix.
- Electric Mixer or Whisk: An electric mixer makes beating the cream cheese a breeze, but a whisk can do the job if you’re up for a little workout!
- Spatula: A spatula is essential for smoothing the cheesecake filling and for folding in the whipped cream. It’s a handy tool to have in your kitchen arsenal.
- Refrigerator: While not a tool per se, you’ll need a fridge to chill your cheesecakes until they’re perfectly set.
With these tools at your side, you’re all set to embark on this delicious culinary adventure. Let’s get cooking!
Variations of Bird’s Nest Mini Oreo Cheesecakes Recipe
While I adore the classic Bird’s Nest Mini Oreo Cheesecakes, there are so many fun variations you can try! Each twist adds a unique flavor and flair to this delightful dessert. Here are a few ideas that I’ve experimented with and loved:
- Peanut Butter Swirl: For all the peanut butter lovers out there, try adding a swirl of creamy peanut butter into the cheesecake filling. It adds a rich, nutty flavor that pairs beautifully with the chocolate crust.
- Fruit-Infused Cheesecake: Mix in some pureed strawberries or raspberries into the cheesecake filling for a fruity twist. It not only adds flavor but also a lovely pink hue!
- Mint Chocolate: Add a few drops of peppermint extract to the cheesecake filling for a refreshing minty flavor. Top with crushed mint chocolate candies for an extra treat.
- Caramel Drizzle: Drizzle some caramel sauce over the top of the cheesecakes before adding the chocolate nest. The sweet and salty combination is simply divine!
Feel free to get creative and mix and match these ideas! The beauty of this recipe is its versatility. Each variation brings a new experience, and I love discovering new favorites with every batch I make.
Cooking Notes for Bird’s Nest Mini Oreo Cheesecakes Recipe
As I’ve made these Bird’s Nest Mini Oreo Cheesecakes over the years, I’ve picked up a few helpful notes that can make your baking experience even better. Here are some tips to keep in mind:
- Room Temperature Ingredients: Always ensure your cream cheese is at room temperature before mixing. This helps achieve a smooth and creamy filling without lumps.
- Chill Time: Don’t rush the chilling process! Allowing the cheesecakes to set for at least 3 hours ensures they hold their shape when served.
- Storage: These mini cheesecakes can be stored in an airtight container in the refrigerator for up to 5 days. They also freeze well, so you can make them ahead of time!
- Serving Size: Each mini cheesecake is rich and satisfying, so I recommend serving them in small portions. They’re perfect for sharing at gatherings!
With these cooking notes in mind, you’ll be well on your way to creating the perfect Bird’s Nest Mini Oreo Cheesecakes. Happy baking!
Serving Suggestions for Bird’s Nest Mini Oreo Cheesecakes Recipe
When it comes to serving my Bird’s Nest Mini Oreo Cheesecakes, I love to get a little creative! Presentation can elevate the experience, and these mini treats are no exception. Here are some of my favorite serving suggestions:
- Garnish with Fresh Berries: A few fresh raspberries or strawberries on the side add a pop of color and a refreshing contrast to the rich cheesecake.
- Serve on a Decorative Platter: Arrange the cheesecakes on a beautiful platter, perhaps with some edible flowers for a springtime touch. It makes for a stunning centerpiece!
- Pair with Whipped Cream: A dollop of freshly whipped cream on top of each cheesecake adds an extra layer of indulgence. You can even sprinkle some cocoa powder for a chocolatey finish.
- Offer a Variety: If you’ve made different variations, consider serving them together. This way, guests can sample a few flavors and find their favorite!
These serving ideas not only enhance the visual appeal but also make the experience of enjoying these delightful cheesecakes even more special. I can’t wait for you to try them out!
Tips for Perfecting Bird’s Nest Mini Oreo Cheesecakes Recipe
As I’ve crafted my Bird’s Nest Mini Oreo Cheesecakes over the years, I’ve gathered a treasure trove of tips to help you achieve the best results. Here are some of my favorite tricks that can elevate your cheesecakes to the next level:
- Use Quality Ingredients: The better the ingredients, the better the flavor! Opt for high-quality cream cheese and fresh whipping cream for a rich, creamy filling.
- Don’t Skip the Chill: Allow your cheesecakes to chill for at least 3 hours. This step is crucial for achieving that perfect, firm texture.
- Experiment with Flavors: Don’t hesitate to add your favorite flavors to the cheesecake filling. A splash of almond extract or a hint of citrus zest can create a delightful twist!
- Be Gentle with the Whipped Cream: When folding in the whipped cream, use a light hand. This keeps the filling airy and fluffy, which is key to a perfect cheesecake.
- Decorate Just Before Serving: For the best presentation, add the chocolate nest and candy eggs right before serving. This keeps everything looking fresh and appealing.
With these tips in your back pocket, you’ll be well on your way to creating Bird’s Nest Mini Oreo Cheesecakes that are not only delicious but also visually stunning. Happy baking!
Breakdown of Time for Bird’s Nest Mini Oreo Cheesecakes Recipe
When it comes to making my Bird’s Nest Mini Oreo Cheesecakes, I always like to plan ahead. Knowing how much time each step takes helps me stay organized and ensures everything runs smoothly. Here’s a quick breakdown of the time you’ll need:
- Prep Time: Approximately 30 minutes. This includes gathering your ingredients, preparing the Oreo crust, and mixing the cheesecake filling.
- Chill Time: At least 3 hours. This is crucial for allowing the cheesecakes to set properly. I often make them a day in advance to save time!
- Total Time: About 3 hours and 30 minutes. This includes both prep and chill time, making it a perfect treat to prepare ahead of a gathering.
With this time breakdown, you can easily fit these delightful mini cheesecakes into your schedule. Just remember, the wait is worth it for that creamy, dreamy bite! Happy baking!
Nutritional Information for Bird’s Nest Mini Oreo Cheesecakes Recipe
As a passionate home cook, I always find it helpful to know the nutritional information of the treats I make. It allows me to enjoy them mindfully while sharing them with family and friends. Here’s a general breakdown of the nutritional content for one Bird’s Nest Mini Oreo Cheesecake, based on the ingredients listed:
- Calories: Approximately 250 calories
- Fat: 18g (Saturated Fat: 10g)
- Carbohydrates: 22g (Sugars: 12g)
- Protein: 3g
- Cholesterol: 50mg
- Sodium: 150mg
Keep in mind that these values can vary based on specific brands and ingredient choices. If you’re looking to lighten the recipe, consider using reduced-fat cream cheese or a sugar substitute. Regardless, these mini cheesecakes are a delightful treat that’s worth every bite! Enjoy them in moderation, and they’ll surely bring joy to your gatherings.
Frequently Asked Questions about Bird’s Nest Mini Oreo Cheesecakes Recipe
As I’ve shared my Bird’s Nest Mini Oreo Cheesecakes with friends and family, I’ve received quite a few questions about this delightful dessert. I love answering these queries because it helps others enjoy the recipe just as much as I do! Here are some of the most frequently asked questions:
Can I make these cheesecakes ahead of time?
Absolutely! In fact, I often make them a day in advance. They store well in the refrigerator for up to 5 days. Just remember to add the chocolate nest and candy eggs right before serving for the best presentation!
What can I use instead of Oreo cookies for the crust?
If you’re looking for a different flavor, you can use chocolate graham crackers or even vanilla wafers. Just crush them the same way you would the Oreos. It’s a fun way to experiment with flavors!
Conclusion on Bird’s Nest Mini Oreo Cheesecakes Recipe
In conclusion, the Bird’s Nest Mini Oreo Cheesecakes are not just a dessert; they are a delightful experience that brings joy to any occasion. With their rich, creamy filling and crunchy Oreo crust, these mini treats are a perfect blend of flavors and textures. The whimsical presentation, topped with colorful candy eggs, adds a playful touch that is sure to impress both kids and adults alike.
Print
Bird’s Nest Mini Oreo Cheesecakes: A Delightful Treat!
- Total Time: 3 hours 30 minutes
- Yield: 12 mini cheesecakes 1x
- Diet: Vegetarian
Description
Bird’s Nest Mini Oreo Cheesecakes are delightful, whimsical treats perfect for spring celebrations, especially Easter. They feature a rich, creamy filling with a crunchy Oreo crust and are topped with colorful mini candy eggs.
Ingredients
- 20 Oreo cookies, crushed
- 4 tablespoons unsalted butter, melted
- 8 oz cream cheese, softened
- ½ cup powdered sugar
- 1 teaspoon vanilla extract
- 1 cup heavy whipping cream, whipped
- 4 oz semisweet chocolate, grated or shaved (optional)
- 36 mini candy eggs (optional)
- Fresh berries (optional)
- Mint leaves (optional)
Instructions
- Prepare the Oreo crust by crushing the Oreos and mixing them with melted butter.
- Press the mixture into muffin cups and chill.
- Make the cheesecake filling by beating cream cheese and powdered sugar, then folding in whipped cream.
- Fill the crusts with the cheesecake mixture and chill to set.
- Create the bird’s nest topping with grated chocolate and mini candy eggs.
Notes
- Ensure cream cheese is at room temperature for a smooth filling.
- Chill the cheesecakes for at least 3 hours for best results.
- Store in an airtight container in the refrigerator for up to 5 days.
- Each mini cheesecake is rich; serve in small portions.
- Prep Time: 30 minutes
- Cook Time: 0 minutes
- Category: Dessert
- Method: No-bake
- Cuisine: American
Nutrition
- Serving Size: 1 mini cheesecake
- Calories: 250
- Sugar: 12g
- Sodium: 150mg
- Fat: 18g
- Saturated Fat: 10g
- Unsaturated Fat: 0g
- Trans Fat: 0g
- Carbohydrates: 22g
- Fiber: 0g
- Protein: 3g
- Cholesterol: 50mg


