

Introduction to Banana Pudding Easter Truffles
As Easter approaches, I find myself craving sweets, especially something that brings joy with every bite. That’s where these Banana Pudding Easter Truffles come into play! They’re a delightful twist on a classic dessert that transforms a busy day into something special. Whether you’re a mom juggling schedules or a professional looking to impress at gatherings, these no-bake truffles are the perfect solution. With just a handful of ingredients and minimal prep time, you’ll create an unforgettable treat that both kids and adults will adore. Let’s dive right into this sweet adventure!
Why You’ll Love This Banana Pudding Easter Truffles
These Banana Pudding Easter Truffles are a game-changer when it comes to dessert! They are incredibly easy to whip up, making them a fantastic choice for busy schedules. The creamy banana flavor and crisp vanilla wafers create an irresistible taste. Plus, the joyful pops of color from sprinkles make them visually stunning for any celebration. You can easily tailor them to fit your family’s preferences! What’s not to love?
Ingredients for Banana Pudding Easter Truffles
Gathering the right ingredients is half the fun of baking, and these Banana Pudding Easter Truffles are no exception! Here’s what you’ll need:
- Banana pudding mix: This is the star ingredient that gives your truffles that luscious banana flavor. It’s a quick route to creamy goodness!
- Milk: Helps activate the pudding mix and adds a silky texture. You can use dairy or a non-dairy alternative like almond milk if preferred.
- Crushed vanilla wafers: These crunchy pieces provide a delightful contrast to the creamy filling. You can also use graham crackers for a fun twist!
- Cream cheese: Adds richness and a smooth texture. Make sure it’s softened for easy blending. Cream cheese alternatives are available for those dairy-free.
- Powdered sugar: A must for sweetness and to help the mixture hold together. You can try coconut sugar as a substitute for a healthier choice!
- Vanilla extract: This enhances the overall flavor, making it more aromatic. Pure vanilla extract is best, but imitation works fine, too.
- White chocolate chips: These are melted to coat the truffles, giving them a sweet, creamy finish. If you’re feeling adventurous, swap them with dark chocolate for a richer taste.
- Colorful sprinkles: These add a festive touch! Use whatever colors suit your celebration or theme, and let your creativity shine!
For exact quantities, don’t worry! They are listed at the end of the article, ready for printing when you want to make these truffles yourself.
How to Make Banana Pudding Easter Truffles
Making these delightful Banana Pudding Easter Truffles is a breeze, and I’ll guide you through every step. With each bite, you’ll experience a burst of banana flavor that’s simply unforgettable. Now, let’s get started!
Step 1: Whisk the Pudding Mix and Milk
Start by grabbing a medium bowl. Add the banana pudding mix and milk to it. Whisk them together until the mixture thickens and resembles pudding. It should take just a few minutes. This is where the magic begins!
Step 2: Combine Cream Cheese and Sugar
Next, add in the softened cream cheese, powdered sugar, and vanilla extract. Mix everything together until it’s nice and smooth. You can use a hand mixer if you want to save time. The goal is creamy perfection!
Step 3: Fold in Vanilla Wafers
Now, it’s time to fold in those crushed vanilla wafers. Gently stir until they are evenly distributed. This step adds texture and crunch to your truffles. You’ll really love that contrast!
Step 4: Chill the Mixture
Cover the bowl and place it in the refrigerator for about 30 minutes. Chilling makes it easier to handle the mixture later. Trust me, waiting is worth it for perfectly shaped truffles!
Step 5: Form the Truffles
Once chilled, scoop small portions of the mixture. With your hands, roll them into 1-inch balls. Place each ball on a parchment-lined baking sheet. Keep them spaced out, as they’ll need room later!
Step 6: Melt the White Chocolate
Time to melt those white chocolate chips! Place them in a microwave-safe bowl. Heat in short intervals, stirring in between. The aim is a silky smooth chocolate. Be patient; it’s worth the wait!
Step 7: Coat the Truffles
Take each truffle and dip it in the melted chocolate. Ensure they’re fully coated. Using a fork can help with this task. It’s like giving each truffle a warm, sweet bath!
Step 8: Add Sprinkles and Refrigerate
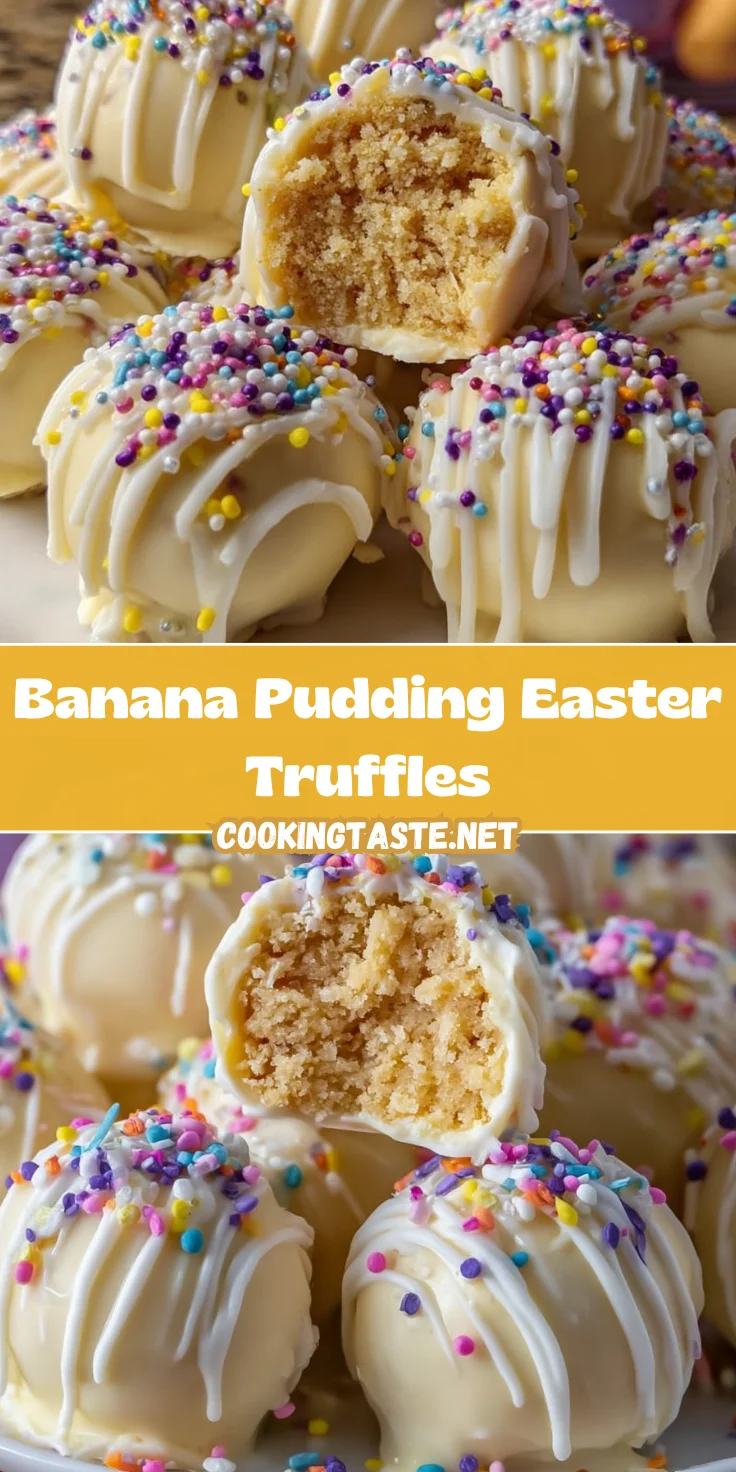
After coating, carefully place the truffles back on the parchment paper. It’s sprinkle time! Add those colorful sprinkles right on top. Then, refrigerate them again for about 20-30 minutes until the chocolate coating firms up. Voila, you’re almost there!
Tips for Success
- Ensure your cream cheese is at room temperature for easier mixing.
- For a smoother chocolate coating, make sure to stir the melted chocolate thoroughly.
- Experiment with different types of sprinkles to match your occasion!
- If the mixture is too sticky, chill it for a little longer.
- Don’t rush the refrigeration times; they’re crucial for the perfect texture.
Equipment Needed for Banana Pudding Easter Truffles
- Mixing bowls: A medium-sized bowl works best, but you can use any bowl you have on hand.
- Whisk: A whisk is perfect for mixing, although a fork can do the job in a pinch.
- Baking sheet: Use a regular baking sheet lined with parchment paper for easy cleanup.
- Microwave-safe bowl: Any bowl safe for the microwave will do for melting chocolate.
- Measuring cups and spoons: While measuring isn’t mandatory, it helps keep things accurate!
Variations of Banana Pudding Easter Truffles
- Nutty Twist: Add chopped nuts like pecans or walnuts to the truffle mixture. This gives an extra crunch and nutty flavor.
- Chocolate Delight: Substitute the white chocolate coating with dark or milk chocolate for a richer taste. Dark chocolate pairs beautifully with the banana flavors!
- Banana Lovers: Incorporate mashed ripe bananas into the truffle mixture for an extra punch of banana goodness.
- Healthier Option: Use Greek yogurt instead of cream cheese for a lighter version that still tastes divine.
- Flavor Infusions: Experiment by adding a dash of almond or coconut extract for an exotic twist that takes the flavors up a notch.
- Colorful Sprinkles: Change up the sprinkles to match different holidays or themes—think pastel sprinkles for Easter or vibrant colors for birthday celebrations!
Serving Suggestions for Banana Pudding Easter Truffles
- Pair these Banana Pudding Easter Truffles with a light fruit salad for a refreshing contrast.
- For drinks, consider serving iced tea or a fruity lemonade to quench the thirst.
- Arrange truffles on a colorful platter and add some fresh flowers for an elegant touch.
- Try pairing with whipped cream or a scoop of vanilla ice cream for a delightful indulgence!
FAQs about Banana Pudding Easter Truffles
Can I make these Banana Pudding Easter Truffles in advance?
Absolutely! These truffles can be made a day ahead of time. Just store them in an airtight container in the refrigerator. This actually allows the flavors to meld even more!
What can I use instead of cream cheese?
If you want a dairy-free option, you can use vegan cream cheese or even Greek yogurt. Both options will still give your truffles a lovely creamy texture!
Are these truffles safe for kids?
Yes! These Banana Pudding Easter Truffles are kid-friendly and contain no raw eggs. Make sure to supervise younger kids while they help in the kitchen!
How should I store leftovers?
Store any leftover truffles in an airtight container in the refrigerator. They’ll keep well for about a week—if they last that long!
Can I freeze these truffles?
You can! Just place them in a single layer on a baking sheet, freeze until firm, then transfer to a container. They’ll last a couple of months in the freezer, allowing for a sweet treat anytime!
Final Thoughts
Creating these Banana Pudding Easter Truffles is more than just making a dessert; it’s about crafting delightful moments. The joy of entering your kitchen, rolling those creamy, sweet bites, and imagining the smiles they’ll bring can brighten even the busiest day. This recipe has a wonderful way of bringing family together, whether you’re enjoying them at Easter or any gathering. With every bite, you’ll savor the nostalgia of childhood favorites, all while sharing new memories with loved ones. So go ahead, indulge yourself and embrace the sweetness of this delightful treat!
Print
Banana Pudding Easter Truffles
- Total Time: 1 hour
- Yield: 24 truffles 1x
- Diet: Vegetarian
Description
Delicious banana pudding truffles coated in white chocolate, perfect for Easter celebrations!
Ingredients
- 1 cup banana pudding mix
- 2 cups milk
- 1 cup crushed vanilla wafers
- 1/2 cup cream cheese, softened
- 1/2 cup powdered sugar
- 1 teaspoon vanilla extract
- 1 cup white chocolate chips
- Sprinkles for decoration
Instructions
- In a medium bowl, whisk together the banana pudding mix and milk until the mixture thickens.
- Add the softened cream cheese, powdered sugar, and vanilla extract. Mix until smooth and well combined.
- Stir in the crushed vanilla wafers until the mixture forms a thick, dough-like consistency.
- Cover the mixture and place it in the refrigerator for about 30 minutes to make it easier to handle.
- Once chilled, scoop small portions of the mixture and roll them into 1-inch balls. Place them on a parchment-lined baking sheet.
- Melt the white chocolate chips in the microwave in short intervals, stirring until smooth.
- Dip each truffle into the melted white chocolate, making sure it is fully coated.
- Place the coated truffles back onto the parchment paper and immediately add colorful sprinkles on top.
- Refrigerate the truffles for about 20–30 minutes until the chocolate coating is set.
Notes
- Ensure that the cream cheese is softened for easier mixing.
- Use a different type of chocolate if desired for a flavor variation.
- Sprinkles can be customized for different occasions.
- Prep Time: 10 minutes
- Cook Time: 0 minutes
- Category: Dessert
- Method: No-Bake
- Cuisine: American
Nutrition
- Serving Size: 1 truffle
- Calories: 150
- Sugar: 12g
- Sodium: 50mg
- Fat: 7g
- Saturated Fat: 4g
- Unsaturated Fat: 2g
- Trans Fat: 0g
- Carbohydrates: 20g
- Fiber: 1g
- Protein: 2g
- Cholesterol: 10mg