

Introduction to The Fruity Pebbles Sushi
Hey there, fellow home cooks! If you’ve ever felt the crunch of life pulling you in a million different directions, you’re not alone. That’s why I absolutely adore making The Fruity Pebbles Sushi. This delightful treat is both a visual feast and a tasty bite, perfect for busy moms and professionals like us. It’s the kind of recipe that invites creativity into our hectic schedule. Plus, who can resist the colorful joy of Fruity Pebbles combined with marshmallows and white chocolate? Trust me, making this will bring smiles all around!
Why You’ll Love This The Fruity Pebbles Sushi
This The Fruity Pebbles Sushi is a delightful escape from the ordinary. It’s not just about the taste; it’s about the joy in the kitchen! With minimal prep time and no baking required, you can whip up this fun treat in just 25 minutes. Plus, it’s a fantastic way to involve the kids. They’ll love rolling up their sushi and experimenting with toppings. It’s guaranteed to make your family smile!
Ingredients in The Fruity Pebbles Sushi
Gathering the right ingredients is half the fun! Here’s what you’ll need for The Fruity Pebbles Sushi:
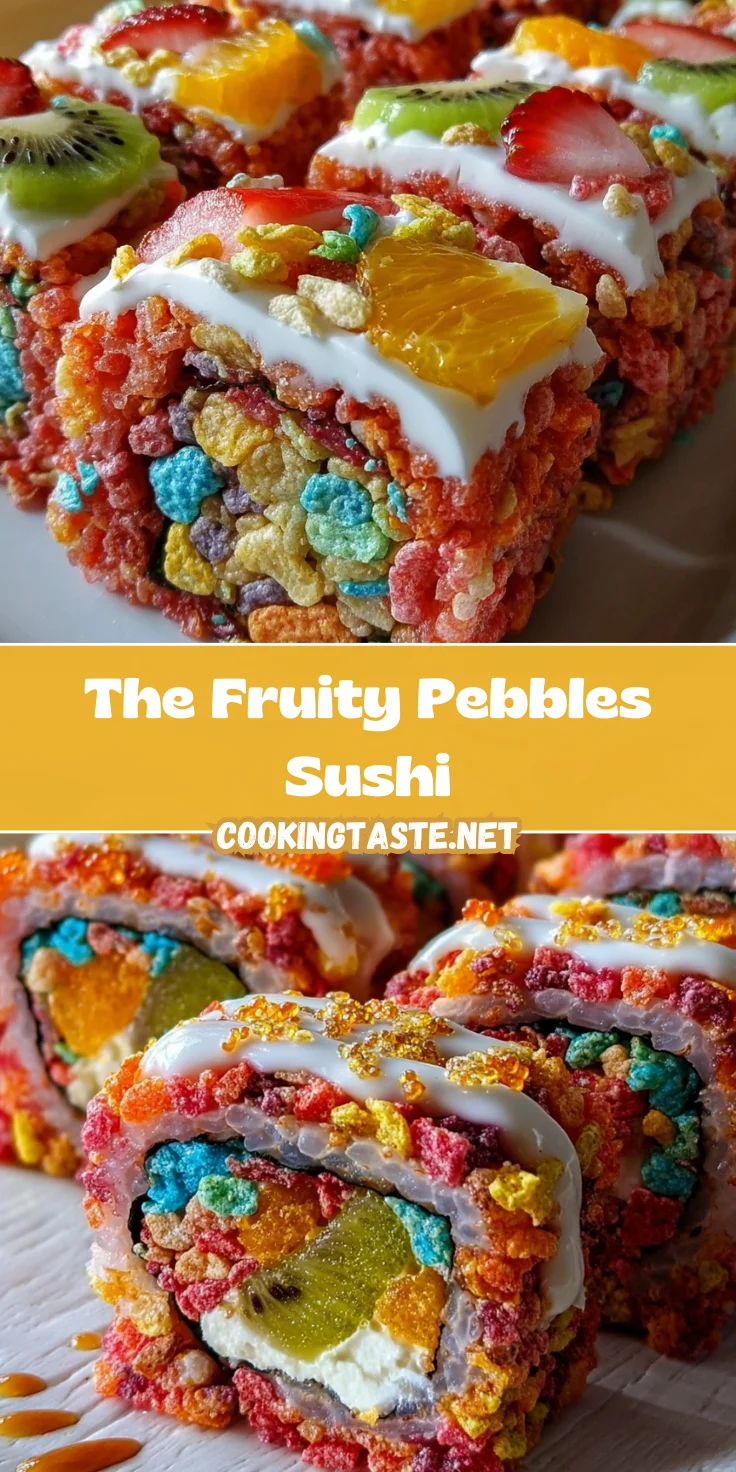
- Fruity Pebbles cereal: This colorful cereal is the star of the show, adding sweetness and texture.
- Marshmallows: They bring that delightful gooeyness and help bind everything together.
- Unsalted butter: Essential for melting with marshmallows; the unsalted variety lets the other flavors shine.
- Vanilla extract: Just a teaspoon adds depth and enhances the sweet flavor profile.
- White chocolate chips: For drizzling, they mimic sushi toppings and add a creamy sweetness.
- Food coloring (optional): Use this to dress up your white chocolate, making your sushi even more vibrant.
- Fresh fruit slices: Think strawberries, kiwi, or mango—these add freshness and a pop of color for garnish.
You’ll find the exact quantities at the bottom of the article, along with a printable version. Feel free to get creative! You can swap out the Fruity Pebbles for other cereals or use dark chocolate instead of white if that suits your taste. The possibilities are endless!
How to Make The Fruity Pebbles Sushi
Ready to dive into the fun of The Fruity Pebbles Sushi? Let’s break it down step by step. Each step is straightforward and has a little tip or two to help you on your adventure. So grab your apron, and let’s create some sweet magic!
Melt the Butter
Start by melting the butter in a large pot over low heat. This slow approach keeps the butter from burning. Trust me, nobody wants the taste of burnt butter in their sushi! Just let it gently melt until it’s all liquid gold.
Add and Melt the Marshmallows
Once your butter is melted, it’s time to add the marshmallows. Stir them continuously until they melt into a smooth gooey mixture. Don’t walk away; you want all that goodness mixed well! It should look like a creamy cloud when you’re done.
Stir in Vanilla Extract
Now, take a moment to enhance that flavor. Add the vanilla extract to your melted mixture. The vanilla adds a subtle sweetness that balances out the marshmallows. It’s like a secret ingredient that lifts the whole dish!
Fold in the Fruity Pebbles
With the marshmallow mixture ready, it’s time to fold in the Fruity Pebbles. Gently scoop the cereal into the marshmallow mix. Use a spatula to fold everything together without crushing the cereal. The goal is to coat each piece lightly; we want that fun crunch!
Shape the Cereal Mixture
Once combined, it’s time for shaping. On a lined baking sheet, firmly press the mixture into a rectangular shape about 1 inch thick. Make sure to press it down well; this helps with keeping your sushi rolls from falling apart later. Patience is key here!
Cut into Strips
After letting the mixture set for about 15 minutes, grab a sharp knife and start cutting. Slice it into 1-inch wide strips. These will be the foundation of your sushi rolls, so make sure they are even. A straight cut makes a happier roll!
Form the Sushi Rolls
Now for the fun part! Take each strip and roll it into a sushi roll shape. Gently press to keep the shape intact. The trick here is to not squish too hard—just enough to hold it together. Voila! You’ve got your sushi form.
Prepare the White Chocolate
In a microwave-safe bowl, melt the white chocolate chips in 30-second intervals. Stir after each time until it’s smooth and creamy. Don’t rush it! This chocolate will be your canvas for creating beautiful sushi toppings.
Decorate with Color
If you’re feeling artistic, divide the melted chocolate into bowls and add food coloring. You can play around with different shades to make your sushi look even more enticing. Drizzle or dip your Fruity Pebbles rolls in this colorful chocolate for that perfect sushi flair!
Chill and Serve
Lastly, let your sushi chill in the refrigerator for about 10 minutes. This helps set the chocolate and gives the rolls their final touch. When you pull them out, they’ll be ready for serving. Don’t forget to add some fresh fruit slices for an extra pop of color on the plate!
Tips for Success
- Use fresh marshmallows for a gooey texture.
- Press the mixture firmly to hold shapes better.
- Experiment with various food colors for vibrant sushi.
- Let the chocolate cool slightly before drizzling.
- Keep any leftovers in an airtight container to maintain freshness.
Equipment Needed
- Large pot: A sturdy pot for melting the butter and marshmallows.
- Spatula: Useful for folding the ingredients gently without crushing the cereal.
- Baking sheet: Line it with parchment paper for easy cleanup.
- Sharp knife: Essential for cutting even strips of your sushi rolls.
- Microwave-safe bowl: For melting white chocolate; any bowl works as long as it’s safe for the microwave.
Variations of The Fruity Pebbles Sushi
- Chocolatey Delight: Substitute Fruity Pebbles with Cocoa Pebbles for a chocolatey twist. This will satisfy any chocolate lover!
- Nutty Crunch: Add chopped nuts like almonds or peanuts to the mix for a crunchy texture contrast and a protein boost.
- Gluten-Free Option: Use gluten-free cereal alternatives to make this dessert suitable for gluten-sensitive family members.
- Fruit Explosion: Mix in mini marshmallows or dried fruits like raisins or cranberries for added sweetness and chewiness.
- Vegan Version: Replace butter with coconut oil and use vegan marshmallows and chocolate for a delightful vegan treat.
Serving Suggestions for The Fruity Pebbles Sushi
- Pair with Milk: A cold glass of milk is a classic! It balances the sweetness and complements the creamy white chocolate.
- Fruit Salad: Serve alongside a fresh fruit salad for an added burst of flavor and color.
- Cute Plating: Arrange sushi rolls on a colorful platter, sprucing them up with sliced fruits for an eye-catching display.
FAQs about The Fruity Pebbles Sushi
Can I use different cereals for this recipe?
Absolutely! Feel free to swap out Fruity Pebbles for another colorful cereal. Cocoa Pebbles or even Rice Krispies can deliver a unique flavor while keeping that fun crunch intact.
How long can I store The Fruity Pebbles Sushi?
You can store the sushi in an airtight container for up to a day. However, for the best texture and flavor, I recommend eating them fresh. They tend to lose their delightful crunch if stored too long.
Can I customize the toppings for the sushi?
Is The Fruity Pebbles Sushi suitable for parties?
Definitely! These colorful treats are perfect for parties. They’re visually appealing and fun to eat, making them a hit with both kids and adults. Plus, they’re no-bake, so you can easily prepare them ahead of time!
What’s the best way to serve The Fruity Pebbles Sushi?
Present your sushi rolls on a vibrant platter, topped with fresh fruit slices. A drizzle of that colorful white chocolate enhances the visual appeal even more. It’s a fun and festive way to serve this delightful treat!
Final Thoughts
Creating The Fruity Pebbles Sushi is more than just making a dessert; it’s about crafting joyful moments in your kitchen. I love how this easy, no-bake treat brings a smile not just to my kids’ faces but to mine as well. Each colorful roll is an invitation to experiment, create, and even bond with your family. Sharing these sweet bites with friends or serving them at gatherings adds a special touch. So roll up your sleeves and dive into this culinary adventure. Happiness is just a bite away!
Print
The Fruity Pebbles Sushi
- Total Time: 25 minutes
- Yield: 12 sushi rolls 1x
- Diet: Vegetarian
Description
The Fruity Pebbles Sushi is a fun and creative treat that combines colorful cereal with marshmallows and white chocolate for a delightful twist on traditional sushi.
Ingredients
- 4 cups Fruity Pebbles cereal
- 1 cup marshmallows
- 3 tablespoons unsalted butter
- 1 teaspoon vanilla extract
- 1 cup white chocolate chips
- Food coloring (optional)
- Fresh fruit slices (strawberries, kiwi, mango) for garnish
Instructions
- In a large pot, melt the butter over low heat.
- Add the marshmallows and stir continuously until completely melted and smooth.
- Remove from heat and stir in vanilla extract.
- Pour the Fruity Pebbles cereal into the marshmallow mixture and gently fold until fully coated.
- On a lined baking sheet, press the mixture firmly into a rectangular shape about 1 inch thick. Allow to cool and set for 15 minutes.
- Once set, use a sharp knife to cut the cereal slab into 1-inch wide strips.
- Roll each strip into a sushi roll shape, pressing gently to keep the shape.
- Melt the white chocolate chips in a microwave-safe bowl in 30-second intervals, stirring each time until smooth.
- If desired, divide the melted white chocolate into bowls and tint with food coloring to resemble sushi toppings.
- Drizzle or dip the Fruity Pebbles rolls in the colored white chocolate to mimic fish and other sushi garnishes.
- Decorate the plate with fresh fruit slices to enhance the sushi presentation.
- Chill in the refrigerator for 10 minutes before serving for the best texture.
Notes
- For more vibrant colors, use multiple shades of food coloring.
- Allow the cereal mix to set properly to maintain the shape when rolling.
- This treat is best served fresh, but can be stored in an airtight container for a day.
- Prep Time: 15 minutes
- Cook Time: 10 minutes
- Category: Dessert
- Method: No-bake
- Cuisine: Fusion
Nutrition
- Serving Size: 1 roll
- Calories: 150
- Sugar: 10g
- Sodium: 50mg
- Fat: 6g
- Saturated Fat: 3g
- Unsaturated Fat: 2g
- Trans Fat: 0g
- Carbohydrates: 22g
- Fiber: 1g
- Protein: 1g
- Cholesterol: 15mg


