

Introduction to Reese’s Crinkle Cookies
Life sometimes requires a sweet escape, and at those times, one can make and enjoy these Reese’s Crinkle Cookies. Imagine it’s a busy afternoon and your dear ones have to be given something special to munch on. These cookies do not just taste chocolatey but have a very attractive look especially because of the involvement of the little ones in placing mini peanut butter cups in each cookie. They are soft, chewy, and full of flavor with a tiny twist of mini peanut butter cups inside – Perfect for busy moms like us to bake something special without all the hassle. Your family is going to ask for seconds!
Why You’ll Love This Reese’s Crinkle Cookies
These Reese’s Crinkle Cookies are a delightful mix of ease and indulgence. In just under an hour, you can create a batch of gooey, chocolatey goodness that’s bound to satisfy even the pickiest eaters in your family. Plus, with minimal prep required, you’ll find it fits perfectly into your busy schedule. Whether for an afternoon snack or a special dessert, these cookies are the perfect way to spread joy with every bite!
Ingredients for Reese’s Crinkle Cookies
Gather these simple yet essential ingredients to create your Reese’s Crinkle Cookies.
- All-purpose flour: The backbone of your cookie dough, providing structure. Make sure to spoon and level it for accuracy.
- Unsweetened cocoa powder: Adds rich chocolate flavor. Hershey’s brand is a favorite for its quality and taste.
- Baking soda: Our secret leavening agent that gives the cookies just the right amount of lift.
- Table salt: A pinch of salt balances the sweetness and enhances the chocolate flavor.
- Creamy peanut butter: This gives your cookies that irresistible peanut butter flavor. I always opt for Reese’s for a touch of nostalgia.
- Salted butter: Softened to room temperature for easy mixing. Salted butter adds flavor, but unsalted works too; just adjust the salt.
- Dark brown sugar: Packed with moisture and richness, dark brown sugar takes the flavor up a notch. Light brown sugar is an acceptable substitute.
- Large egg: Acts as a binder and adds moisture to the cookies.
- Pure vanilla extract: A splash brings warmth and depth to the flavor profile, enhancing the overall deliciousness.
- Miniature peanut butter cups: The gold stars of this recipe! Halved, they create gooey pockets of heaven inside the cookies. You can use any other chocolate candy as a substitute.
- Granulated sugar: This adds sweetness and contributes to that lovely crackled finish.
- Powdered sugar: Used for rolling the cookies, giving them a sweet, snowy finish.
Exact measurements for these ingredients are located at the bottom of this article, along with a printer-friendly version for your convenience!

How to Make Reese’s Crinkle Cookies
Ready to dive into a world of chocolatey bliss? Making Reese’s Crinkle Cookies is simple and oh-so-rewarding. Let’s roll up our sleeves and get started!
Step 1: Prepare Your Dry Ingredients
Begin by sifting the all-purpose flour, cocoa powder, baking soda, and salt into a medium mixing bowl. This step is crucial; it breaks up clumps and ensures your cookie dough will be smooth. It also helps to evenly distribute the dry ingredients. Trust me, this can make all the difference when baking!
Step 2: Cream Together Peanut Butter and Butter
In another bowl, use a stand mixer or a handheld mixer to cream the creamy peanut butter and softened salted butter. Beat them together on medium-high speed for about 1 to 1.5 minutes until the mixture is silky and smooth. The creamy texture will play a big role in making your cookies soft and chewy.
Step 3: Mix in Sugar and Egg
Time to sweeten things up! Add the dark brown sugar to the peanut butter mixture and continue mixing for another minute until fully combined. Then, lower the mixer speed to medium-low and crack in your large egg. Mix just until no yellow streaks are visible. You don’t want to overdo it, as we still need to keep things tender!
Step 4: Add Vanilla and Incorporate Dry Ingredients
Add in the pure vanilla extract and mix until it’s well combined. Now, carefully add your dry ingredient mixture in parts. Do this 1 cup at a time, mixing just until incorporated. Remember, overmixing can lead to tough cookies, so let that mixer work just enough!
Step 5: Chill the Cookie Dough
Cover your cookie dough with plastic wrap and pop it in the fridge for about 30 minutes. Chilling is the secret weapon here! It helps prevent those delightful treats from spreading too much while baking, ensuring they maintain that lovely crinkle effect.
Step 6: Preheat and Prepare Baking Sheets
During the last minutes of chilling, go ahead and preheat your oven to 350°F. Line two baking sheets with parchment paper or heavy-duty aluminum foil. If using the foil, give it a light spritz of non-stick cooking spray to prevent sticking. Your kitchen will start smelling amazing soon!
Step 7: Form and Coat the Cookies
Using a tablespoon scoop, grab some chilled cookie dough and scoop it into your hands. Flatten each ball slightly, place half of a miniature peanut butter cup in the center, then fold the dough around it. Roll it into a ball. Roll each cookie ball in granulated sugar, then dust with powdered sugar for that signature snowy finish!
Step 8: Bake and Cool
Place your coated cookie balls on one of the prepared baking sheets, spacing them about 2 inches apart. Pop them in your preheated oven and bake for 8 to 10 minutes, or until the surface starts to crackle. Trust your instincts here; about 9 minutes is magical for me. Allow them to rest on the baking sheet for 2 to 3 minutes before transferring them to a cooling rack. Just wait until you take that first bite!
Tips for Success
- Always sift your dry ingredients to avoid lumps and ensure even mixing.
- Chilling the dough is key to achieving those perfect crinkles!
- Use a cookie scoop for uniform sizing; it helps with even baking.
- Don’t overbake; cookies should be soft in the center for the best texture.
- Keep an eye on your cookies as they bake; ovens can vary.
Equipment Needed
- Mixing bowls: You’ll need at least two; one for dry and one for wet ingredients. Any size works fine!
- Stand mixer or handheld mixer: Either will do for easy creaming of ingredients. A wooden spoon can work too, but it’ll require more elbow grease!
- Baking sheets: Line them with parchment or foil. You’ll need two to bake all your cookies at once.
- Cookie scoop: A 1-tablespoon scoop makes portioning effortless. Alternatively, your hands can do the trick!
- Cooling rack: Essential for letting those cookies cool down perfectly. If you don’t have one, a plate will work!

Variations of Reese’s Crinkle Cookies
- Nutty Delight: Add chopped nuts like walnuts or pecans for an added crunch and flavor twist.
- Gluten-Free Option: Swap the all-purpose flour with a 1:1 gluten-free flour blend for a delightful gluten-free version.
- Mint Chocolate Chip: Mix in some mint chocolate chips along with the peanut butter cups to give a refreshing minty flavor.
- Dark Chocolate Lovers: Use dark cocoa powder instead of regular cocoa powder for an intense chocolate experience.
- Vegan Version: Replace the egg with a flaxseed meal or chia seed gel and substitute dairy butter with coconut oil for a vegan-friendly treat.
Serving Suggestions for Reese’s Crinkle Cookies
- Serve them warm with a scoop of vanilla ice cream on the side for a delightful dessert experience.
- Pair with a glass of cold milk to complement the rich chocolate flavors.
- For a festive touch, stack the cookies in a decorative jar and gift them to friends.
- Top each cookie with a drizzle of melted chocolate or a sprinkle of sea salt for an extra kick!
FAQs about Reese’s Crinkle Cookies
Can I make these Reese’s Crinkle Cookies ahead of time? Absolutely! You can prepare the dough in advance and keep it in the refrigerator for up to 3 days. Just remember to chill it before baking for best results!
How do I store leftover cookies? To keep your cookies fresh, store them in an airtight container at room temperature. They should stay delightful for about a week, although I doubt they’ll last that long!
Can I freeze these cookies? Yes! You can freeze the dough balls before baking. Just place them on a baking sheet until firm, then transfer to a freezer bag. Bake them straight from the freezer when you crave a sweet treat later!
What can I use instead of peanut butter cups? If you’re looking for alternatives, any chocolate candy works well. You can try chopped chocolate bars or even other candy like caramel-filled chocolates for a unique twist!
Why didn’t my cookies crinkle? Those lovely crinkles can be elusive! Ensure your dough chills properly and don’t overbake. Sometimes, subtle factors like humidity or oven temperature differences affect the outcome.
Final Thoughts
Making Reese’s Crinkle Cookies is more than just baking; it’s about creating delicious memories with loved ones. The joy of watching those cookies rise, crackle, and become soft pillows of chocolatey goodness is simply unmatched. Whether you’re indulging solo with a glass of milk or sharing them during family game night, each bite carries warmth and nostalgia. So go ahead, embrace the little moments in the kitchen and whip up these delightful treats. I promise, they’ll bring smiles and sweet satisfaction to your home, making every busy day feel like a special occasion!
Print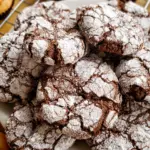
Reese’s Crinkle Cookies
- Total Time: 55 minutes
- Yield: 15 cookies 1x
- Diet: Vegetarian
Description
Reese’s Crinkle Cookies are rich, indulgent cookies filled with mini peanut butter cups, coated in powdered and granulated sugar for a delightful texture and taste.
Ingredients
- 1 cup all-purpose flour, spooned and leveled
- ½ cup unsweetened cocoa powder, I used Hershey’s brand
- 1 teaspoon baking soda
- ¼ teaspoon table salt
- ½ cup creamy peanut butter, I used Reese’s creamy peanut butter
- ½ cup salted butter, softened to room temperature
- ¾ cup dark brown sugar, packed
- 1 large egg, room temperature
- 1½ teaspoons pure vanilla extract
- 15 halved miniature peanut butter cups, I used Reese’s miniature peanut butter cups
- ¼ cup granulated sugar
- ¾ cup powdered sugar, sifted
Instructions
- Sift the flour, cocoa powder, baking soda and salt into a medium-sized bowl (2-3 quarts).
- Using a stand mixer or a medium-sized mixing bowl (2-3 quarts) and a handheld mixer on medium-high speed, beat the peanut butter and butter together for 1-1½ minutes until smooth.
- Add the dark brown sugar and continue mixing for another 1-1½ minutes until combined.
- Lower the mixer speed to medium-low. Add the egg and beat just until there are no more yellow streaks.
- Add the vanilla and mix just until no brown streaks from the vanilla remain.
- Keep the mixer speed on medium-low, and add the flour mixture 1 cup at a time, mixing just until incorporated. (Be careful not to overmix the cookie dough, as that can cause the baked cookies to have a tough texture) Cover and chill in the refrigerator for 30 minutes.
- Preheat the oven to 350°F. Line 2 baking sheets with parchment paper or heavy-duty aluminum foil. (If you are using aluminum foil, be sure to lightly spray with nonstick cooking spray.)
- Add the granulated sugar to a small bowl. Add the sifted powdered sugar to a small bowl or a quart-size ziplock baggie.
- Use a 1-tablespoon cookie scoop to scoop out the cookie dough. Roll the cookie dough into a ball. Flatten the cookie dough ball slightly. Place 1 of the miniature peanut butter cup halves in the center. Fold the edges of the dough up and roll the cookie dough and peanut butter cup half into a ball. Roll out all the Reese’s filled cookie balls and place them on one of your cookie sheets.
- Roll each cookie dough ball in the granulated sugar first and then roll it in the powdered sugar until completely coated. Place the coated dough ball on the other prepared baking sheet. Space the dough balls 2 inches apart.
- Bake for 8-10 minutes or until the cookie surface is crackled. (Every oven cooks differently, but 9 minutes was spot on for me.) Allow the cookies to rest on the baking sheets for 2-3 minutes before transferring to a cooling rack to cool completely.
Notes
- Chilling the dough helps prevent the cookies from spreading too much while baking.
- Store cookies in an airtight container to maintain freshness.
- These cookies can be frozen for later enjoyment.
- Prep Time: 15 minutes
- Cook Time: 10 minutes
- Category: Dessert
- Method: Baking
- Cuisine: American
Nutrition
- Serving Size: 1 cookie
- Calories: 150
- Sugar: 10g
- Sodium: 90mg
- Fat: 8g
- Saturated Fat: 4g
- Unsaturated Fat: 3g
- Trans Fat: 0g
- Carbohydrates: 18g
- Fiber: 1g
- Protein: 3g
- Cholesterol: 20mg


