

Introduction to Lemon Blueberry Icebox Cake
With the sun drenching the summer sky with light, I can’t help but desire something cold and tasty, and that’s where my need for Lemon Blueberry Icebox Cake pops up. This scrumptious sweet dish spells summertime in every way – think layers of creamy lemon heaven cut through with rich blueberry fillings. This is one sweet that never fails to make everybody smile, be it when you have guests over or just spend a quiet evening with your loved ones. Plus, it’s a no-bake dessert so simple to pull together- all the better for a busy schedule.
Why You’ll Love This Lemon Blueberry Icebox Cake
Let’s be honest—life gets busy, and sometimes we all need a little shortcut in the kitchen. This Lemon Blueberry Icebox Cake is not just a treat; it’s a lifesaver for busy moms and professionals alike. It’s quick to make, which means you can serve an impressive dessert without spending all day in the kitchen. Plus, the combination of zesty lemon and sweet blueberries makes it absolutely irresistible! Your family will be begging for seconds!
Ingredients for Lemon Blueberry Icebox Cake
Gathering the right ingredients is like preparing for an epic culinary adventure. Here’s what you’ll need for your Lemon Blueberry Icebox Cake:
- Cream cheese: This creamy base gives a luscious texture, making each bite feel indulgent.
- Lemon instant pudding mix: A quick way to add a burst of lemon flavor and sweetness without cooking.
- Freshly squeezed lemon juice: Homemade is best! It brings brightness and acidity that elevates the cake.
- Vanilla extract: A hint of vanilla adds warmth to the flavor profile; it’s a must-have.
- Whole milk: This keeps the cream cheese mixture smooth and delightful.
- Cool Whip: Thawed whipped topping makes the dessert light and fluffy—a delightful contrast to the creaminess.
- Graham crackers: These layered crunchy bases provide delightful textural contrast to the creamy filling.
- Blueberry pie filling: Sweet and tart, it layers beautifully, creating a visual treat as well as a flavorful one.
- Lemon zest: A simple garnish that packs a punch of aroma and flavor, adding a refreshing touch.
- Fresh blueberries: For garnish and a burst of fruitiness—that’s a win-win!
For exact measurements, don’t forget to check the bottom of the article, where you can print this recipe out!
How to Make Lemon Blueberry Icebox Cake
Creating this Lemon Blueberry Icebox Cake is easier than you might think! Just follow these simple steps and you’ll be on your way to delighting your family and friends with a refreshing dessert. Let’s get started!
Step 1: Prepare the Cream Cheese Mixture
First things first, let’s get that cream cheese ready! In a medium bowl, beat the softened cream cheese until it’s light and fluffy. This is the foundation of our Lemon Blueberry Icebox Cake. A well-prepared cream cheese mixture makes the cake velvety smooth, enhancing every bite.
Step 2: Combine the Key Ingredients
Next, it’s time to bring in the zesty flavors! Add the lemon pudding mix, freshly squeezed lemon juice, vanilla extract, and whole milk into that fluffy cream cheese. Now, beat everything together until the mixture is fully combined. The pudding mix will infuse the cream with tangy sweetness, making it the star of the dessert!
Step 3: Fold in Cool Whip
Time to add a touch of magic! Gently fold in the thawed Cool Whip into the creamy mixture. This is super important as it gives our cake that delightful lightness! Be careful while mixing; you want to maintain its airy texture while incorporating it well. The result? A fluffy, dreamy filling that tempts your taste buds!
Step 4: Layering the Cake
Now comes the fun part: layering! Start by covering the bottom of a 9×13 inch baking dish with a single layer of graham crackers. Then, spread one-fifth of the creamy pudding mixture evenly over the crackers. Repeat these layers: more graham crackers followed by pudding, creating that beautiful contrast. Don’t rush this step; keeping those distinct layers makes for a stunning presentation!
Step 5: Add Blueberry Pie Filling
Let’s sprinkle in that blueberry goodness! Spoon half of the blueberry pie filling in dollops over the top of your pudding layer. You don’t have to smooth it out completely—just aim for even distribution. The blobs of blueberry filling will bring sweetness and a burst of flavor that contrasts beautifully with the lemony cream!
Step 6: Final Assembly
For the grand finale, repeat the layering process one last time! Begin with graham crackers, then one more layer of pudding mixture, followed by blueberry filling. Finish with a final layer of graham crackers on top! Spread the remaining pudding mixture atop that last cracker layer, smoothing it out nicely. This beautiful layered structure is what makes the cake so visually appealing!
Step 7: Freezing and Serving
Now, it’s time to chill! Cover the assembled dessert and place it in the freezer for at least 4 hours. This step is crucial, as it solidifies the layers, making it easier to cut and serve. When you’re ready to enjoy, remove it from the freezer and let it sit for about 15-20 minutes before slicing. This little wait allows the flavors to warm and meld, creating an incredible treat!

Tips for Success
- Make sure your cream cheese is softened for easy blending.
- Use fresh lemons for the best flavor; bottled juice just won’t cut it.
- Don’t rush the layering; take your time to create beautiful layers.
- Feel free to adjust the sweetness of the blueberry filling to suit your taste.
- Make it a day ahead for intensified flavors; it’s even better after a night in the freezer!
Equipment Needed
- Mixing bowl: A medium-sized bowl for mixing your cream cheese and pudding.
- Electric mixer: This makes beating easy; however, a whisk works too, but it takes longer.
- 9×13 inch baking dish: This is perfect for layering; any similar-sized dish will also do.
- Spatula: It’s great for folding and spreading your mixtures smoothly.
Variations
- Berry Medley: Swap out blueberry filling for a mix of strawberries, raspberries, or blackberries. This creates a delightful twist!
- Gluten-Free Option: Use gluten-free graham crackers to cater to those with dietary restrictions, ensuring everyone can indulge.
- Vegan Version: Substitute cream cheese with a dairy-free alternative and use coconut whipped cream in place of Cool Whip. Just as creamy and delicious!
- Citrus Burst: Add a splash of orange juice or zest for an extra citrusy flavor that brightens the entire cake.
- Chocolate Lovers: Integrate a layer of chocolate pudding mix for a rich, indulgent treat that chocolate lovers can’t resist!
Serving Suggestions
- Pair with a scoop of vanilla ice cream for an extra creamy treat that complements the cake’s flavors.
- Serve alongside fresh fruit salad to enhance the refreshing summer vibe.
- Drizzle a light lemon glaze over the top for a pop of extra sweetness and brightness.
- Present on a beautiful platter garnished with mint leaves for an elegant touch.
FAQs about Lemon Blueberry Icebox Cake
You’ve got questions, and I’m here to help! Here are some frequently asked questions about this refreshing Lemon Blueberry Icebox Cake to guide you on your dessert-making journey.
Can I make this cake a day in advance?
Absolutely! In fact, making the Lemon Blueberry Icebox Cake a day ahead enhances its flavor. It gives the layers time to meld together beautifully!
What can I substitute for Cool Whip?
If you want a homemade touch, feel free to use whipped cream instead. Just whip heavy cream with a bit of sugar, and you’ll get a lovely, fresh alternative!
Is this cake suitable for special diets?
Yes! You can easily make it gluten-free by using gluten-free graham crackers. Additionally, opt for dairy-free cream cheese and whipped cream to accommodate vegan diets.
How long can I store leftovers?
Leftovers can be stored in the freezer for about a week. Just make sure to keep it well-covered to prevent freezer burn. Trust me, though, you might not have any leftovers!
Can I use homemade blueberry filling?
Definitely! If you have fresh blueberries, making your filling is a great idea. Just cook them down with a bit of sugar and cornstarch for thickening.
Final Thoughts
Every bite of this Lemon Blueberry Icebox Cake takes me back to sunny days, laughter, and joy. It’s not just a dessert; it’s a labor of love that brings people together. Whether you’re celebrating a special occasion or simply treating your family on a warm afternoon, this cake is bound to elevate the moment. Its vibrant flavors and dreamy textures capture the essence of summer, making memories sweeter with every slice. So grab those ingredients and let the delightful process of creating this masterpiece unfold in your kitchen. You’ll be so glad you did!
Print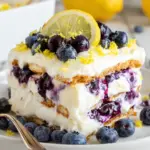
Lemon Blueberry Icebox Cake
- Total Time: 4 hours 20 minutes
- Yield: 12 servings 1x
- Diet: Vegetarian
Description
A refreshing summer dessert featuring layers of cream cheese, lemon pudding, graham crackers, and blueberry filling.
Ingredients
- 8 oz cream cheese, softened
- 6.8 oz lemon instant pudding mix (2 boxes, 3.4 oz each), unprepared
- ½ cup freshly squeezed lemon juice (approx. 3 large lemons)
- 2 teaspoons vanilla extract
- 2 ½ cups whole milk
- 16 oz Cool Whip, thawed
- 3 sleeves graham crackers (approx. 27–28 crackers)
- 42 oz blueberry pie filling (2 cans, 21 oz each)
- Lemon zest (for garnish)
- Fresh blueberries (for garnish)
Instructions
- Beat the softened cream cheese in a medium bowl until light and fluffy.
- Add lemon instant pudding mix, freshly squeezed lemon juice, vanilla extract, and whole milk to the cream cheese. Continue beating until fully combined.
- Fold in the thawed Cool Whip and beat until the mixture begins to thicken.
- Cover the bottom of a 9×13 inch baking dish with a single layer of graham crackers.
- Spread one-fifth of the pudding mixture evenly over the graham crackers.
- Spoon approximately one can of blueberry pie filling in dollops over the pudding layer, then gently spread to maintain distinct layering.
- Repeat the layering sequence: pudding mixture, graham crackers, pudding mixture, blueberry pie filling, pudding mixture, and a final layer of graham crackers.
- Spread the remaining pudding mixture atop the last graham cracker layer.
- Place the assembled dessert in the freezer for at least 4 hours to firm up.
- Remove from the freezer 15 to 20 minutes before serving. Garnish with fresh blueberries and lemon zest for presentation.
Notes
- This cake can be made a day in advance for best flavor.
- Feel free to adjust the amount of blueberry filling to your taste.
- Use fresh lemons for the best flavor in the cream cheese mixture.
- Prep Time: 20 minutes
- Cook Time: 0 minutes
- Category: Dessert
- Method: No-bake
- Cuisine: American
Nutrition
- Serving Size: 1 slice
- Calories: 320
- Sugar: 28g
- Sodium: 200mg
- Fat: 15g
- Saturated Fat: 9g
- Unsaturated Fat: 6g
- Trans Fat: 0g
- Carbohydrates: 42g
- Fiber: 1g
- Protein: 4g
- Cholesterol: 40mg


