Description
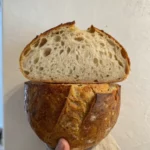
Achieving that beautiful loaf you see today felt like discovering a secret shortcut in baking. By fully committing to the autolyse method, the entire process became more intuitive, relaxed, and deeply satisfying. The dough practically worked with me instead of against me. If you have been struggling to get that perfect rise and open crumb, you will find this method surprisingly simple and incredibly effective. Autolyse is a game-changer, especially for home bakers aiming to produce professional-quality bread right in their own kitchens. This article will guide you through every step, sharing insights and tips for achieving remarkable results.
Ingredients
- 1000g bread flour (high-protein flour recommended)
- 750g water (preferably filtered)
- 160g active sourdough starter (mature and bubbly)
- 20g salt (fine sea salt or kosher salt)
Each ingredient plays a vital role. The bread flour provides strength and structure. Water hydrates the dough and activates gluten development. The starter introduces natural yeasts and bacteria for fermentation, and salt not only enhances flavor but also strengthens gluten bonds.
Instructions
1. Autolyse: In a large mixing bowl, thoroughly mix the bread flour and water until no dry flour remains. Do not knead. Cover the bowl with a damp towel or plastic wrap and let it rest for 5 hours. During this time, enzymes in the flour start breaking down proteins and starches, improving dough extensibility and flavor.
2. Fermentolyse: After the autolyse, add the active sourdough starter to the dough. Gently fold and mix until fully incorporated. Cover and rest for 45 minutes. This stage allows the starter to begin its work, kickstarting fermentation while keeping the dough tender.
3. Stretch and Folds + Coil Folds: Add the salt during the first stretch and fold. Perform two sets of stretch and folds and two sets of coil folds, spaced 30 to 45 minutes apart. These gentle manipulations strengthen the dough by aligning gluten strands, enhancing its elasticity and gas retention capacity.
4. Bulk Fermentation: Let the dough bulk ferment at 80°F for 6 hours. The dough should expand by about 50%, showing bubbles throughout. Maintaining a warm and stable environment is critical for consistent fermentation.
5. Pre-shape and Bench Rest: Lightly flour your work surface and pre-shape the dough into loose rounds. Let them bench rest uncovered for 20 minutes. This relaxes the gluten and makes final shaping easier and more effective.
6. Final Shaping: After resting, shape the dough into tight boules or batards, depending on your preference. Ensure good surface tension to support oven spring during baking.
7. Cold Fermentation: Place the shaped dough into proofing baskets lined with floured cloths. Cover and refrigerate for 12 hours. This slow proofing process develops deeper flavors, improves crust texture, and makes scoring easier.
8. Baking: Preheat your oven to its maximum setting with a Dutch oven inside. When ready, transfer the dough directly from the fridge into the hot Dutch oven. Bake covered for 20 minutes to trap steam, then uncovered until the crust turns deep golden brown and the loaf sounds hollow when tapped.
Notes
This sourdough bread recipe uses a full autolyse method to create two artisan-style loaves with an open crumb and rich flavor. Patience and gentle handling are key.
- Prep Time: 6 hours (includes autolyse, fermentolyse, folds, and bulk fermentation)
- Additional Time:: 12 hours (cold fermentation in the refrigerator)
- Cook Time: 40–45 minutes
- Category: Bread
- Method: Sourdough Baking
- Cuisine: Artisan, American, European
Nutrition
- Serving Size: 1 slice
- Calories: Approximately 140 kcal
- Sugar: 0.5 g
- Sodium: 190 mg
- Fat: 0.5 g
- Saturated Fat: 0.1 g
- Unsaturated Fat: 0.4 g
- Trans Fat: 0 g
- Carbohydrates: 28 g
- Fiber: 1.2 g
- Protein: 4 g
- Cholesterol: 0mg