

Introduction to Christmas Tree Cake Trifle
As the holiday season approaches, we all crave those special desserts that capture the spirit of festivities. The Christmas Tree Cake Trifle is my ultimate go-to for a scrumptious treat that dazzles and delights! With busy days filled with shopping and planning, this layered joy gives you an easy and impressive way to celebrate. It’s a dessert that not only tastes divine but also brightens any table with its vibrant colors and festive flair. Whether sharing with family or bringing to a gathering, this trifle is a sweet escape into holiday happiness!
Why You’ll Love This Christmas Tree Cake Trifle
This Christmas Tree Cake Trifle is truly a lifesaver for those bustling holiday days! It’s quick to prepare, allowing you to whip it up in under an hour. The taste? Oh, it’s a heavenly blend of creamy and cake-y goodness that makes every bite feel like a festive hug. Plus, it dresses up your table effortlessly, perfect for impressing relatives or simply treating yourself after busy days of cheer!
Ingredients for Christmas Tree Cake Trifle
Gathering the right ingredients is the first step toward crafting a beautiful Christmas Tree Cake Trifle. Each component plays a crucial role in delivering delicious flavor and festive cheer! Here’s what you’ll need:
- White cake mix: The base of your trifle, this provides a soft and fluffy texture. Feel free to use any brand you love!
- Eggs: Essential for binding the cake together, they add richness and a nice structure to the cake layers.
- Vegetable oil: Helps keep the cake moist and adds a tender crumb. You can substitute with melted coconut oil for a different flavor.
- Water: Required by the cake mix for hydration—simple, yet essential.
- Green gel food coloring: To transform half of your cake batter into a vibrant holiday green. Just a few drops will do!
- Cream cheese: The creamy layer that makes this dessert heavenly. For a lighter option, use low-fat cream cheese.
- Powdered sugar: This sweetener gives the cream filling its delightful sweetness and smooth texture.
- Vanilla extract: A splash of pure vanilla enhances the flavor of both the filling and the cake, making everything taste richer.
- Whipped topping: Adds a light and airy texture to the cream cheese filling. You can choose a non-dairy whipped topping for a vegan twist.
- Milk: This helps achieve a creamy consistency in the filling. Almond or oat milk makes for a great dairy-free option.
- Holiday sprinkles: These delightful little decorations add color and festive cheer, making your trifle look extra special.
- Star decoration: Whether it’s a sprinkle, cookie, or chocolate star, this is the final touch that gives your trifle its signature festive look!
Don’t worry—exact quantities for all these delightful ingredients are at the bottom of the article and available for printing, so you can easily bring this festive masterpiece to life!
How to Make Christmas Tree Cake Trifle
Crafting your Christmas Tree Cake Trifle is a delightful journey, where every step adds to the festive spirit! Let’s dive into the joyful process of bringing this delicious layered masterpiece to life!
Step 1: Prepare the Cake Batter
First, follow the cake mix instructions on the box. It usually calls for eggs, oil, and water. After mixing, divide your batter into two bowls. Now, here comes the fun part—add a few drops of that magical green gel food coloring to one bowl until you reach your desired shade. Trust me; it’ll make your trifle sing with holiday cheer!
Step 2: Bake the Cakes
Preheat your oven and pour each colored batter into separate 8×8 pans. Bake them according to the package instructions, monitoring closely. When a toothpick poked in the center comes out clean, they’re done! Oh, but wait—let both cakes cool completely before cutting. This ensures they won’t crumble when you’re ready to layer.
Step 3: Make the Cream Cheese Filling
Now onto the creamy goodness! In a mixing bowl, beat your softened cream cheese until smooth. Mix in the powdered sugar and a splash of vanilla extract. Then, fold in the whipped topping gently until it’s looking fluffy. This filling is the heart of your trifle, adding richness and sweetness that meld beautifully with the cake layers.
Step 4: Cut the Cakes
Once your cakes are cooled, it’s time to slice them into cubes! Aim for 1-inch bites—it makes for easy layering. Uniform pieces not only look great but also ensure each layer gets a fair amount of cake and filling. Set those cubes aside, and let’s prepare for the assembly!
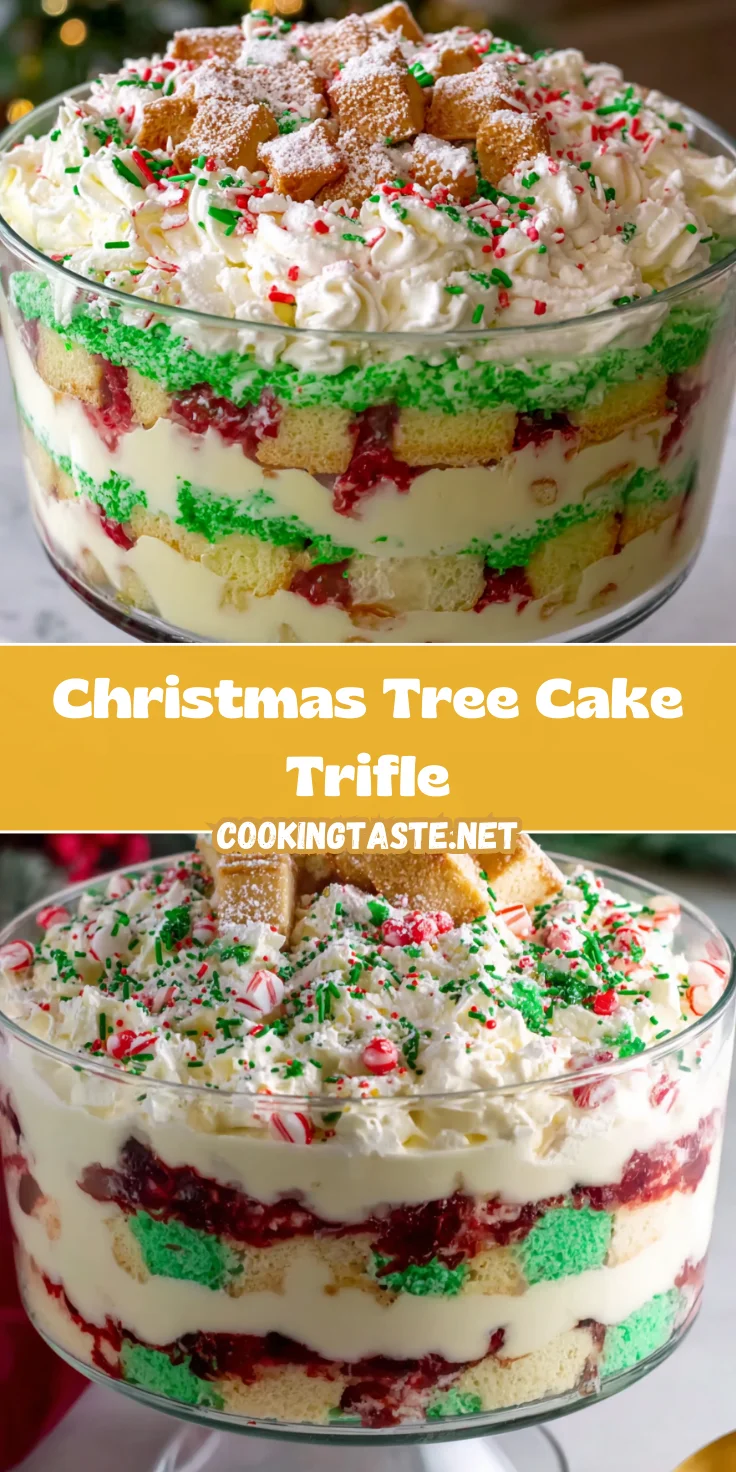
Step 5: Assemble the Trifle
Grab your clear trifle bowl; it’s the showpiece of this dessert! Start with a layer of green cake cubes, followed by a generous scoop of your cream cheese filling. Sprinkle some holiday sprinkles on top for a pop of color! Then, add a layer of white cake cubes and repeat until you fill the bowl, making it as tall and festive as possible!
Step 6: Final Touches
Your trifle is shaping up beautifully! Finish it off with a light layer of whipped topping on the top. Go wild with more sprinkles and don’t forget to place your star decoration on top for that wow factor. It’s the cherry on top of your Christmas Tree Cake Trifle!
Step 7: Refrigerate
Last but not least, cover your trifle and let it chill in the fridge for at least 4 hours (or overnight if you can wait!). This step lets all the flavors mingle and marry into pure bliss. When it’s time to serve, dig into this festive treat and watch your loved ones’ faces light up with joy!
Tips for Success
- Ensure your cream cheese is at room temperature for a smooth filling.
- When coloring the cake, start with a small amount of gel food coloring; you can always add more.
- Use a serrated knife to cut your cakes evenly.
- Consider using seasonal sprinkles for added holiday flair!
- Feel free to make this trifle a day ahead; it gets better with time!
Equipment Needed
- Mixing bowls: Use two medium-sized bowls for mixing batters and fillings—plastic or glass works fine!
- 8×8 baking pans: These are essential for baking your cake layers; you can substitute with similar-sized pans.
- Trifle bowl: A clear glass bowl showcases your layers beautifully; a large clear bowl works, too!
- Electric mixer: A hand or stand mixer makes whipping the cream cheese a breeze; a whisk will do in a pinch!
- Serrated knife: Perfect for cutting your cakes into cubes—safe and effective!
Variations
- Chocolate Cake Base: Swap the white cake mix for chocolate! This pairs beautifully with the cream cheese filling for a festive twist.
- Layer with Fresh Fruit: Add layers of fresh strawberries or raspberries between the cake and filling for a fruity surprise!
- Dairy-Free Alternative: Use dairy-free cream cheese and whipped topping for a vegan-friendly version that everyone can enjoy.
- Gluten-Free Option: Choose a gluten-free cake mix to cater to those with dietary restrictions while keeping every layer delicious!
- Spice it Up: Add a dash of cinnamon or nutmeg to the cream filling for a warm holiday flavor boost.
Serving Suggestions
- Pairing with Coffee: A warm cup of coffee complements the sweetness of the trifle perfectly—add a sprinkle of cinnamon for fun!
- Holiday Cocktails: Serve with festive drinks like sparkling cider or a light holiday punch.
- Presentation Tip: Place the trifle on a festive platter for a stunning centerpiece that draws attention!
FAQs about Christmas Tree Cake Trifle
Can I make the Christmas Tree Cake Trifle ahead of time?
Absolutely! This dessert actually tastes better after chilling for a few hours or overnight. It gives the flavors time to meld and makes your preparation stress-free!
What can I use instead of cream cheese?
If cream cheese isn’t your preference, try using mascarpone or a dairy-free cream cheese alternative. They both work well and maintain that rich, creamy texture.
How do I store leftovers?
Store any uneaten trifle in an airtight container in the refrigerator. It’s best enjoyed within 2 to 3 days to keep the textures nice!
Can I add different flavors to the filling?
You can jazz up the filling by adding flavored extracts, like almond or peppermint, to give your Christmas Tree Cake Trifle a unique twist!
Is this trifle suitable for kids?
Absolutely! With its colorful layers and sweet flavors, kids will love digging into this festive treat. Plus, it’s a fun way to get them involved in the kitchen!
Final Thoughts
Creating a Christmas Tree Cake Trifle is not just about baking; it’s an experience filled with joy and togetherness. Each layer tells a story, bursting with vibrant colors and flavors that embody the spirit of the season. As you serve this delightful treat, you can see the smiles lighting up the faces of loved ones. This dessert becomes a sweet centerpiece of your holiday celebrations, inviting everyone to gather and indulge in deliciousness. So, roll up your sleeves, embrace the festive spirit, and let the Christmas Tree Cake Trifle weave its magic into your holiday traditions!
Print
Christmas Tree Cake Trifle
- Total Time: 4 hours 30 minutes
- Yield: 8 servings 1x
- Diet: Vegetarian
Description
A festive and delightful Christmas Tree Cake Trifle that layers delicious cake and creamy filling for a perfect holiday dessert.
Ingredients
- 1 box white cake mix
- 3 eggs
- 1/2 cup vegetable oil
- 1 cup water
- a few drops green gel food coloring
- 8 oz cream cheese, softened
- 1 cup powdered sugar
- 1 tsp vanilla extract
- 12 oz whipped topping
- 1/2 cup milk
- 1/2 cup holiday sprinkles
- 1 star decoration (sprinkle, cookie, or chocolate)
Instructions
- Prepare cake mix according to package instructions using eggs, oil, and water. Divide batter in half, tint one half green, and leave the other white.
- Bake each color separately in 8×8 pans until a toothpick comes out clean. Let cool completely.
- Beat cream cheese until smooth. Add powdered sugar and vanilla, mix well. Fold in whipped topping and stir in milk until smooth and creamy.
- Cut both cakes into 1-inch cubes for layering.
- In a clear trifle bowl, layer green cake cubes, cream mixture, and sprinkles. Follow with white cake, more cream, and sprinkles. Repeat layers until full.
- Top with whipped topping, additional sprinkles, and place a star decoration on top.
- Refrigerate for at least 4 hours or overnight before serving to allow flavors to blend.
Notes
- Ensure both cakes are completely cooled before cutting into cubes.
- Use any type of star decoration according to preference.
- Can substitute cream cheese with a non-dairy option for a vegan dessert.
- Prep Time: 30 minutes
- Cook Time: 30 minutes
- Category: Dessert
- Method: Baking and layering
- Cuisine: American
Nutrition
- Serving Size: 1 cup
- Calories: 350
- Sugar: 22g
- Sodium: 200mg
- Fat: 18g
- Saturated Fat: 8g
- Unsaturated Fat: 10g
- Trans Fat: 0g
- Carbohydrates: 45g
- Fiber: 1g
- Protein: 4g
- Cholesterol: 60mg


