

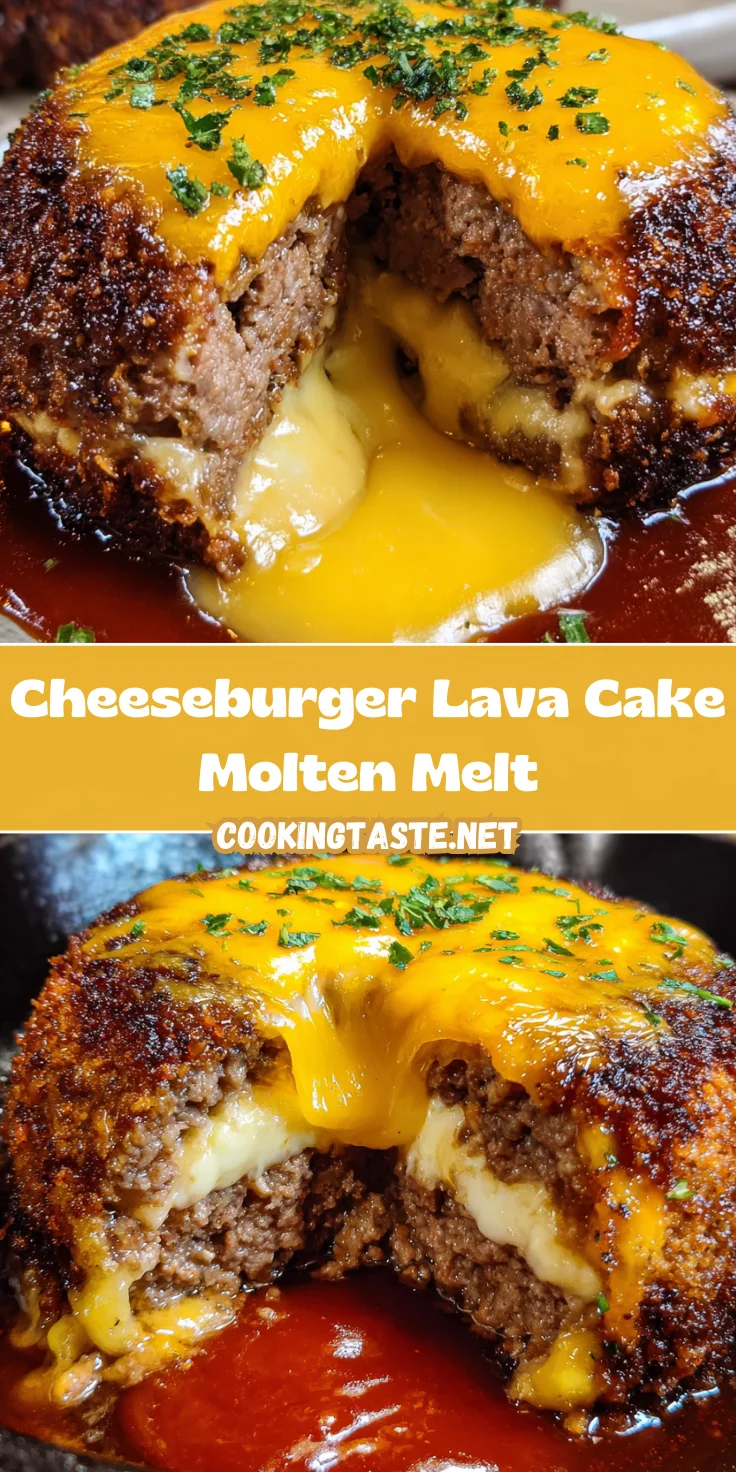
Introduction to Cheeseburger Lava Cake Molten Melt
Hey there, fellow food lovers! Let me introduce you to my latest kitchen adventure: the Cheeseburger Lava Cake Molten Melt. Imagine biting into a juicy burger, only to discover a creamy, oozy cheese center that floods your taste buds with delight! This recipe is perfect for busy moms and professionals who crave comfort food but also want a splash of creativity on their dinner plates. With minimal prep and a wow-factor presentation, this dish brings both joy and satisfaction, ensuring that mealtime becomes a cherished moment for you and your loved ones.
Why You’ll Love This Cheeseburger Lava Cake Molten Melt
This Cheeseburger Lava Cake Molten Melt isn’t just any burger; it’s a delightful surprise wrapped in juicy goodness. With that molten cheese center waiting to erupt with every bite, it transforms the ordinary into the extraordinary. Perfect for satisfying your burger cravings, this dish adds an element of fun to your table, making it a hit with kids and adults alike. Get ready for some oozy, cheesy happiness!
Ingredients for Cheeseburger Lava Cake Molten Melt
Now that you’re as excited as I am about the Cheeseburger Lava Cake Molten Melt, let’s dive into the heart of the recipe—the ingredients! Each one plays a specific role, bringing flavor and texture that will tantalize your taste buds. Trust me, this mouthwatering combination will be a showstopper!
- Ground Beef: The star of the show! I recommend an 80/20 blend for that ideal balance of flavor and juiciness. That richness pairs wonderfully with molten cheese and keeps everything moist.
- Garlic Powder: Just a pinch of this magic dust can elevate the beef’s flavor, giving it that aromatic warmth that feels like a hug.
- Onion Powder: It adds another layer of depth, making every bite more savory. You’ll be surprised how this simple spice transforms the dish!
- Paprika: A sprinkle of paprika introduces a hint of smokiness and color, making your cheeseburgers take on a lovely, appetizing hue.
- Salt and Black Pepper: Essential for enhancing flavors, these seasonings are your go-to for that extra zing. Taste before forming patties to ensure perfection!
- Shredded Cheddar Cheese: Bold and sharp, cheddar adds that classic cheeseburger flavor. It melts beautifully, creating that irresistible gooeyness.
- Shredded Mozzarella Cheese: Known for its magnificent stretching quality, mozzarella ensures your molten center is as cheesy as it gets—perfect for that dramatic reveal!
- Cream Cheese: This decadent ingredient lends a rich creaminess to the filling, resulting in a wonderfully smooth texture that makes the cheese ball feel extra indulgent.
- Unsalted Butter: Used for searing the cakes to a perfect golden-brown crust. This adds richness and a beautiful texture that’s hard to resist.
- BBQ Sauce or Ketchup Glaze: Optional, but oh-so-recommended! A drizzle of these sauces can enhance the taste and add a tangy touch—your guests will love it!
Remember, the specific quantities will follow in the printable section later, so no need to rush on measuring just yet. Let’s get ready to create some kitchen magic together!
How to Make Cheeseburger Lava Cake Molten Melt
Ready to get cooking? Making the Cheeseburger Lava Cake Molten Melt is a delightful adventure! I promise, with a little bit of time and love, you can create this fun dish effortlessly. Let’s dive into the steps, focusing on how to create that magical cheese-filled center while balancing your busy schedule.
Step 1: Prepare the Cheese Filling
First up, let’s whip up the cheese filling. In a medium bowl, combine shredded cheddar, mozzarella, and softened cream cheese. Mix them until they’re smooth and well-blended, kind of like a cheesy hug.
Next, shape the mixture into small balls, using about 2 to 3 tablespoons for each. You want them to be compact enough to hold their shape.
Now, here’s the secret: place those cheese balls on a tray lined with parchment paper and pop them in the freezer for 15 to 20 minutes. Freezing is key, folks! This ensures that when you bake the cakes, the cheese inside will become a delightful molten center, ready to ooze out when you cut into it.
Step 2: Season the Beef
Time to prepare the beef! In a large mixing bowl, combine your ground beef with the garlic powder, onion powder, paprika, salt, and black pepper.
Use your hands to gently mix everything together. But listen carefully: be gentle! Overworking the beef can lead to tough patties, and nobody wants a chewy burger.
Once everything’s blended, you’re ready to portion it out into equal pieces—aim for six portions. Flatten each piece into a thin disk, like little beef blanket ready to cuddle that precious cheese!
Step 3: Assemble the Cheeseburger Cakes
Now comes the fun part—assembly! Take one beef disk and place a chilled cheese ball right in the center.
Grab a second patty and cover the cheese ball. Now, it’s crucial to seal the edges well. Pinch them closed to create a secure “cake” that will protect the molten goodness inside. Think of it as wrapping a gift; you want it to be perfectly sealed!
Step 4: Cook the Cheeseburger Cakes
Preheat your oven to 375°F (190°C) while you get the skillet ready. Melt the unsalted butter in an oven-safe skillet over medium-high heat.
Once the butter is sizzling, carefully add each cheeseburger cake to the skillet. Sear them for 2 to 3 minutes per side until you achieve that beautiful, golden-brown crust.
After searing, carefully transfer the skillet to your preheated oven. Bake the cakes for 10 to 12 minutes. This melding of oven and skillet really gives each cake a juicy texture that’s hard to resist.
When the time’s up, take them out and let them rest for a few minutes. This waiting game allows the molten cheese center to settle and become even more delicious!
Tips for Success
- Freeze the cheese balls long enough for the perfect molten center.
- Don’t overmix the beef; keep it tender and juicy by mixing gently.
- Use an oven-safe skillet for easy transitions from stovetop to oven.
- Let the cakes rest after baking; this prevents cheese from leaking too soon.
- Experiment with cheese varieties to customize your flavors!
Equipment Needed
To make the Cheeseburger Lava Cake Molten Melt, you’ll need some essential tools. Grab an oven-safe skillet, mixing bowls, and a baking tray. If you don’t have an oven-safe skillet, any heavy-bottomed pan will do. A good set of measuring spoons will also help you stay precise!
Variations
- Cheese Lovers: Switch up your cheese game! Try adding pepper jack for a spicy kick, or gouda for a smoky flavor. The possibilities are endless!
- Vegetarian Delight: Replace the ground beef with a mixture of mushrooms, black beans, or lentils. These hearty options still provide texture and flavor while keeping it plant-based.
- Spice It Up: Want more heat? Add diced jalapeños or a splash of hot sauce to your cheese filling. You can adjust the paprika to smoked paprika for an extra smoky flavor too!
- Herbal Infusion: Add fresh herbs like parsley or cilantro to the beef mixture for a touch of freshness. You could mix in a handful of spinach for added nutrition without compromising flavor.
- Mini Lava Cakes: For bite-sized fun, form smaller patties and cheese balls. These mini versions make for excellent appetizers or party snacks!
Serving Suggestions
To elevate your Cheeseburger Lava Cake Molten Melt experience, pair it with a crisp side salad or some crispy fries. Presentation is key, so arrange the cakes on a vibrant plate, drizzle with BBQ sauce, and garnish with fresh herbs for a pop of color. Your family will be amazed!
FAQs about Cheeseburger Lava Cake Molten Melt
Got questions about the Cheeseburger Lava Cake Molten Melt? No worries, I’ve got you covered! Here are some of the most common inquiries that pop up when making this ooey-gooey recipe.
Can I substitute ground beef with another protein?
Absolutely! You can use ground turkey or chicken for a lighter option. If you’re feeling adventurous, try using plant-based meat alternatives for a delicious vegetarian twist.
How should I store leftover Cheeseburger Cakes?
To keep your Cheeseburger Lava Cake Molten Melt fresh, place leftovers in an airtight container and refrigerate. They can last for 2 to 3 days, but trust me, they won’t last that long!
Can I freeze the Cheeseburger Lava Cakes?
You bet! After assembling, you can freeze them before cooking. Just wrap them tightly in plastic wrap and store them in a freezer-safe container. When you’re ready to cook, bake them straight from the freezer, adding a few extra minutes to the bake time.
What’s the best way to reheat these cakes?
To reheat, place the cakes in an oven preheated to 350°F (175°C) for about 10 to 15 minutes. This will help maintain their amazing texture without drying them out. Microwaving is an option too, but I recommend using a lower power setting to keep that cheese molten!
Can I make the cheese filling ahead of time?
Definitely! You can prepare the cheese balls in advance and freeze them. Just remember to let them sit in the freezer for at least 15 to 20 minutes before using in your Cheeseburger Lava Cake Molten Melt!
Final Thoughts
Making the Cheeseburger Lava Cake Molten Melt is not just about cooking; it’s about creating moments that you’ll cherish around the dinner table. The joy of bringing family and friends together over a dish that surprises and delights makes every bite worthwhile. The beauty of this recipe lies in its creativity, allowing you to personalize it, spark conversations, and create memories. With its oozy cheese center and comforting flavors, each serving tells a story. So roll up your sleeves, gather your loved ones, and enjoy the laughter and connection that comes with this delicious dish! You won’t regret it!
Print
Cheeseburger Lava Cake Molten Melt
- Total Time: 45 minutes
- Yield: 6 servings 1x
- Diet: Gluten Free
Description
A unique twist on a classic cheeseburger, featuring a molten cheese center encased in juicy beef patties.
Ingredients
- 1 pound ground beef (80/20 blend)
- 1 teaspoon garlic powder
- 1 teaspoon onion powder
- 1 teaspoon paprika
- Salt, to taste
- Freshly ground black pepper, to taste
- 3.5 ounces shredded cheddar cheese
- 2 ounces shredded mozzarella cheese
- 1 ounce cream cheese, softened
- 2 tablespoons unsalted butter
- BBQ sauce or ketchup glaze, optional
Instructions
- In a medium bowl, thoroughly blend the shredded cheddar, shredded mozzarella, and softened cream cheese until smooth. Shape the mixture into balls, each using 2 to 3 tablespoons. Place the cheese balls on a lined tray and freeze for 15 to 20 minutes until firm.
- In a large mixing bowl, combine the ground beef with garlic powder, onion powder, paprika, salt, and black pepper. Mix gently to distribute seasonings evenly, taking care not to overwork the meat.
- Divide the seasoned beef mixture into 6 equal portions. Flatten each portion into a thin disk. Place a chilled cheese ball at the center of one patty, then cover with a second patty. Firmly seal the edges to enclose the cheese and shape into a sealed cake.
- Preheat the oven to 375°F (190°C). Melt the unsalted butter in an oven-safe skillet over medium-high heat. Sear each beef cake for 2 to 3 minutes per side until a golden-brown crust forms.
- Transfer the skillet to the preheated oven and bake for 10 to 12 minutes. Remove from the oven and let the cakes rest several minutes before slicing to allow the cheese center to settle.
- If desired, brush the tops with BBQ sauce or ketchup glaze before serving. Serve immediately while molten.
Notes
- Ensure the cheese balls are frozen adequately to create a proper molten center.
- Don’t overmix the beef to maintain a tender texture.
- Adjust seasoning to your preference, especially salt and pepper.
- Prep Time: 30 minutes
- Cook Time: 15 minutes
- Category: Main Course
- Method: Baking and Searing
- Cuisine: American
Nutrition
- Serving Size: 1 cake
- Calories: 400
- Sugar: 2g
- Sodium: 600mg
- Fat: 25g
- Saturated Fat: 12g
- Unsaturated Fat: 10g
- Trans Fat: 1g
- Carbohydrates: 4g
- Fiber: 0g
- Protein: 30g
- Cholesterol: 80mg


